Hello! I'm Lynn.
  • About Me
  • Work With Me
  • Contact Me
  • Subscribe
  • Home
    • About
    • Contact
    • Disclaimer
    • Terms & Conditions
    • Privacy Policy
    • Subscribe
      • Work With Me
        • Media Kit
        • Portfolio and Samples
  • diy
  • lifestyle
    • home decor
  • recipes
  • gifts, parties & holidays
  • health & wellness with lynn

Lynn Mumbing Mejia

Crafting coziness, one recipe, DIY project, and holiday celebration at a time.

diy · June 12, 2021

DIY Easy Ice Cream Garland

*This post may contain affiliate or sponsored links, which means I may get paid or receive a commission if you purchase through my link, at no extra cost to you!*

Read more for all the details on DIY Easy Ice Cream Garland.

About the blogger: I’m Loren, also known as Camila, the lifestyle and DIY Montreal-based blogger at Plaid + Sugar and I am so glad to be here!

I’ve been blogging for over 3.5 years and I cannot imagine not blogging. Plaid and Sugar was the result of the anxiety, depressions and loneliness I felt when I first moved to Quebec from Alberta. Since I’ve always loved to write, sew and bake, I started the blog as a way to cope with emotions.  And through blogging, I was able to not only share my thoughts and sewing projects with others but I also got to “meet” other amazing people, like Lynn!

The blog as mentioned first started as a sewing + baking blog but over time it became advice, DIY, sewing, overall lifestyle blog and I’m glad it did. I love sharing DIYs that are easy to do and are budget-friendly. Some of my favourite DIY posts I’ve loved making and sharing are how to make a charming floral wreath with metallic hoop for under $15 and how to make your own heat/cold packs for mere dollars. 

Summer is almost here which means hot and ice cream-filled days! So I thought why not share with you all a DIY Easy Ice Cream Garland that I’ve been wanting to share for a while. Perfect to decorate your house, for summer parties or even an ice-cream lover’s birthday decor.

PIN DIY Easy Ice Cream Garland FOR LATER:

Ice Cream Garland - Pin1

I’m a firm believer that DIYs should not cost an arm or leg to make and should be a fun & interesting endeavour rather than a chore. Otherwise, what’s the whole point of DIYing or crafting?!

Obviously, the cost depends on the quality and type of work being done, but otherwise, I want to get the look without the cost. Which is how I was able to transform my boring awkward nook into a modern farmhouse entryway for under $50 mainly by DIYing mostly everything!

Anywho, as mentioned, I am so glad to be able to share with you this fun, cute and summery DIY Ice Cream Garland today since not only does it make a cute decor piece but it also came together for under $10! 

When Lynn asked me for a summer-themed DIY I racked up my head for something that would be fun to make and cute to look at, and after going over Lynn’s DIY posts I saw that she had shared a Christmas garland post and that’s when it clicked for me. 

For the longest time I’ve wanted to do DIY with paint chips and a summer garland,  so I realized that an Ice Cream Garland with pom-poms would be perfect! My inspiration for this project came from my love of ice cream, garlands and Etsy. I had seen a cute fabric + felt popsicle garland and thought it’d be great to recreate it using paint chips and so here it is!

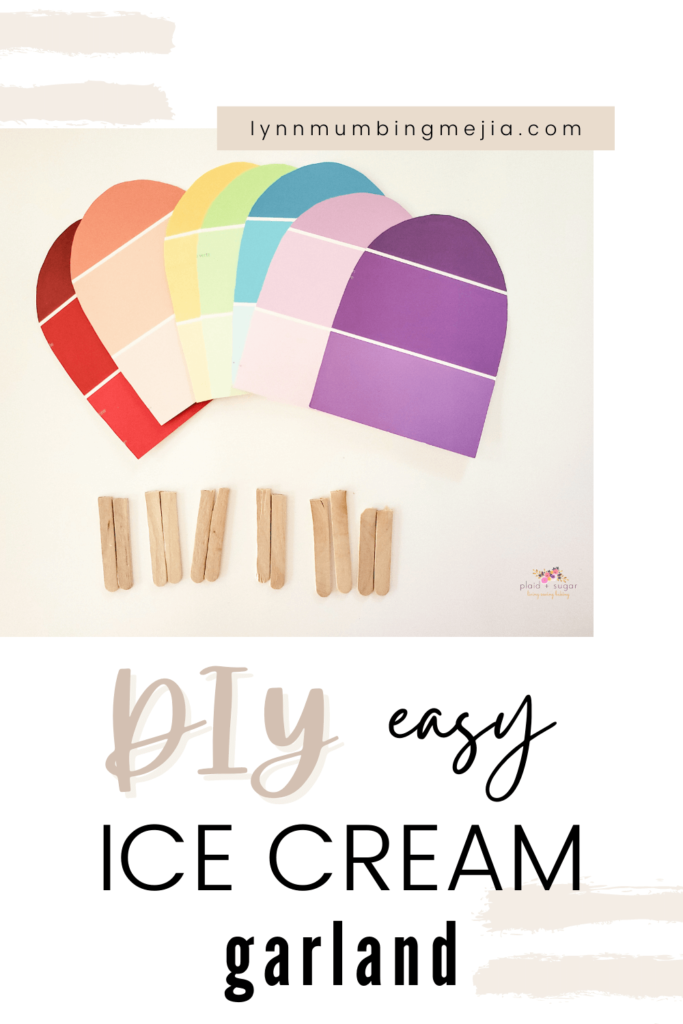
Plus a huge chunk of this ice cream garland was free! To make the ice cream popsicles I went to my local hardware store and got paint chips in various colours (seven to be exact) for free and at the dollar store, I found twine, popsicle sticks and some pom poms.

This Ice Cream Garland took under 30 minutes although it could be made in half of that time (I’m a perfectionist and wanted it to look picture perfect!) and it was fairly easy to make. The hardest part was trying not to accidentally burn my fingers, but otherwise, it was easy!

* All links with an asterisk are affiliate links, which means that at no extra cost to you I get a small commission which helps support Plaid + Sugar’s blog. 

Table of Contents

Toggle
  • HERE IS HOW TO MAKE A EASY DIY Ice Cream Garland:
    • Materials
    • Instructions

HERE IS HOW TO MAKE A EASY DIY Ice Cream Garland:

Materials

  • Paint chips in various colours
    • I got gradient ones 
  • Twine*, yarn or rope
  • Popsicle sticks, either the thin ones *or the big jumbo ones*. 
  • Pom-poms *in various colours
    • I found these with metallic, shiny trim at Michaels on sale.
  • Glue gun* + glue

Instructions

  1. Take the paint ships and draw a popsicle shape cut it out. The height and width will depend on the size of the paint chips. Repeat with all 7 paint chips 
  2. Take the popsicle sticks and cut them to about 1-1.5 inches long and then hot glue them to the middle back of the paint chips. Now you have seven cute popsicles! The next part is somewhat tricky.
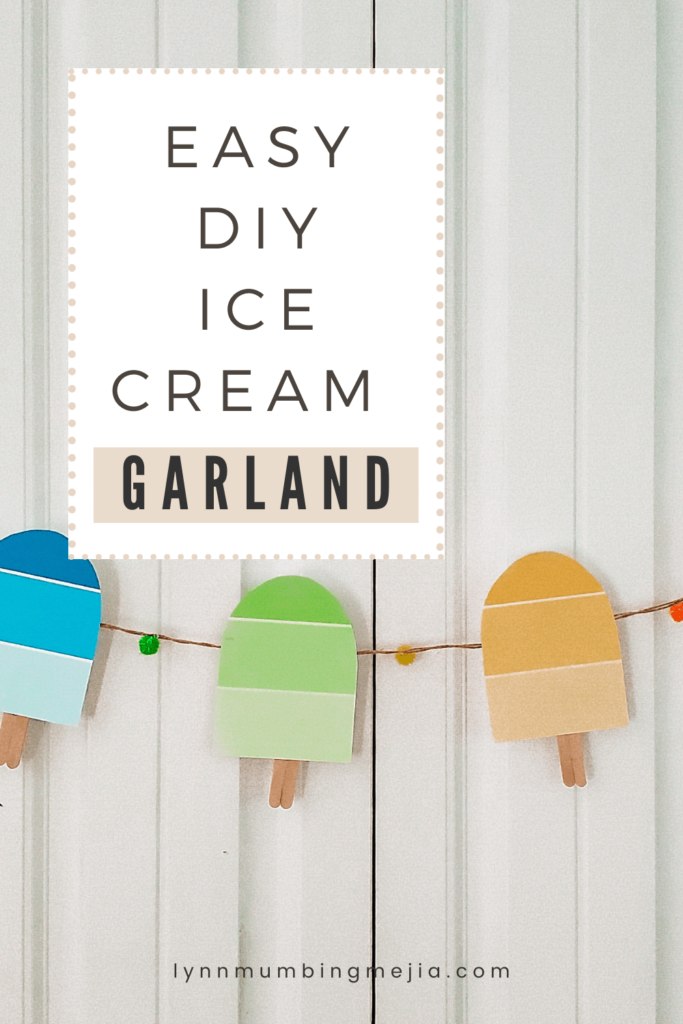
  3. For the twine or yarn, cut either two one-meter lengths of yarn or cut a two-meter length and fold it in half. Then at each end, make a simple slip knot at each end for hanging. To add definition or texture, I have my long length of rope a couple of twists and then it’s ready to add the popsicles!
  4. Prior to glueing, take the ice creams and lay them out on top of the twine to figure out how much space goes in between each piece, mark the place.  I place mine about 2 inches apart.
  5. When your glue gun is hot and ready, take one of the ice creams/popsicles, turn it around and add the glue about 1.5 inches from the top and press to the twine. Do this to all pieces. Mine graciously had a line right where I needed it lol.
  6. Now that the popsicles have been glued on, grab 8 pom poms in various colours and glue them onto the twine in between the ice creams. As I was doing ice cream, rainbow-themed I used pom poms in 7 different colours plus white. 
  7. After glueing on the pom-poms you are done! Now you can place your ice cream garland on a window or wall to decorate for summer. 

My time has now come to an end and I hope you enjoyed this Ice Cream Garland DIY project then you’ll love the other DIYs I have on my blog. If DIYs aren’t for you, I also have some sewing and food-related posts, including a no-churn cookie dough ice cream recipe. 

Well, that’s all for now! You can keep in touch with me on Instagram, Twitter, Pinterest and, obviously, the blog at plaidandsugar.com.  

Thank you Lynn for having me on your blog and thank you to all of you for reading my guest post! It was an amazing experience to guest post for another Canadian blogger and also one who loves to bake and DIY too!

See you around and have a wonderful + warm weekend!

This blog post is all the details on DIY Easy Ice Cream Garland.

P.S: If you haven’t read my most recent post, click here!

PIN DIY Easy Ice Cream Garland FOR LATER:

Ice Cream Garland - Pin 2

Posted In: diy · Tagged: cool summer crafts, Easy DIY, Easy DIY crafts, fun diy projects for adults, summer craft ideas, summer decorations for house, summer DIY, summer diy crafts, summer diy decor

Get on the List

You’ll Also Love

DIY Easy Spring Stickers
DIY Pumpkin Jack-O-Lantern Costume
How You Can Make Paper Crafts Last For a Long Time | GUEST POST

Comments

  1. Madeline says

    June 13, 2021 at

    You’re right , DIY shouldn’t cost an arm and a leg. I’d love to try this ice cream garland as decoration for my son’s 1st bday party.

    Madeline
    madelinewilsonojo.com

    • Lynn Mumbing Mejia says

      June 18, 2021 at

      Agreed! Thanks for stopping by, Madeline! x

  2. photosbycris says

    June 13, 2021 at

    It is gorgeous Loved it Cris

    • Lynn Mumbing Mejia says

      June 18, 2021 at

      Thanks so much! x

  3. aimsysantics says

    June 13, 2021 at

    What a fab DIY! I love that the paint colour cards have been used for it to give it a really colourful look. These would be perfect for that summer party/BBQ for the decor.
    Thanks for sharing!
    Aimsy xoxo
    Aimsy’s Antics

    • Lynn Mumbing Mejia says

      June 18, 2021 at

      Thank you so much Aimsy! x

  4. Della Driscoll says

    June 13, 2021 at

    What a fab and cute DIY project, perfect for all the summer parties. Great post xx

    • Lynn Mumbing Mejia says

      June 19, 2021 at

      Thank you for commenting, Della! x

  5. Caroline says

    June 13, 2021 at

    These are so cute! Love a DIY project x

    • Lynn Mumbing Mejia says

      June 19, 2021 at

      Thank you Caroline! xx

  6. Jodie | That Happy Reader says

    June 13, 2021 at

    This is such a cute way to decorate for summer! Thanks for sharing this guest post!

    • Lynn Mumbing Mejia says

      June 19, 2021 at

      Thanks for stopping by, Jodie! x

  7. Tiffany McCullough - Metaphysical Mama says

    June 13, 2021 at

    What a cute DIY for summer!! I always end up with so many paint chips. I end up throwing them out because I never know what to do with them. Now I know!! Thanks for sharing this tutorial!

    • Lynn Mumbing Mejia says

      June 19, 2021 at

      Thanks a bunch, Tiffany! xx

  8. Michelle says

    June 13, 2021 at

    This is so cute! And I just happen to have a bunch of paint chip cards saved.

    • Lynn Mumbing Mejia says

      June 19, 2021 at

      Thanks so much for reading, Michelle! x

  9. lucymarytaylor says

    June 13, 2021 at

    This is such a cute DIY project! x

    Lucy | http://www.lucymary.co.uk

    • Lynn Mumbing Mejia says

      June 19, 2021 at

      Thank you for reading, Lucy! x

  10. Gingi Edmonds Freeman says

    June 13, 2021 at

    OMG super adorbs!! I will have to do this as a summer project with my kiddos! <3
    http://www.domesticgeekgirl.com

    • Lynn Mumbing Mejia says

      June 20, 2021 at

      Thank you so much for reading! x

  11. headphonesthoughts says

    June 13, 2021 at

    Yes I love DIY project ideas. This is such a great easy to make DIY. Also it’s super cute.

    • Lynn Mumbing Mejia says

      June 20, 2021 at

      Thanks so much for reading! x

  12. Monique says

    June 13, 2021 at

    These are so cute, Lynn! Perfect for my niece’s 1st birthday. I’m gonna share this to my cousins. Thanks for sharing!

    • Lynn Mumbing Mejia says

      June 21, 2021 at

      Thank you for reading, Monique! xx

  13. Alonyo says

    June 13, 2021 at

    What a great idea. Adding a little something different to any outdoor event. Even idea for Early Gears settings too.

    • Lynn Mumbing Mejia says

      June 21, 2021 at

      Agreed! Thanks for stopping by, Alonyo! x

  14. Jenny in Neverland says

    June 14, 2021 at

    Definitely agree that DIY doesn’t need to cost a fortune! Something like this looks so fun to make and is SUPER cute. Perfect for a Summer BBQ or a kids party! x

    • Lynn Mumbing Mejia says

      June 21, 2021 at

      Agreed! Thanks for reading, Jenny! xx

  15. CristinaR says

    June 14, 2021 at

    I love these and completely agree that DIY shouldn’t be expensive! This would surely brighten up the walls fornsummer and love the idea of the gradient paper x

    • Lynn Mumbing Mejia says

      June 21, 2021 at

      Yes! The gradient paper looks so nice! Thank you for commenting, Cristina xx

  16. loverosiee says

    June 14, 2021 at

    This is so lovely. I’m going to attempt to make this for my neice’s birthday bbq!

    Rosie

    • Lynn Mumbing Mejia says

      June 21, 2021 at

      Oh, that would be lovely! Thanks for reading, Rosie! x

  17. Rayo says

    June 14, 2021 at

    What a fab DIY idea, perfect for kids birthday party ?

    • Lynn Mumbing Mejia says

      June 21, 2021 at

      Thank you so much for stopping by! x

  18. Not-So-Modern-Girl says

    June 14, 2021 at

    Aw this is so adorable, I love it! It’s the perfect way to commemorate an event and make ice-cream a cute event x

    • Lynn Mumbing Mejia says

      June 21, 2021 at

      Isn’t it! Thank you so much for commenting, Eleanor x

  19. Nyxinked says

    June 14, 2021 at

    These are so cute and perfect for a summer party! I’ll have to keep these in mind as a DIY project with the nieces.

    • Lynn Mumbing Mejia says

      June 21, 2021 at

      Thanks so much for stopping by, Nyxie! x

  20. Molly @ Transatlantic Notes says

    June 14, 2021 at

    The garland looks adorable! What a great idea for a craft idea and themed decoration — love it!

    • Lynn Mumbing Mejia says

      June 23, 2021 at

      Thanks so much for reading, Molly! xx

  21. The Twinsight | Lifestyle Blog says

    June 14, 2021 at

    This looks so adorable and I love how perfect it is for summer decor!

    • Lynn Mumbing Mejia says

      June 23, 2021 at

      It truly is! Thanks so much for commenting x

  22. Love and Literature says

    June 14, 2021 at

    Aw, I love this idea! It’s so cute and fun to make! Perfect for garden décor and family BBQs x

    • Lynn Mumbing Mejia says

      June 23, 2021 at

      Totally! Thanks for reading, Sophie x

  23. Julia says

    June 14, 2021 at

    This is such an adorable DIY for the summer, I love it! So fun and colourful! Thanks for sharing this idea as I’d never seen it before!

    Julia x

    • Lynn Mumbing Mejia says

      June 23, 2021 at

      Thank you for commenting, Julia! Loren did a great job! x

  24. Jaya Avendel says

    June 14, 2021 at

    This is so sweet! I love the colorful colors and feel like this would be perfect to add a splash to a baby shower or birthday party. <3

    • Lynn Mumbing Mejia says

      June 23, 2021 at

      Agreed! Thank you, Jaya! xx

  25. Karalee says

    June 16, 2021 at

    This is so cute & perfect for the summer! I love that you used the paint chips for the garland!

    • Lynn Mumbing Mejia says

      June 29, 2021 at

      Right! It’s so cute. Thanks so much for reading, Karalee! x

Trackbacks

  1. 3 Easy DIY Outdoor Party Decorations | Lynn Mumbing Mejia says:
    June 18, 2021 at

    […] DIY Easy Ice Cream Garland […]

  2. DIY Trendy Bendy Candles | Lynn Mumbing Mejia says:
    June 23, 2021 at

    […] DIY Easy Ice Cream Garland […]

  3. Minimalist Boho Tassel Decor | Lynn Mumbing Mejia says:
    July 25, 2021 at

    […] DIY Easy Ice Cream Garland […]

Next Post >

100 Questions For My 100th Blog Post

About Photo
Hey there friend! My name is Lynn and I'm a Canadian Content Creator who's focused on Minimal & Neutral Home Decor Inspo, Simple & Budget Friendly DIY Projects, All Things Holidays and Quick & Easy Recipes. I'm so happy you're here and I hope you'll find something that you love!

Categories

follow lynn

  • Facebook
  • Instagram
  • Pinterest
  • Twitter
  • YouTube

Search

Join Us!

Trending Now

Popular Posts

Links

  • About
  • Contact
  • Disclaimer
  • Privacy Policy
  • Terms & Conditions

Socials

  • Instagram
  • Youtube
  • Facebook
  • Twitter
  • Pinterest

Shop

  • Home Wall Art
  • Recipe Cards
  • Greeting Cards
  • Planner Templates

JOIN THE INNER CIRCLE

DIY all-year round wreath 🌲 Full video up on YouTu DIY all-year round wreath 🌲 Full video up on YouTube!! #diyhomedecor
Kimchi Avocado Toast 🥑🍞 This Kimchi Avocado Toast Kimchi Avocado Toast 🥑🍞

This Kimchi Avocado Toast is tangy, creamy, and perfect for a gut-friendly breakfast! Buttery avocado meets tangy, spicy kimchi for the perfect balance of richness and heat! All this layered on crispy toast makes for an easy, satisfying breakfast to start your day.

INGREDIENTS
* 1 Slice Sourdough Bread toasted 
* 1/2 Ripe Avocado mashed
* 1/4 Cup Kimchi chopped
* 1 Egg
* 1 Tbsp Butter or Oil to cook the egg
* Salt to taste

INSTRUCTIONS
* Toast the sourdough slice until your preferred toast level!
* Spread the mashed avocado evenly over the toast. Sprinkle lightly with salt.
* Heat butter or oil in a small pan over medium heat. Crack in the egg and cook to your preference (fried, sunny-side up, or over-easy).
* Spoon the chopped kimchi over the avocado layer.
* Top with the cooked egg, serve and enjoy!


avocado kimchi toast, avocado toast, egg avocado toast, kimchi toast, avocado toast ideas, avocado toast recipe, avocadotoast, avocado, kimchi, avocado recipe, avocado recipes, how to eat kimchi, toast, toast ideas, kimchi used cooking, toast recipes, breakfast toast
Kimchi Avocado Toast 🥑🍞 This Kimchi Avocado Toast Kimchi Avocado Toast 🥑🍞

This Kimchi Avocado Toast is tangy, creamy, and perfect for a gut-friendly breakfast! Buttery avocado meets tangy, spicy kimchi for the perfect balance of richness and heat! All this layered on crispy toast makes for an easy, satisfying breakfast to start your day.

INGREDIENTS
* 1 Slice Sourdough Bread toasted 
* 1/2 Ripe Avocado mashed
* 1/4 Cup Kimchi chopped
* 1 Egg
* 1 Tbsp Butter or Oil to cook the egg
* Salt to taste

INSTRUCTIONS
* Toast the sourdough slice until your preferred toast level!
* Spread the mashed avocado evenly over the toast. Sprinkle lightly with salt.
* Heat butter or oil in a small pan over medium heat. Crack in the egg and cook to your preference (fried, sunny-side up, or over-easy).
* Spoon the chopped kimchi over the avocado layer.
* Top with the cooked egg, serve and enjoy!�

avocado kimchi toast, avocado toast, egg avocado toast, kimchi toast, avocado toast ideas, avocado toast recipe, avocadotoast, avocado, kimchi, avocado recipe, avocado recipes, how to eat kimchi, toast, toast ideas, kimchi used cooking, toast recipes, breakfast toast
diy watercolor painted coffee station sign 🤎 full diy watercolor painted coffee station sign 🤎 full video up on youtube now! love you guysssss have a great weekend 😘
Chocolate Chip Cookie Dough Syrup 🍪☕️ This Chocol Chocolate Chip Cookie Dough Syrup 🍪☕️

This Chocolate Chip Cookie Dough Syrup is sweet and packed with cozy cookie flavor! Perfect for stirring into iced coffee, drizzling over desserts, or upgrading your favorite drinks, it’s an easy homemade syrup that tastes just like classic cookie dough in liquid form.

INGREDIENTS
* 1 Cup Water
* 1/2 Cup Brown Sugar
* 1/2 Cup Granulated Sugar
* 1 1/2 tsp Cocoa Powder
* 1/2 Tbsp Vanilla Extract
* 1/8 tsp Almond Extract I just put a drop! <3 
* 1/4 tsp Salt

INSTRUCTIONS
* In a small saucepan over medium heat, combine water, brown sugar, and granulated sugar.
* Whisk until the sugars dissolve completely and the mixture begins to gently simmer.
* Whisk in the cocoa powder until fully incorporated and smooth.
* Remove from heat and stir in vanilla extract, almond extract, and salt.
* Let cool completely before transferring to a sealed jar or bottle.


chocolate chip cookie dough syrup,iced coffee,cold brew,coffee syrup,chocolate syrup,cookie syrup,chocolate chip cookie dough,coffee at home,iced coffee recipe,cold brew recipe,syrup recipe,homemade syrup,cookie dough syrup
Chocolate Chip Cookie Dough Syrup 🍪☕️ This Chocol Chocolate Chip Cookie Dough Syrup 🍪☕️

This Chocolate Chip Cookie Dough Syrup is sweet and packed with cozy cookie flavor! Perfect for stirring into iced coffee, drizzling over desserts, or upgrading your favorite drinks, it’s an easy homemade syrup that tastes just like classic cookie dough in liquid form.

INGREDIENTS
* 1 Cup Water
* 1/2 Cup Brown Sugar
* 1/2 Cup Granulated Sugar
* 1 1/2 tsp Cocoa Powder
* 1/2 Tbsp Vanilla Extract
* 1/8 tsp Almond Extract I just put a drop! <3 
* 1/4 tsp Salt

INSTRUCTIONS
* In a small saucepan over medium heat, combine water, brown sugar, and granulated sugar.
* Whisk until the sugars dissolve completely and the mixture begins to gently simmer.
* Whisk in the cocoa powder until fully incorporated and smooth.
* Remove from heat and stir in vanilla extract, almond extract, and salt.
* Let cool completely before transferring to a sealed jar or bottle.�

chocolate chip cookie dough syrup,iced coffee,cold brew,coffee syrup,chocolate syrup,cookie syrup,chocolate chip cookie dough,coffee at home,iced coffee recipe,cold brew recipe,syrup recipe,homemade syrup,cookie dough syrup
baby steps to the cottagecore/whimsy/floral bedroo baby steps to the cottagecore/whimsy/floral bedroom of my dreams 🤎🌼 since we bought our house, we’ve not done anything to it so i’m excited to start making changes to make our house more ours!! 🧸 full video is up my on channel!! 

#bedroomupdate #bedroomdecor #bedroomdiy

Copyright © 2026 Lynn Mumbing Mejia · Theme by 17th Avenue