Hello! I'm Lynn.
  • About Me
  • Work With Me
  • Contact Me
  • Subscribe
  • Home
    • About
    • Contact
    • Disclaimer
    • Terms & Conditions
    • Privacy Policy
    • Subscribe
      • Work With Me
        • Media Kit
        • Portfolio and Samples
  • diy
  • lifestyle
    • home decor
  • recipes
  • gifts, parties & holidays
  • health & wellness with lynn

Lynn Mumbing Mejia

Crafting coziness, one recipe, DIY project, and holiday celebration at a time.

diy, gifts/parties/holidays · January 28, 2025

Valentine’s Paper Heart Garland

*This post may contain affiliate or sponsored links, which means I may get paid or receive a commission if you purchase through my link, at no extra cost to you!*

Read more for all the details on Valentine’s Paper Heart Garland.

Celebrating the holidays doesn’t have to be so expensive! I love decorating my home for anything I possibly can on a budget and this would mean lots of DIY and budget-friendly options! This super cute paper heart garland is perfect to get into the Valentine’s day spirit!

PIN Valentine’s Paper Heart Garland FOR LATER:
Valentine's Paper Heart Garland - Lynn Mumbing Mejia - Pin 1

This Valentine’s Paper Heart Garland is accompanied by a YouTube Tutorial. If you haven’t subscribed to me on YouTube, don’t forget to!

Table of Contents

Toggle
  • HERE IS HOW TO MAKE A VALENTINE’S PAPER HEART GARLAND:
    • WHERE CAN YOU FIND THE MATERIALS TO MAKE THIS VALENTINE’S PAPER HEART GARLAND?
    • WHAT ARE THE MATERIALS NEEDED FOR THIS VALENTINE’S PAPER HEART GARLAND?
    • WHAT EQUIPMENT DO I NEED?
    • CAN I SUBSTITUTE ANY MATERIALS OUT?
    • DOES THE GARLAND LAST TO USE FOR THE FOLLOWING YEARS?
    • HOW LONG DOES IT TAKE TO PUT TOGETHER?
    • INSPIRATIONS FOR THIS DIY?
    • STEPS TO PUT TOGETHER THIS VALENTINE’S PAPER HEART GARLAND:
      • Step 1: Draw Out HeartShapes & Cut
      • Step 2: Cut Twine To The Desired Length
      • Step 3: Use Mini Pins To Attach Hearts To Twine
      • Step 4: Hang Garland And Space Out Heart Shapes Accordingly

HERE IS HOW TO MAKE A VALENTINE’S PAPER HEART GARLAND:

WHERE CAN YOU FIND THE MATERIALS TO MAKE THIS VALENTINE’S PAPER HEART GARLAND?

Hopefully, you should have these materials accessible or even already have them at home but if you don’t you can find the materials for this at your local dollar store, craft store or even online like on Amazon!

WHAT ARE THE MATERIALS NEEDED FOR THIS VALENTINE’S PAPER HEART GARLAND?

Here is what you will need for this super cute Valentine’s day paper garland!

  • Pink and Red Cardstock Paper
  • Mini Clothespins
  • Thin Twine
  • Scissors

WHAT EQUIPMENT DO I NEED?

No equipment is really needed for this aside from scissors! You can free hand the heart shapes or if you’re like me and need an outline, you can print a bunch of heart outlines and cut it out!

CAN I SUBSTITUTE ANY MATERIALS OUT?

You sure can! If you really want to have some more fun with it, you can try and find some red or pink mini clips or even red or pink twine or ribbon!

DOES THE GARLAND LAST TO USE FOR THE FOLLOWING YEARS?

Yes! As long as you store the paper hearts in a dry container, you can reuse and put this garland up for years!

HOW LONG DOES IT TAKE TO PUT TOGETHER?

If you’re great with cutting, this can take 5 minutes! I take a little longer to cut everything so it took me about 15 minutes! Super quick and easy!

INSPIRATIONS FOR THIS DIY?

I honestly love any decor that is affordable and easy to put together so paper garlands are my fav! I’ll continue to make these forever!

STEPS TO PUT TOGETHER THIS VALENTINE’S PAPER HEART GARLAND:

Step 1: Draw Out HeartShapes & Cut

I used Canva to find a heart outline but you can free-hand or cut templates to help you trace and cut!

Step 2: Cut Twine To The Desired Length

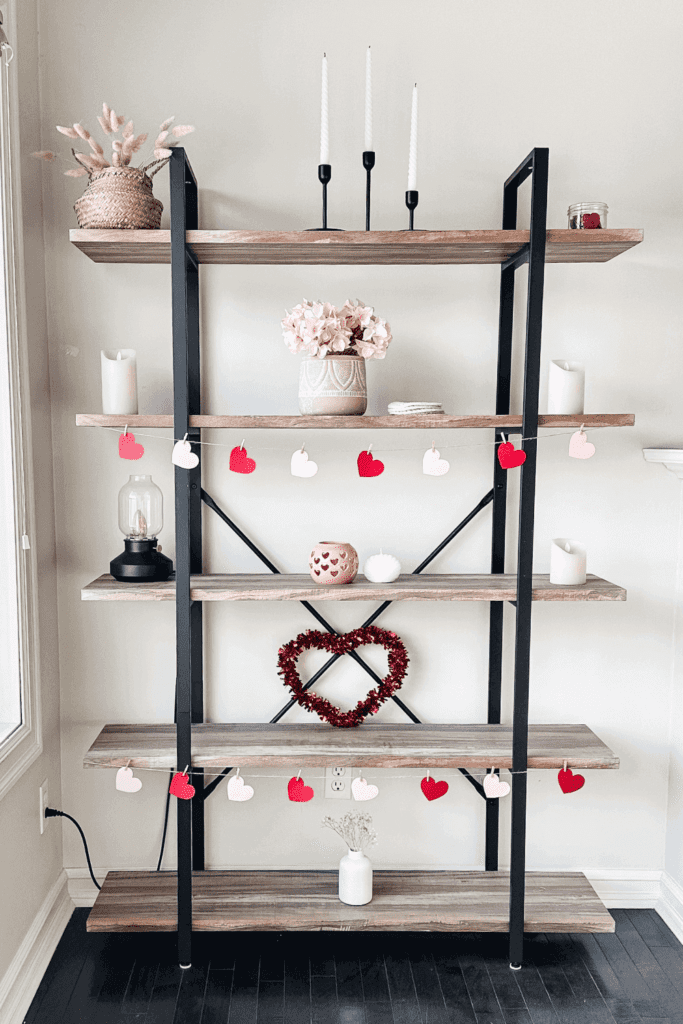
Pick where you’d like to hang your garland and cut your twine to the length of that. You can use tape if you’d like as it’s super light but you can also use a thumb tacks/pushpins! I love hanging my garlands on my mantel, office mirror and shelf!

Step 3: Use Mini Pins To Attach Hearts To Twine

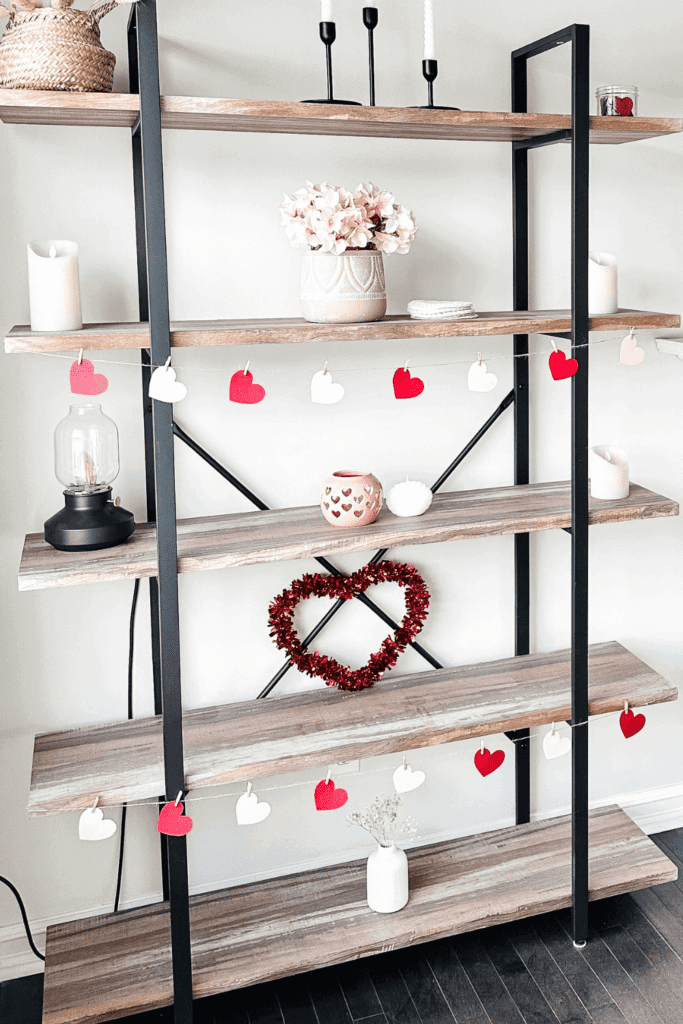
Attach the paper heart shapes to the twine using your mini pins. I love to tilt the paper shapes to one side and have them hanging angled but you can do what works for you!

Step 4: Hang Garland And Space Out Heart Shapes Accordingly

Lastly, hang your garland and space out the shapes evenly throughout and you’re done! Such a cute and simple garland idea and honestly, it gives your home such a nice homemade touch to your Valentine’s decor!

Xo,

Lynn

Are you going to try making this DIY Valentine’s Paper Heart Garland?! Don’t forget to tag me if you do!

Valentine's Paper Heart Garland - Lynn Mumbing Mejia - Tag Us

This blog post is all the details on Valentine’s Paper Heart Garland.

P.S: If you haven’t read my most recent post, click here!

PIN Valentine’s Paper Heart Garland FOR LATER:
Valentine's Paper Heart Garland - Lynn Mumbing Mejia - Pin 2

If you liked reading Valentine’s Paper Heart Garland, you might like these as well!

Easy Christmas Tree Garland

Easy Snowman Paper Garland

Easy Gingerbread Paper Garland Decor

DIY Ghost Paper Garland

St. Patrick’s Day Paper Clover Garland

Cute Paper Easter Bunny Garland – Easy DIY!

Easy Neutral Paper Pumpkin Garland

DIY Easy Ice Cream Garland

This is the end of Valentine’s Paper Heart Garland.

Shop The Post

Posted In: diy, gifts/parties/holidays · Tagged: DIY paper, DIY paper garland, DIY paper heart, garland valentine, heart garland, heart garlands, paper heart, paper heart garland, paper hearts, valentine decorating ideas, valentine home decor, valentine's day crafts, valentine's day decor, valentine's day decor diy

Get on the List

You’ll Also Love

Fall Thanksgiving Pie Paper Garland
Easy Dollar Tree Valentine Wreath
Valentine's Day Treat Bag Tags - Lynn Mumbing Mejia - Featured Blog Post ImageEasy Valentine’s Day Treat Bag Tags

Trackbacks

  1. DIY Easy Spring Stickers | Lynn Mumbing Mejia says:
    March 18, 2025 at

    […] Valentine’s Paper Heart Garland […]

  2. Easy DIY Ribbon Garland | Lynn Mumbing Mejia says:
    May 5, 2025 at

    […] Valentine’s Paper Heart Garland […]

Next Post >

Easy Dollar Tree Valentine Wreath

About Photo
Hey there friend! My name is Lynn and I'm a Canadian Content Creator who's focused on Minimal & Neutral Home Decor Inspo, Simple & Budget Friendly DIY Projects, All Things Holidays and Quick & Easy Recipes. I'm so happy you're here and I hope you'll find something that you love!

Categories

follow lynn

  • Facebook
  • Instagram
  • Pinterest
  • Twitter
  • YouTube

Search

Join Us!

Trending Now

Popular Posts

Links

  • About
  • Contact
  • Disclaimer
  • Privacy Policy
  • Terms & Conditions

Socials

  • Instagram
  • Youtube
  • Facebook
  • Twitter
  • Pinterest

Shop

  • Home Wall Art
  • Recipe Cards
  • Greeting Cards
  • Planner Templates

JOIN THE INNER CIRCLE

DIY all-year round wreath 🌲 Full video up on YouTu DIY all-year round wreath 🌲 Full video up on YouTube!! #diyhomedecor
Kimchi Avocado Toast 🥑🍞 This Kimchi Avocado Toast Kimchi Avocado Toast 🥑🍞

This Kimchi Avocado Toast is tangy, creamy, and perfect for a gut-friendly breakfast! Buttery avocado meets tangy, spicy kimchi for the perfect balance of richness and heat! All this layered on crispy toast makes for an easy, satisfying breakfast to start your day.

INGREDIENTS
* 1 Slice Sourdough Bread toasted 
* 1/2 Ripe Avocado mashed
* 1/4 Cup Kimchi chopped
* 1 Egg
* 1 Tbsp Butter or Oil to cook the egg
* Salt to taste

INSTRUCTIONS
* Toast the sourdough slice until your preferred toast level!
* Spread the mashed avocado evenly over the toast. Sprinkle lightly with salt.
* Heat butter or oil in a small pan over medium heat. Crack in the egg and cook to your preference (fried, sunny-side up, or over-easy).
* Spoon the chopped kimchi over the avocado layer.
* Top with the cooked egg, serve and enjoy!


avocado kimchi toast, avocado toast, egg avocado toast, kimchi toast, avocado toast ideas, avocado toast recipe, avocadotoast, avocado, kimchi, avocado recipe, avocado recipes, how to eat kimchi, toast, toast ideas, kimchi used cooking, toast recipes, breakfast toast
Kimchi Avocado Toast 🥑🍞 This Kimchi Avocado Toast Kimchi Avocado Toast 🥑🍞

This Kimchi Avocado Toast is tangy, creamy, and perfect for a gut-friendly breakfast! Buttery avocado meets tangy, spicy kimchi for the perfect balance of richness and heat! All this layered on crispy toast makes for an easy, satisfying breakfast to start your day.

INGREDIENTS
* 1 Slice Sourdough Bread toasted 
* 1/2 Ripe Avocado mashed
* 1/4 Cup Kimchi chopped
* 1 Egg
* 1 Tbsp Butter or Oil to cook the egg
* Salt to taste

INSTRUCTIONS
* Toast the sourdough slice until your preferred toast level!
* Spread the mashed avocado evenly over the toast. Sprinkle lightly with salt.
* Heat butter or oil in a small pan over medium heat. Crack in the egg and cook to your preference (fried, sunny-side up, or over-easy).
* Spoon the chopped kimchi over the avocado layer.
* Top with the cooked egg, serve and enjoy!�

avocado kimchi toast, avocado toast, egg avocado toast, kimchi toast, avocado toast ideas, avocado toast recipe, avocadotoast, avocado, kimchi, avocado recipe, avocado recipes, how to eat kimchi, toast, toast ideas, kimchi used cooking, toast recipes, breakfast toast
diy watercolor painted coffee station sign 🤎 full diy watercolor painted coffee station sign 🤎 full video up on youtube now! love you guysssss have a great weekend 😘
Chocolate Chip Cookie Dough Syrup 🍪☕️ This Chocol Chocolate Chip Cookie Dough Syrup 🍪☕️

This Chocolate Chip Cookie Dough Syrup is sweet and packed with cozy cookie flavor! Perfect for stirring into iced coffee, drizzling over desserts, or upgrading your favorite drinks, it’s an easy homemade syrup that tastes just like classic cookie dough in liquid form.

INGREDIENTS
* 1 Cup Water
* 1/2 Cup Brown Sugar
* 1/2 Cup Granulated Sugar
* 1 1/2 tsp Cocoa Powder
* 1/2 Tbsp Vanilla Extract
* 1/8 tsp Almond Extract I just put a drop! <3 
* 1/4 tsp Salt

INSTRUCTIONS
* In a small saucepan over medium heat, combine water, brown sugar, and granulated sugar.
* Whisk until the sugars dissolve completely and the mixture begins to gently simmer.
* Whisk in the cocoa powder until fully incorporated and smooth.
* Remove from heat and stir in vanilla extract, almond extract, and salt.
* Let cool completely before transferring to a sealed jar or bottle.


chocolate chip cookie dough syrup,iced coffee,cold brew,coffee syrup,chocolate syrup,cookie syrup,chocolate chip cookie dough,coffee at home,iced coffee recipe,cold brew recipe,syrup recipe,homemade syrup,cookie dough syrup
Chocolate Chip Cookie Dough Syrup 🍪☕️ This Chocol Chocolate Chip Cookie Dough Syrup 🍪☕️

This Chocolate Chip Cookie Dough Syrup is sweet and packed with cozy cookie flavor! Perfect for stirring into iced coffee, drizzling over desserts, or upgrading your favorite drinks, it’s an easy homemade syrup that tastes just like classic cookie dough in liquid form.

INGREDIENTS
* 1 Cup Water
* 1/2 Cup Brown Sugar
* 1/2 Cup Granulated Sugar
* 1 1/2 tsp Cocoa Powder
* 1/2 Tbsp Vanilla Extract
* 1/8 tsp Almond Extract I just put a drop! <3 
* 1/4 tsp Salt

INSTRUCTIONS
* In a small saucepan over medium heat, combine water, brown sugar, and granulated sugar.
* Whisk until the sugars dissolve completely and the mixture begins to gently simmer.
* Whisk in the cocoa powder until fully incorporated and smooth.
* Remove from heat and stir in vanilla extract, almond extract, and salt.
* Let cool completely before transferring to a sealed jar or bottle.�

chocolate chip cookie dough syrup,iced coffee,cold brew,coffee syrup,chocolate syrup,cookie syrup,chocolate chip cookie dough,coffee at home,iced coffee recipe,cold brew recipe,syrup recipe,homemade syrup,cookie dough syrup
baby steps to the cottagecore/whimsy/floral bedroo baby steps to the cottagecore/whimsy/floral bedroom of my dreams 🤎🌼 since we bought our house, we’ve not done anything to it so i’m excited to start making changes to make our house more ours!! 🧸 full video is up my on channel!! 

#bedroomupdate #bedroomdecor #bedroomdiy

Copyright © 2026 Lynn Mumbing Mejia · Theme by 17th Avenue