Hello! I'm Lynn.
  • About Me
  • Work With Me
  • Contact Me
  • Subscribe
  • Home
    • About
    • Contact
    • Disclaimer
    • Terms & Conditions
    • Privacy Policy
    • Subscribe
      • Work With Me
        • Media Kit
        • Portfolio and Samples
  • diy
  • lifestyle
    • home decor
  • recipes
  • gifts, parties & holidays
  • health & wellness with lynn

Lynn Mumbing Mejia

Crafting coziness, one recipe, DIY project, and holiday celebration at a time.

diy, gifts/parties/holidays · January 26, 2025

Easy Dollar Tree Valentine Wreath

*This post may contain affiliate or sponsored links, which means I may get paid or receive a commission if you purchase through my link, at no extra cost to you!*

Read more for all the details on Easy Dollar Tree Valentine Wreath.

If you love all things pink and red and girly, decorating for Valentine’s day is probably your favourite just like me! I love making homemade DIY decor for anything holiday. Personally, DIY decor is my preferred decor pieces because it just makes a home feel EXTRA homey!

PIN Easy Dollar Tree Valentine Wreath FOR LATER:

This Easy Dollar Tree Valentine Wreath is accompanied by a YouTube Tutorial. If you haven’t subscribed to me on YouTube, don’t forget to!

Table of Contents

Toggle
  • HERE IS HOW TO MAKE EASY DOLLAR TREE VALENTINE WREATH:
    • WHERE CAN YOU FIND THE MATERIALS TO MAKE THIS EASY DOLLAR TREE VALENTINE WREATH?
    • WHAT ARE THE MATERIALS NEEDED FOR THIS EASY DOLLAR TREE VALENTINE WREATH?
    • WHAT EQUIPMENT DO I NEED?
    • CAN I SUBSTITUTE ANY MATERIALS OUT?
    • DOES THIS WREATH LAST TO USE FOR THE FOLLOWING YEARS?
    • HOW LONG DOES IT TAKE TO PUT TOGETHER?
    • INSPIRATIONS FOR THIS WREATH?
    • STEPS TO PUT TOGETHER THIS EASY DOLLAR TREE VALENTINE WREATH:
      • Step 1: Prepare Hot Glue Gun
      • Step 2: Cut Your Preferred Ribbon Length
      • Step 3: Plan Out Wood Hearts On Frame
      • Step 4: Glue Wood Hearts
      • Step 5: Tie Red Ribbon On Top Of Wreath

HERE IS HOW TO MAKE EASY DOLLAR TREE VALENTINE WREATH:

WHERE CAN YOU FIND THE MATERIALS TO MAKE THIS EASY DOLLAR TREE VALENTINE WREATH?

I bought everything from my local dollar store last week! When January rolls around, you can find so many cute crafty Valentine’s things in the dollar store. If you can’t find what you want, you can also look at a craft store like Michael’s or JoAnn’s or even online like on Amazon!

WHAT ARE THE MATERIALS NEEDED FOR THIS EASY DOLLAR TREE VALENTINE WREATH?

Here is what you will need for this super cute Valentine’s day wreath!

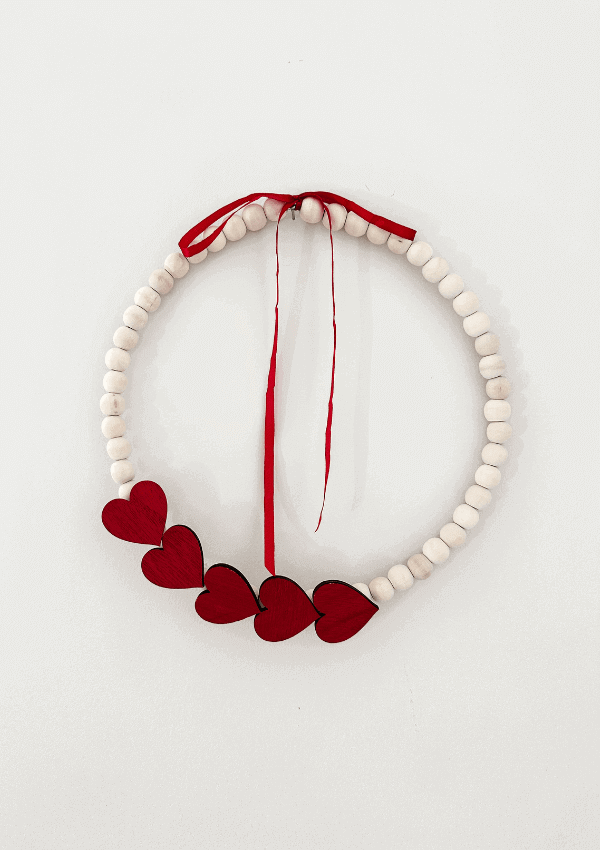
  • Wood Bead Wreath Frame
  • Mini Wood Hearts – you can use as many as you’d like!
  • Thin Red Ribbon -thickness of the ribbon is up to you! I used red thin ribbon for this 🙂
  • Hot Glue Gun
  • Scissors

WHAT EQUIPMENT DO I NEED?

All you’ll really need is scissors and a hot glue gun! If you don’t have or want to use a hot glue gun, you can use some super or gorilla glue! As long as your glue is good quality and you know will really adhere wood together, any glue you want to use works!

CAN I SUBSTITUTE ANY MATERIALS OUT?

This wreath is so simple and easy! You can do so many things to spruce it up! If you don’t like plain wood beads, you can use a different wreath frame or even paint the wood beads to the color that you prefer! Some additional things you can include are glitter, more wood hearts, some dried florals, letters etc!

DOES THIS WREATH LAST TO USE FOR THE FOLLOWING YEARS?

It sure does! That is why the glue quality is super important! Of course, you want to store it away neatly perhaps in a box to protect all the pieces but it does indeed last for a long time.

HOW LONG DOES IT TAKE TO PUT TOGETHER?

This wreath was so simple and easy to make! it literally took me 5 mins! It’s that easy and super cute to decorate your door or walls in your home for some Valentine’s day spirit!

INSPIRATIONS FOR THIS WREATH?

I love wreaths so much and I don’t know why but I get intimidated throwing it all together! I one day want to make multiple large wreaths for every holiday! I had no inspirations for this wreath specifically but I walked into the dollar store and just found these items and thought it would look so pretty and simple put together!

I have all sorts of gorgeous visions of DIYs in my head and to be completely honest, some things don’t turn out but this wreath was so cute for about $5!

Easy Dollar Tree Valentine Wreath - Lynn Mumbing Mejia - Featured Blog Image

STEPS TO PUT TOGETHER THIS EASY DOLLAR TREE VALENTINE WREATH:

Step 1: Prepare Hot Glue Gun

Plug in your hot glue gun and give it time to warm up.

Step 2: Cut Your Preferred Ribbon Length

Cut how much ribbon you want to use on the top of your wreath.

Step 3: Plan Out Wood Hearts On Frame

I usually like to plan out the heart of the wood hearts to make sure I’m glueing it in the right places! I used 5 for this DIY but you can use anywhere from 1 to even filling up the wreath if you’d like!

Step 4: Glue Wood Hearts

Glue your wood hearts on the wreath frame.

Step 5: Tie Red Ribbon On Top Of Wreath

Finally tie your ribbon on top and you’re done!

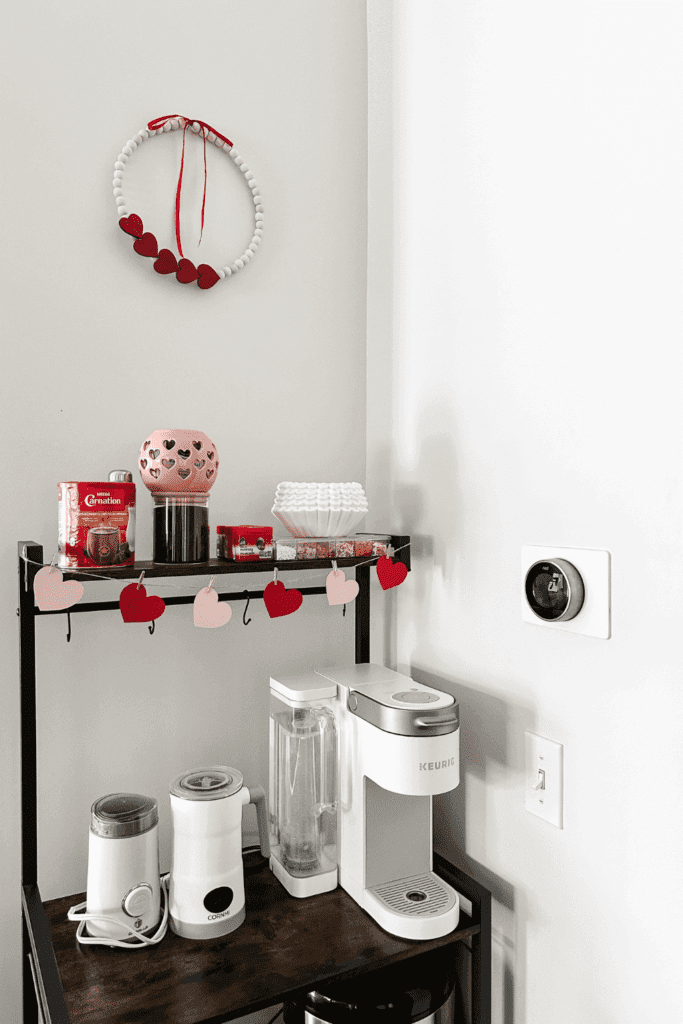
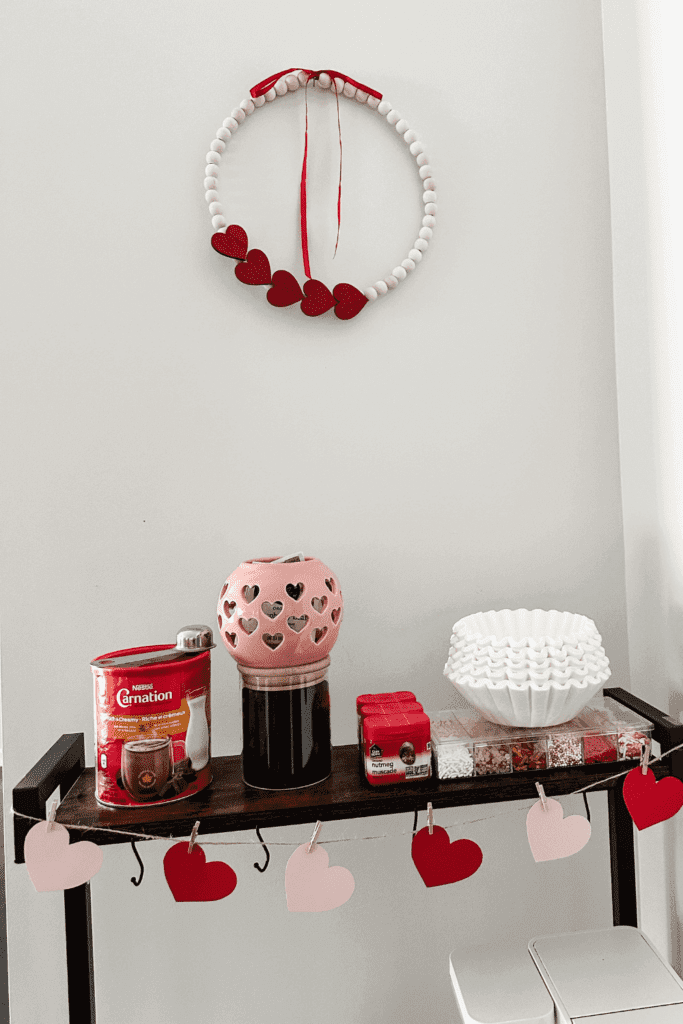
I hope you enjoyed reading through this simple DIY Valentine’s Day wreath! It was super fun to make and it’s hanging above my coffee station now which I love. Let me know if you make this!

Xo,

Lynn

Are you going to try making this Easy Dollar Tree Valentine Wreath?! Don’t forget to tag me if you do!

Easy Dollar Tree Valentine Wreath - Lynn Mumbing Mejia - Tag Us

This blog post is all the details on Easy Dollar Tree Valentine Wreath.

P.S: If you haven’t read my most recent post, click here!

PIN Easy Dollar Tree Valentine Wreath FOR LATER:

If you liked reading Easy Dollar Tree Valentine Wreath, you might like these as well!

Mini Heart Shaped Cherry Pies

Easy Valentine’s Day Treat Bag Tags

Valentine’s Day Cake Mix Cookies

Valentine’s Day Cupid Floats

Sweet and Salty Valentine’s Day Chocolate Bark

This is the end of Easy Dollar Tree Valentine Wreath.

Shop The Post

Posted In: diy, gifts/parties/holidays · Tagged: DIY dollar tree, diy wreath, dollar tree, dollar tree valentine, heart wreath, valentine decorating ideas, valentine home decor, valentine's day crafts, valentine's day decor, valentine's day decor diy, valentine's day home decorating, valentines day DIY

Get on the List

You’ll Also Love

DIY All-year Round Neutral Wreath
DIY Fall Wrapped Book Decor
DIY Pretty Spring Wreath

Comments

  1. Danielle says

    January 31, 2025 at

    How adorble!

    Danielle Writes | danielle-writes.co.uk

Trackbacks

  1. Valentine's Paper Heart Garland | Lynn Mumbing Mejia says:
    January 28, 2025 at

    […] P.S: If you haven’t read my most recent post, click here! […]

  2. DIY Pretty Spring Wreath | Lynn Mumbing Mejia says:
    March 1, 2025 at

    […] made this super cute Easy Dollar Tree Valentine Wreath and loved how it turned out! I love wreaths so much and I honestly hang them anywhere that has a […]

Next Post >

Mini Heart Shaped Cherry Pies

About Photo
Hey there friend! My name is Lynn and I'm a Canadian Content Creator who's focused on Minimal & Neutral Home Decor Inspo, Simple & Budget Friendly DIY Projects, All Things Holidays and Quick & Easy Recipes. I'm so happy you're here and I hope you'll find something that you love!

Categories

follow lynn

  • Facebook
  • Instagram
  • Pinterest
  • Twitter
  • YouTube

Search

Join Us!

Trending Now

Popular Posts

Links

  • About
  • Contact
  • Disclaimer
  • Privacy Policy
  • Terms & Conditions

Socials

  • Instagram
  • Youtube
  • Facebook
  • Twitter
  • Pinterest

Shop

  • Home Wall Art
  • Recipe Cards
  • Greeting Cards
  • Planner Templates

JOIN THE INNER CIRCLE

Asian Sesame Vermicelli Salad 🥗 This Asian Sesam Asian Sesame Vermicelli Salad 🥗 

This Asian Sesame Vermicelli Salad is light, refreshing, and packed with flavor! Tender vermicelli noodles are tossed with crisp veggies and a savory sesame dressing for an easy, vibrant dish that’s perfect for lunches, meal prep, or summer gatherings.

INGREDIENTS
* 3 Bundles Vermicelli about 150g uncooked
* 1 Cup Purple Cabbage thinly shredded 
* 1 Cup Red Peppers thinly shredded 
* 1 Cup Carrots thinly shredded 
* 1/2 Cup Edamame
* 2 Stalks Green Onion thinly sliced 

Sauce
* 1 Clove Garlic grated
* 2 Tbsp Sesame Oil
* 1 tsp Sesame Oil
* 2 Tbsp Soy Sauce
* 1 Tbsp Brown Sugar
* 1 Tbsp Rice Vinegar

INSTRUCTIONS
* Cook the vermicelli noodles according to package instructions. Drain and rinse under cold water.
* In a large bowl, combine the cooked vermicelli, cabbage, red bell pepper, carrot, edamame, and green onions.
* In a small bowl, whisk together garlic, sesame oil, sesame seeds, soy sauce, brown sugar, and rice vinegar until well combined.
* Pour the sauce over the salad and toss until evenly coated.
* Chill in the fridge before serving for extra flavor for minimally 12 hours! Enjoy!

vietnamese vermicelli salad recipe, vermicelli noodle salad, vermicelli salad recipe, how to make vermicelli noodle salad, vermicelli noodles salad recipe, asian salad, asian salad dressing, how to make vietnamese vermicelli noodle salad recipe, asian noodle salad, asian salad recipe, easy sesame noodle salad, asian cold noodle salad, glass noodle salad with sesame dressing, bean vermicelli, ramen salad, vegan salad, vegetarian salad, sesame sauce, sesame sauce recipe
Poppy Seed Almond Muffins 🤎 Have you ever tried C Poppy Seed Almond Muffins 🤎

Have you ever tried Costco’s almond poppy seed muffins? If you have, this is a copycat version of it! It’s my fav muffin and I knew I had to recreate it at home!

These Poppy Seed Almond Muffins are soft, fluffy, and bursting with sweet almond flavor. With a tender crumb and delicate crunch from the poppy seeds, they’re the perfect cozy bakery-style treat for breakfast, snacking, or coffee breaks.

INGREDIENTS
* 2 1/4 Cups Flour
* 1/2 tsp Salt
* 1/2 tsp Baking Soda
* 1/2 tsp Baking Powder
* 3/4 Cup Oil 
* 1 Cup White Sugar
* 2 Eggs
* 1 tsp Vanilla Extract
* 1 Tbsp Almond Extract 
* 3/4 Cup Sour Cream
* 1/4 Cup Milk
* 2 Tbsp Poppy Seeds
* 1/4 Cup Slivered Almonds sprinkle on top

INSTRUCTIONS
* Preheat oven to 350°F and line a 12-cup muffin tin with liners or lightly grease it.
* In a large bowl, whisk together oil, sugar, eggs, vanilla extract, almond extract, sour cream, and milk until smooth.
* Add flour, salt, baking soda, and baking powder directly into the same bowl. Gently mix until just combined.
* Fold in the poppy seeds.
* Divide the batter evenly between the 12 muffin cups and sprinkle slivered almonds on top.
* Bake for 25 minutes, or until a toothpick inserted into the center comes out clean.
* Let cool slightly before serving.


almond poppy seed muffins, poppy seed muffins, costco copycat, costco copycat recipes, almond muffins, easy muffin recipes, simple muffins, poppy seed almond muffins
Spicy Canned Tuna Sushi Bake 🐟🍣 This Spicy Canned Spicy Canned Tuna Sushi Bake 🐟🍣

This Spicy Canned Tuna Sushi Bake is creamy, savory, and packed with bold flavor! Made with simple pantry ingredients, it’s an easy, budget-friendly twist on sushi! It is perfect for sharing, scooping with seaweed, and satisfying all your sushi cravings at home.

INGREDIENTS
* 1 Can Tuna drained
* 2 Tbsp Sriracha
* 1/4 Cup Mayo
* 1 Tbsp Sesame Oil
* 2 Tbsp Furikake
* 1 Cup White Rice cooked
* 1 tsp Sugar
* 1/2 Tbsp Rice Vinegar
* 1 Packet Seasoned Seaweed

INSTRUCTIONS
* Preheat your oven to 400F and prepare a 6-inch baking pan.
* In a bowl, add in your rice and heat it in the microwave for 1 minute. This is so it’s easier for the sugar and rice vinegar to soak in. Add in your rice vinegar and sugar and mix well.
* Next, add in the rice mixture to your baking pan in an even layer. Sprinkle furikake on top.
* Use the same bowl that you mixed up your rice in and add in your drained canned tuna, sesame oil, sriracha, and mayo and mix well.
* Add the layer of saucy tuna on your rice layer evenly on top. Sprinkle with furikake.
* Bake at 400F for 20-30 minutes or until the top is golden brown.
* Serve with a side of seasoned seaweed and enjoy!


sushi bake canned tuna, spicy tuna sushi bake, tuna sushi bake, spicy tuna sushi, sushi bake tuna, spicy tuna mayo sushi, canned tuna, sushi bake, easy sushi bake, sushi bake dish, sushi bake asmr, baked sushi, easy baked sushi, sushi bake tutorial, spicy tuna, easy sushi bake ideas, sushi bake steps, viral sushi bake, sushi bake how to, sushi bake trend, sushi baked recipe, easy sushi bake recipe, how to make a sushi bake, sushi bake recipe, tiktok sushi bake, sushi bake tiktok
Spicy Canned Tuna Sushi Bake 🐟🍣 This Spicy Canned Spicy Canned Tuna Sushi Bake 🐟🍣

This Spicy Canned Tuna Sushi Bake is creamy, savory, and packed with bold flavor! Made with simple pantry ingredients, it’s an easy, budget-friendly twist on sushi! It is perfect for sharing, scooping with seaweed, and satisfying all your sushi cravings at home.

INGREDIENTS
* 1 Can Tuna drained
* 2 Tbsp Sriracha
* 1/4 Cup Mayo
* 1 Tbsp Sesame Oil
* 2 Tbsp Furikake
* 1 Cup White Rice cooked
* 1 tsp Sugar
* 1/2 Tbsp Rice Vinegar
* 1 Packet Seasoned Seaweed

INSTRUCTIONS
* Preheat your oven to 400F and prepare a 6-inch baking pan.
* In a bowl, add in your rice and heat it in the microwave for 1 minute. This is so it’s easier for the sugar and rice vinegar to soak in. Add in your rice vinegar and sugar and mix well.
* Next, add in the rice mixture to your baking pan in an even layer. Sprinkle furikake on top.
* Use the same bowl that you mixed up your rice in and add in your drained canned tuna, sesame oil, sriracha, and mayo and mix well.
* Add the layer of saucy tuna on your rice layer evenly on top. Sprinkle with furikake.
* Bake at 400F for 20-30 minutes or until the top is golden brown.
* Serve with a side of seasoned seaweed and enjoy!�

sushi bake canned tuna, spicy tuna sushi bake, tuna sushi bake, spicy tuna sushi, sushi bake tuna, spicy tuna mayo sushi, canned tuna, sushi bake, easy sushi bake, sushi bake dish, sushi bake asmr, baked sushi, easy baked sushi, sushi bake tutorial, spicy tuna, easy sushi bake ideas, sushi bake steps, viral sushi bake, sushi bake how to, sushi bake trend, sushi baked recipe, easy sushi bake recipe, how to make a sushi bake, sushi bake recipe, tiktok sushi bake, sushi bake tiktok
Banana Bread Syrup 🍌 This Banana Bread Syrup is Banana Bread Syrup 🍌 

This Banana Bread Syrup is warm, sweet, and full of cozy flavor just like your favorite homemade loaf in liquid form! Perfect for coffee, pancakes, waffles, or desserts, it’s an easy homemade syrup that adds a comforting, bakery-style touch to any treat 💛

INGREDIENTS
* 1/2 Cup White Sugar
* 1/2 Cup Brown Sugar
* 1 Mashed Ripe Banana
* 1 tsp Vanilla Extract
* 1/2 tsp Cinnamon
* 1 Cup Water

INSTRUCTIONS
* In a small saucepan over medium heat, combine water, white sugar, and brown sugar.
* Stir until the sugars fully dissolve and the mixture begins to gently simmer.
* Add the mashed banana and cinnamon. Simmer for 5–8 minutes, stirring occasionally.
* Remove from heat and stir in the vanilla extract.
* Strain the syrup (optional for a smoother texture) and let cool.
* Transfer to a jar or bottle and store in the fridge.

banana bread syrup, banana bread, banana latte, banana bread latte, banana bread matcha latte, copycat starbucks banana bread matcha latte, banana bread breve, banana bread, copycat starbucks iced banana bread matcha latte, copycat starbucks banana bread matcha, copycat starbucks iced banana bread matcha recipe, iced latte, banana milk, banana coffee, banana coffee recipe, fun latte recipes, banana coffee syrup,
Banana Bread Syrup 🍌 This Banana Bread Syrup is Banana Bread Syrup 🍌 

This Banana Bread Syrup is warm, sweet, and full of cozy flavor just like your favorite homemade loaf in liquid form! Perfect for coffee, pancakes, waffles, or desserts, it’s an easy homemade syrup that adds a comforting, bakery-style touch to any treat 💛

INGREDIENTS
* 1/2 Cup White Sugar
* 1/2 Cup Brown Sugar
* 1 Mashed Ripe Banana
* 1 tsp Vanilla Extract
* 1/2 tsp Cinnamon
* 1 Cup Water

INSTRUCTIONS
* In a small saucepan over medium heat, combine water, white sugar, and brown sugar.
* Stir until the sugars fully dissolve and the mixture begins to gently simmer.
* Add the mashed banana and cinnamon. Simmer for 5–8 minutes, stirring occasionally.
* Remove from heat and stir in the vanilla extract.
* Strain the syrup (optional for a smoother texture) and let cool.
* Transfer to a jar or bottle and store in the fridge.�
banana bread syrup, banana bread, banana latte, banana bread latte, banana bread matcha latte, copycat starbucks banana bread matcha latte, banana bread breve, banana bread, copycat starbucks iced banana bread matcha latte, copycat starbucks banana bread matcha, copycat starbucks iced banana bread matcha recipe, iced latte, banana milk, banana coffee, banana coffee recipe, fun latte recipes, banana coffee syrup,

Copyright © 2026 Lynn Mumbing Mejia · Theme by 17th Avenue