Hello! I'm Lynn.
  • About Me
  • Work With Me
  • Contact Me
  • Subscribe
  • Home
    • About
    • Contact
    • Disclaimer
    • Terms & Conditions
    • Privacy Policy
    • Subscribe
      • Work With Me
        • Media Kit
        • Portfolio and Samples
  • diy
  • lifestyle
    • home decor
  • recipes
  • gifts, parties & holidays
  • health & wellness with lynn

Lynn Mumbing Mejia

Crafting coziness, one recipe, DIY project, and holiday celebration at a time.

gifts/parties/holidays, diy · July 15, 2024

DIY Froot Loops Costume

*This post may contain affiliate or sponsored links, which means I may get paid or receive a commission if you purchase through my link, at no extra cost to you!*

Read more for all the details on how to put together a DIY Froot Loops Costume.

Unleash your creativity and embrace your playful side with a DIY Froot Loops costume! This fun and colorful costume idea is perfect for Halloween, costume parties, or themed events. It’s a unique and eye-catching way to stand out from the crowd and pay homage to your favorite childhood cereal. Whether you’re looking to create a solo costume or coordinating outfits for a group, this guide will help you craft a Froot Loops costume that’s sure to impress.

You certainly don’t need to spend lots of money to make a cute DIY costume! I love reusing the materials I have and purchasing a few things that are available to me! For this froot loops costume, I only really needed to buy colorful felt sheets which I purchased for $14.99 on Amazon and there were so many different colors that I can use these for future projects!

Creating a DIY Froot Loops costume is not only fun but also allows you to showcase your artistic skills and love for one of the most iconic breakfast cereals. With a little effort and imagination, you can turn a simple idea into a show-stopping outfit that will delight everyone who sees it. So, gather your materials and get ready to craft a costume that’s as colorful and fun as a bowl of Froot Loops!

PIN DIY Froot Loops Costume FOR LATER:
DIY Froot Loops Costume - Pin 1 - Lynn Mumbing Mejia

This DIY Froot Loops Costume is accompanied by a YouTube Tutorial. If you haven’t subscribed to me on YouTube, don’t forget to!

Table of Contents

Toggle
  • HERE IS HOW TO MAKE A DIY MISS UNIVERSE COSTUME:
    • WHERE CAN YOU FIND THE MATERIALS TO MAKE THIS DIY MISS FROOT LOOPS COSTUME?
    • WHAT ARE THE MATERIALS NEEDED FOR THIS DIY FROOT LOOPS COSTUME?
    • WHAT EQUIPMENT DO I NEED?
    • CAN I SUBSTITUTE ANY MATERIALS OUT?
    • DOES THE COSTUME LAST TO USE FOR THE FOLLOWING YEARS?
    • HOW LONG DOES IT TAKE TO PUT TOGETHER?
    • INSPIRATIONS FOR THIS COSTUME?
    • STEPS TO PUT TOGETHER THIS DIY FROOT LOOPS COSTUME:

HERE IS HOW TO MAKE A DIY MISS UNIVERSE COSTUME:

WHERE CAN YOU FIND THE MATERIALS TO MAKE THIS DIY MISS FROOT LOOPS COSTUME?

My favourite thing about this froot loops costume is that the materials are super basic that you probably have these items in your house already and if not, the dollar store most likely has everything! If the dollar store isn’t an option, you can source these materials from many different stores but I like to find my items at craft stores like Michaels, Jo-Ann’s or, online from Amazon or Shein, and I buy my heels from Torrid!

DIY Froot Loops Costume - What You Need - Lynn Mumbing Mejia

WHAT ARE THE MATERIALS NEEDED FOR THIS DIY FROOT LOOPS COSTUME?

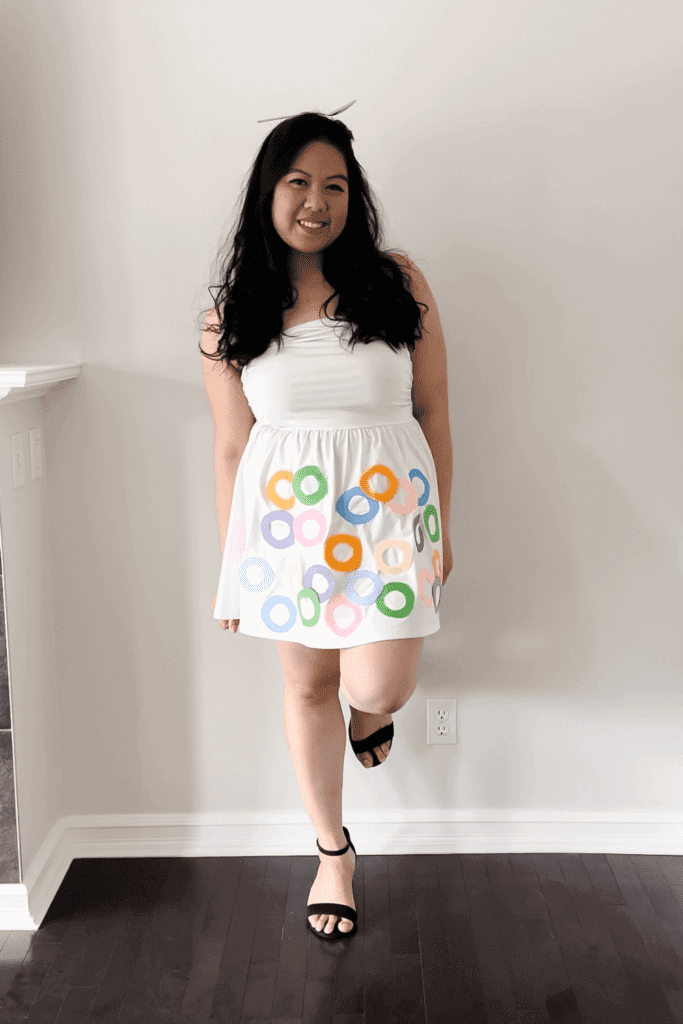
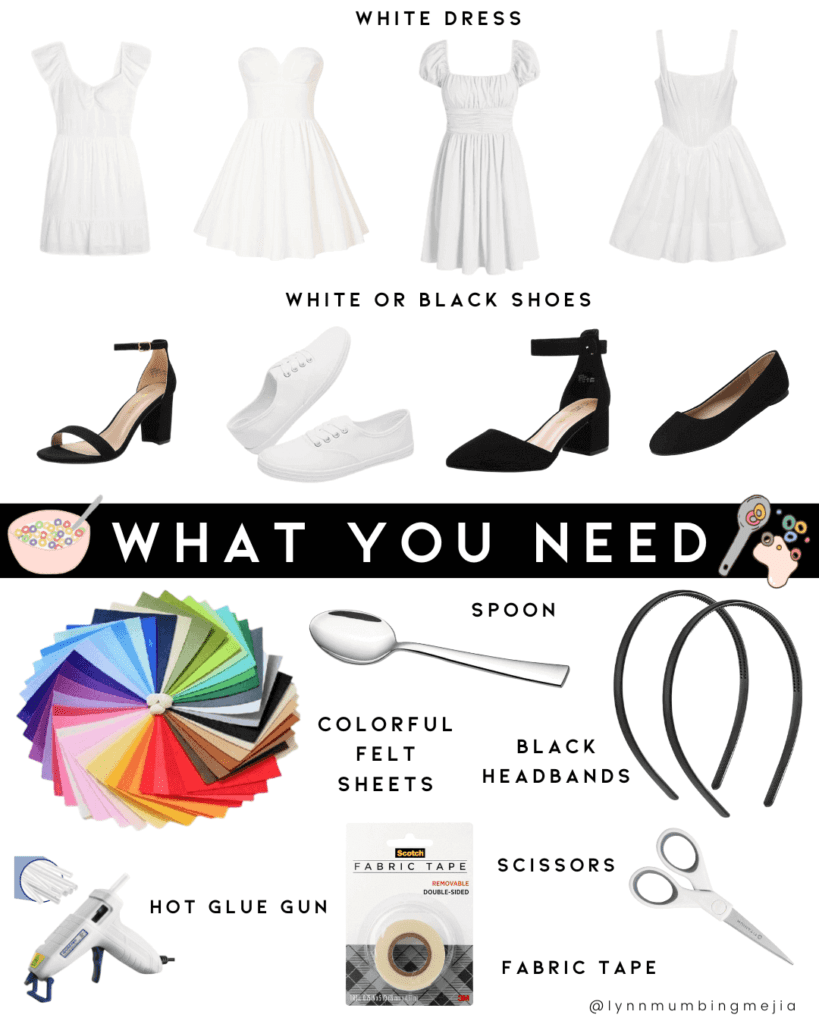
To start your DIY Froot Loops costume, gather the essential materials. You’ll need a plain white big t-shirt or dress as the base of your costume. This will serve the milk to your cereal pieces! Additionally, you’ll need colored felt sheets or felt in a variety of bright colors to represent the different Froot Loops. These can be found at craft stores, dollar stores or online retailers.

Other materials include fabric tape, scissors, and a hot glue gun for attaching the Froot Loops to your costume. To complete the look, consider adding a headband with a spoon, which you can easily make with a plain black headband and a kitchen spoon!

Shop Here!

WHAT EQUIPMENT DO I NEED?

This DIY Froot Loops costume is so great because it barely needs any equipment! All you’ll really need for this DIY costume is scissors, fabric tape, hot glue gun/tape!

Aside from this, you really just need to put everything together!

CAN I SUBSTITUTE ANY MATERIALS OUT?

Of course you can! I love making DIY costumes and 100% encourage to use up what you have or can afford. That is my favorite part of making these costumes! I love the ability to reuse or recreate costumes as much as I want and need. All the materials can be easily found at the dollar store or craft store.

I could not find colours for the froot loops that were EXACTLY like the cereal but in my opinion, it is nice to have a bit of a different look! It just reminds me more that this is homemade and DIY and makes me even prouder to wear it! If you can find exact colours then that is great! If you can’t, it’s totally fine to use the closest you can find!

On Pinterest, I’ve seen lots of people use different materials like pool noodles to create the cereal pieces! I personally like the felt sheets as it’s less bulky and if you’re wearing the costume all day, you have to be careful with pieces that would stick out.

You can use a spoon from home that you already have and hot glue or tape the spoon to a headband to wear but you can also try and create your own spoon with aluminum foil!

DOES THE COSTUME LAST TO USE FOR THE FOLLOWING YEARS?

Yes! If you use the fabric tape for your cereal pieces on your white top/dress, it lasts for a really long time! I have previous costumes like my DIY Pumpkin Jack-O-Lantern Costume that I use fabric tape to pieces onto the dress and to this day, it’s in great condition!

Also really great if you want to take the pieces off and save them but still use the white dress regularly! The fabric tape does not damage the fabric at all!

This DIY froot loops costume is super easy to put together so if you ever want to reuse your costumes for the future, you can easily put this back together!

HOW LONG DOES IT TAKE TO PUT TOGETHER?

Okay, so I’ll be honest, cutting circles is not my strong suit so it does take me longer than usual! I put this together while I was filming and it took me about 30 minutes to cut and stick all the pieces! I would say that if you like cutting things, you could probably get away with finishing this within 20 minutes instead!

This costume would be great to put together while you are watching TV in the evening or want to unwind and just do a little bit of crafting in the evening!

INSPIRATIONS FOR THIS COSTUME?

While I was trying to decide what costumes I wanted to recreate this year, I saw on Pinterest a few variations of this costume and wanted to recreate it myself! I didn’t like the cereal pieces sticking out and thought it might be annoying to have to watch out for them all night so I thought of trying it out with felt sheets instead for a sleeker look!

I absolutely loved the way this DIY froot loops costume turned out and how easy it was to put together!

STEPS TO PUT TOGETHER THIS DIY FROOT LOOPS COSTUME:

Step 1: Get your 5-7 colours of your felt sheets and cut out 4″ x 4″ circle pieces and then cut out another circle in the middle to resemble a froot loops cereal piece.

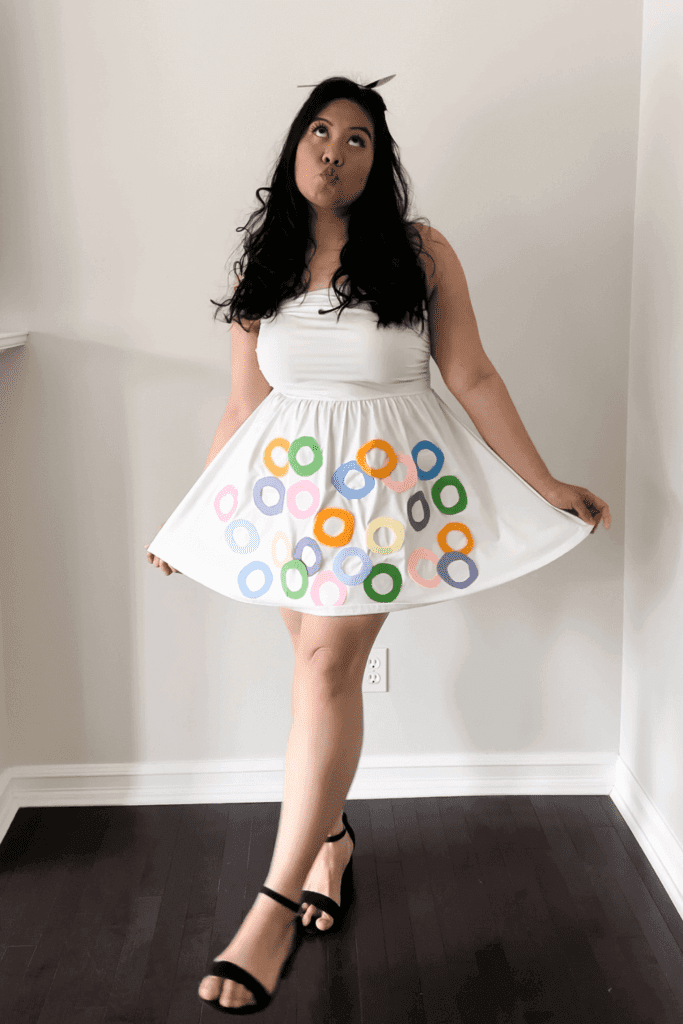
Step 2: Next, use your fabric tape to place the froot loops pieces on your dress or white top! You can either place them neatly and in a pattern or scattered! I did mine scattered a little bit to look a bit more realistic for what a bowl of froot loops cereal and milk looks like!

Step 3: Get your spoon and either hot glue or tape it to your black headband. If you’re wanting to reuse the spoon, then taping it is fine! If you don’t need the spoon after this costume, hot glue is a lot more secure!

Step 4: Put on your cereal top/dress, spoon headband, and shoes and have fun in your costume!

Thank you so much for following this blog post on how to create a DIY Froot Loops Costume!

Xo,

Lynn

Are you going to try making this DIY Froot Loops Costume?! Don’t forget to tag me if you do!

DIY Froot Loops Costume - Tag Us - Lynn Mumbing Mejia

This blog post is all the details on DIY Froot Loops Costume.

P.S: If you haven’t read my most recent post, click here!

PIN DIY Froot Loops Costume FOR LATER:
DIY Froot Loops Costume - Pin 2 - Lynn Mumbing Mejia

If you liked reading DIY Froot Loops Costume, you might like these are well!

DIY Miss Universe Costume

DIY Winnie The Pooh Costume

DIY Taro Boba Costume

DIY Pumpkin Jack-O-Lantern Costume

Cute and Affordable DIY Ice Cream Costume

Easy DIY Despicable Me Minion Costume

Cute and Cheap DIY McDonald’s French Fries Costume

DIY Starbucks Frappuccino and Barista Costume

This is the end of DIY Froot Loops Costume.

Shop The Post

Posted In: gifts/parties/holidays, diy · Tagged: cereal and milk costume, cereal bowl costume, cereal costume, costume diy, diy costume, diy costumes for college, diy costumes for kids, diy costumes for teens, froot loops, fruit loops, fruit loops costume, loops costume

Get on the List

You’ll Also Love

DIY Mario Toad Costume
DIY Pacman Costume
DIY Scream Ghost Face Costume

Trackbacks

  1. DIY Popcorn Costume | Lynn Mumbing Mejia says:
    July 15, 2024 at

    […] P.S: If you haven’t read my most recent post, click here! […]

  2. DIY Strawberry Costume | Lynn Mumbing Mejia says:
    July 16, 2024 at

    […] DIY Froot Loops Costume […]

Next Post >

DIY Miss Universe Costume

About Photo
Hey there friend! My name is Lynn and I'm a Canadian Content Creator who's focused on Minimal & Neutral Home Decor Inspo, Simple & Budget Friendly DIY Projects, All Things Holidays and Quick & Easy Recipes. I'm so happy you're here and I hope you'll find something that you love!

Categories

follow lynn

  • Facebook
  • Instagram
  • Pinterest
  • Twitter
  • YouTube

Search

Join Us!

Trending Now

Popular Posts

Links

  • About
  • Contact
  • Disclaimer
  • Privacy Policy
  • Terms & Conditions

Socials

  • Instagram
  • Youtube
  • Facebook
  • Twitter
  • Pinterest

Shop

  • Home Wall Art
  • Recipe Cards
  • Greeting Cards
  • Planner Templates

JOIN THE INNER CIRCLE

Spicy Canned Tuna Sushi Bake 🐟🍣 This Spicy Canned Spicy Canned Tuna Sushi Bake 🐟🍣

This Spicy Canned Tuna Sushi Bake is creamy, savory, and packed with bold flavor! Made with simple pantry ingredients, it’s an easy, budget-friendly twist on sushi! It is perfect for sharing, scooping with seaweed, and satisfying all your sushi cravings at home.

INGREDIENTS
* 1 Can Tuna drained
* 2 Tbsp Sriracha
* 1/4 Cup Mayo
* 1 Tbsp Sesame Oil
* 2 Tbsp Furikake
* 1 Cup White Rice cooked
* 1 tsp Sugar
* 1/2 Tbsp Rice Vinegar
* 1 Packet Seasoned Seaweed

INSTRUCTIONS
* Preheat your oven to 400F and prepare a 6-inch baking pan.
* In a bowl, add in your rice and heat it in the microwave for 1 minute. This is so it’s easier for the sugar and rice vinegar to soak in. Add in your rice vinegar and sugar and mix well.
* Next, add in the rice mixture to your baking pan in an even layer. Sprinkle furikake on top.
* Use the same bowl that you mixed up your rice in and add in your drained canned tuna, sesame oil, sriracha, and mayo and mix well.
* Add the layer of saucy tuna on your rice layer evenly on top. Sprinkle with furikake.
* Bake at 400F for 20-30 minutes or until the top is golden brown.
* Serve with a side of seasoned seaweed and enjoy!


sushi bake canned tuna, spicy tuna sushi bake, tuna sushi bake, spicy tuna sushi, sushi bake tuna, spicy tuna mayo sushi, canned tuna, sushi bake, easy sushi bake, sushi bake dish, sushi bake asmr, baked sushi, easy baked sushi, sushi bake tutorial, spicy tuna, easy sushi bake ideas, sushi bake steps, viral sushi bake, sushi bake how to, sushi bake trend, sushi baked recipe, easy sushi bake recipe, how to make a sushi bake, sushi bake recipe, tiktok sushi bake, sushi bake tiktok
Spicy Canned Tuna Sushi Bake 🐟🍣 This Spicy Canned Spicy Canned Tuna Sushi Bake 🐟🍣

This Spicy Canned Tuna Sushi Bake is creamy, savory, and packed with bold flavor! Made with simple pantry ingredients, it’s an easy, budget-friendly twist on sushi! It is perfect for sharing, scooping with seaweed, and satisfying all your sushi cravings at home.

INGREDIENTS
* 1 Can Tuna drained
* 2 Tbsp Sriracha
* 1/4 Cup Mayo
* 1 Tbsp Sesame Oil
* 2 Tbsp Furikake
* 1 Cup White Rice cooked
* 1 tsp Sugar
* 1/2 Tbsp Rice Vinegar
* 1 Packet Seasoned Seaweed

INSTRUCTIONS
* Preheat your oven to 400F and prepare a 6-inch baking pan.
* In a bowl, add in your rice and heat it in the microwave for 1 minute. This is so it’s easier for the sugar and rice vinegar to soak in. Add in your rice vinegar and sugar and mix well.
* Next, add in the rice mixture to your baking pan in an even layer. Sprinkle furikake on top.
* Use the same bowl that you mixed up your rice in and add in your drained canned tuna, sesame oil, sriracha, and mayo and mix well.
* Add the layer of saucy tuna on your rice layer evenly on top. Sprinkle with furikake.
* Bake at 400F for 20-30 minutes or until the top is golden brown.
* Serve with a side of seasoned seaweed and enjoy!�

sushi bake canned tuna, spicy tuna sushi bake, tuna sushi bake, spicy tuna sushi, sushi bake tuna, spicy tuna mayo sushi, canned tuna, sushi bake, easy sushi bake, sushi bake dish, sushi bake asmr, baked sushi, easy baked sushi, sushi bake tutorial, spicy tuna, easy sushi bake ideas, sushi bake steps, viral sushi bake, sushi bake how to, sushi bake trend, sushi baked recipe, easy sushi bake recipe, how to make a sushi bake, sushi bake recipe, tiktok sushi bake, sushi bake tiktok
Banana Bread Syrup 🍌 This Banana Bread Syrup is Banana Bread Syrup 🍌 

This Banana Bread Syrup is warm, sweet, and full of cozy flavor just like your favorite homemade loaf in liquid form! Perfect for coffee, pancakes, waffles, or desserts, it’s an easy homemade syrup that adds a comforting, bakery-style touch to any treat 💛

INGREDIENTS
* 1/2 Cup White Sugar
* 1/2 Cup Brown Sugar
* 1 Mashed Ripe Banana
* 1 tsp Vanilla Extract
* 1/2 tsp Cinnamon
* 1 Cup Water

INSTRUCTIONS
* In a small saucepan over medium heat, combine water, white sugar, and brown sugar.
* Stir until the sugars fully dissolve and the mixture begins to gently simmer.
* Add the mashed banana and cinnamon. Simmer for 5–8 minutes, stirring occasionally.
* Remove from heat and stir in the vanilla extract.
* Strain the syrup (optional for a smoother texture) and let cool.
* Transfer to a jar or bottle and store in the fridge.

banana bread syrup, banana bread, banana latte, banana bread latte, banana bread matcha latte, copycat starbucks banana bread matcha latte, banana bread breve, banana bread, copycat starbucks iced banana bread matcha latte, copycat starbucks banana bread matcha, copycat starbucks iced banana bread matcha recipe, iced latte, banana milk, banana coffee, banana coffee recipe, fun latte recipes, banana coffee syrup,
Banana Bread Syrup 🍌 This Banana Bread Syrup is Banana Bread Syrup 🍌 

This Banana Bread Syrup is warm, sweet, and full of cozy flavor just like your favorite homemade loaf in liquid form! Perfect for coffee, pancakes, waffles, or desserts, it’s an easy homemade syrup that adds a comforting, bakery-style touch to any treat 💛

INGREDIENTS
* 1/2 Cup White Sugar
* 1/2 Cup Brown Sugar
* 1 Mashed Ripe Banana
* 1 tsp Vanilla Extract
* 1/2 tsp Cinnamon
* 1 Cup Water

INSTRUCTIONS
* In a small saucepan over medium heat, combine water, white sugar, and brown sugar.
* Stir until the sugars fully dissolve and the mixture begins to gently simmer.
* Add the mashed banana and cinnamon. Simmer for 5–8 minutes, stirring occasionally.
* Remove from heat and stir in the vanilla extract.
* Strain the syrup (optional for a smoother texture) and let cool.
* Transfer to a jar or bottle and store in the fridge.�
banana bread syrup, banana bread, banana latte, banana bread latte, banana bread matcha latte, copycat starbucks banana bread matcha latte, banana bread breve, banana bread, copycat starbucks iced banana bread matcha latte, copycat starbucks banana bread matcha, copycat starbucks iced banana bread matcha recipe, iced latte, banana milk, banana coffee, banana coffee recipe, fun latte recipes, banana coffee syrup,
made my DIY pink cute phone charm a couple weeks a made my DIY pink cute phone charm a couple weeks ago and i’m still obsessed!! how cute is this 🌸 #diyphonecharm #phonecharm
Mediterranean Chicken Quinoa Salad 🥗 This Mediter Mediterranean Chicken Quinoa Salad 🥗

This Mediterranean Chicken Quinoa Salad is fresh, hearty, and full of vibrant flavor! Packed with juicy chicken, fluffy quinoa, and salty feta and crunchy veggies, it’s tossed in a balsamic vinegar dressing for a healthy, satisfying meal that’s perfect for meal prep or easy lunches.

INGREDIENTS
* 2 1/2 Cups Cooked Quinoa
* 2 1/2 Cups Cooked Chicken Breast 
* 2 Cucumbers diced
* 3 Tomatoes diced
* 1 1/2 Cups Feta crumbled
* 1/4 Cup Olive Oil
* 1/2 Cup Balsamic Vinegar
* 1 tsp Black Pepper
* Salt to taste

INSTRUCTIONS
* In a large bowl, combine the cooked quinoa and cooked chicken breast.
* Add the diced cucumbers, tomatoes, and crumbled feta.
* In a small bowl, whisk together olive oil, balsamic vinegar, black pepper, and salt.
* Pour the dressing over the salad and toss until everything is well coated.
* Taste and adjust seasoning if needed.
* Serve immediately or chill in the fridge for 2 hours for best flavor.

mediterranean quinoa salad, medittareanean quinoa salad, mediterranean salad, mediterranean salad recipe, quinoa salad, quinoa salad meal prep, chicken quinoa recipe, easy quinoa salad, how to make a quinoa salad, healthy quinoa salad, quinoa chicken recipe, cucumber quinoa salad, best quinoa salad, how to make quinoa salad, quinoa salad with feta cheese, greek quinoa salad, quinoa salad recipe, easy meal prep, easy lunches,
Mediterranean Chicken Quinoa Salad 🥗 This Mediter Mediterranean Chicken Quinoa Salad 🥗

This Mediterranean Chicken Quinoa Salad is fresh, hearty, and full of vibrant flavor! Packed with juicy chicken, fluffy quinoa, and salty feta and crunchy veggies, it’s tossed in a balsamic vinegar dressing for a healthy, satisfying meal that’s perfect for meal prep or easy lunches.

INGREDIENTS
* 2 1/2 Cups Cooked Quinoa
* 2 1/2 Cups Cooked Chicken Breast 
* 2 Cucumbers diced
* 3 Tomatoes diced
* 1 1/2 Cups Feta crumbled
* 1/4 Cup Olive Oil
* 1/2 Cup Balsamic Vinegar
* 1 tsp Black Pepper
* Salt to taste

INSTRUCTIONS
* In a large bowl, combine the cooked quinoa and cooked chicken breast.
* Add the diced cucumbers, tomatoes, and crumbled feta.
* In a small bowl, whisk together olive oil, balsamic vinegar, black pepper, and salt.
* Pour the dressing over the salad and toss until everything is well coated.
* Taste and adjust seasoning if needed.
* Serve immediately or chill in the fridge for 2 hours for best flavor.�
mediterranean quinoa salad, medittareanean quinoa salad, mediterranean salad, mediterranean salad recipe, quinoa salad, quinoa salad meal prep, chicken quinoa recipe, easy quinoa salad, how to make a quinoa salad, healthy quinoa salad, quinoa chicken recipe, cucumber quinoa salad, best quinoa salad, how to make quinoa salad, quinoa salad with feta cheese, greek quinoa salad, quinoa salad recipe, easy meal prep, easy lunches,
Ube Butter Mochi 💜 I have been making this recipe Ube Butter Mochi 💜

I have been making this recipe for years and years now and have finally been able to post a recipe! I always whip this out whenever I have a family gathering and those are the most rushed times for me so I have never been able to film the recipe making process haha 😆 

My family is obsessed with these and I make them everytime I see them! It is the #1 requested item from me and I’m excited to share this recipe!

INGREDIENTS
* 1/2 Cup Unsalted Butter melted
* 2 Cups Granulated Sugar
* 4 Eggs
* 1 tsp Vanilla Extract
* 2 Tbsp Ube Extract
* 1 Box Mochiko Flour
* 2 tsp Baking Powder
* 1 can Evaporated Milk
* 1 can Coconut Milk

INSTRUCTIONS
* Preheat your oven to 350F and grease an 9×13 baking dish.
* In a large bowl, whisk together your butter, sugar, eggs, evaporated milk, coconut milk, ube extract, and vanilla extract until well combined. 
* Next, add in your mochiko flour and baking powder and whisk until the batter is smooth.
* Pour into baking dish in an even layer and bake in oven for 1 hour. 
* After 1 hour, let cool for 30 minutes then enjoy!


ube butter mochi, butter mochi ube, ube butter mochi cake, best ube butter mochi, easy ube butter mochi, chewy ube butter mochi, ube butter mochi recipe, ube mochi butter muffin, how to make ube butter mochi, ube mochi butter cake, ube butter mochi recipe easy, easy ube butter mochi recipe, easy recipe for ube butter mochi,

Copyright © 2026 Lynn Mumbing Mejia · Theme by 17th Avenue