
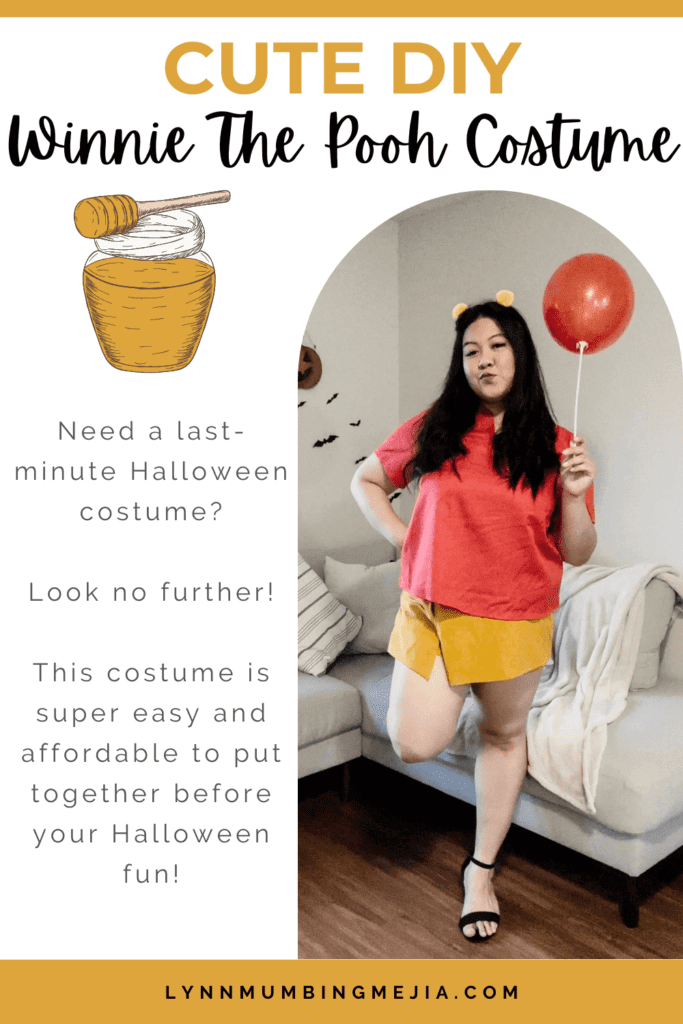
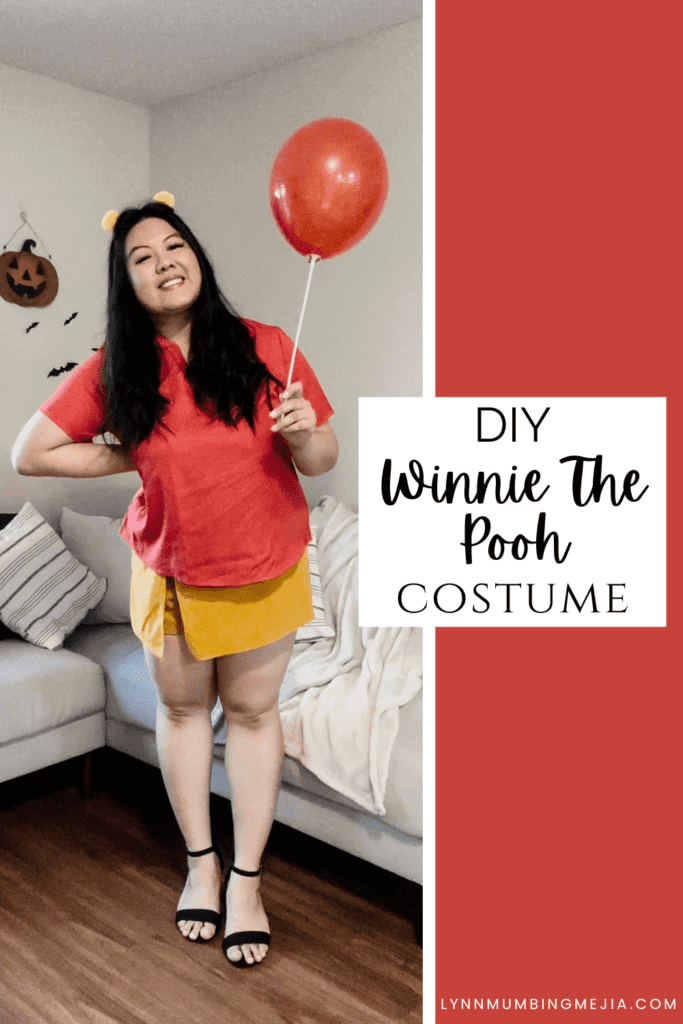
DIY Winnie The Pooh Costume
Read more for all the details on DIY Winnie The Pooh Costume.
If you’re in a pinch for time this Halloween or want to look cute with very minimal effort, this DIY Winnie The Pooh Costume is for you!
Loved how easy and cute this was to put together with very minimal props. I had everything I needed for this costume already in my closet and picked up the rest of Michaels and the Dollar Store!
PIN DIY Winnie The Pooh Costume FOR LATER:
This DIY Winnie The Pooh Costume is accompanied by a YouTube Tutorial. If you haven’t subscribed to me on YouTube, don’t forget to!
HERE IS HOW TO MAKE A WINNIE THE POOH COSTUME:
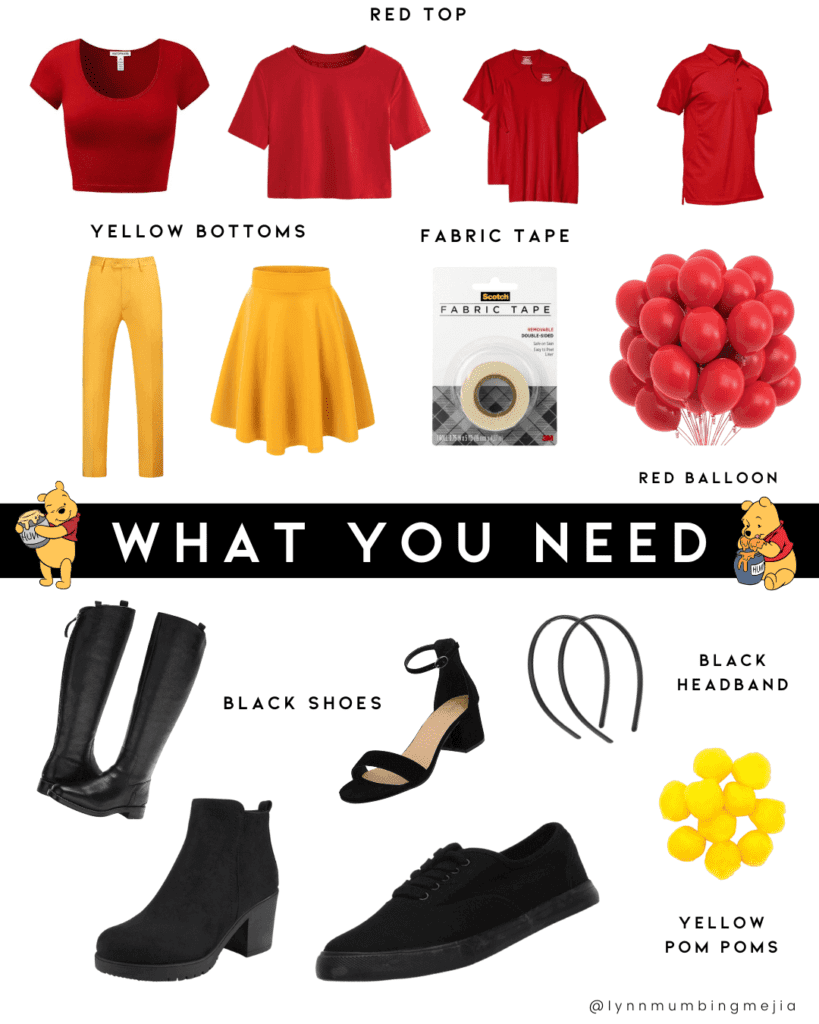
WHAT ARE THE MATERIALS NEEDED FOR THIS DIY WINNIE THE POOH COSTUME?
All you’ll need to put this pumpkin jack-o-lantern costume together is:
- Red Top/Dress
- Dark Yellow Bottoms (If wearing a top instead of a dress)
- Fabric Tape
- Red Balloon
- Dark Yellow Pom Poms
- Black Shoes
- Black Headband
WHAT EQUIPMENT DO I NEED?
This DIY costume is super easy to make! All you’ll need is fabric tape to stick on the pom poms to the headband. This Scotch brand fabric tape is my fav to use because it’s super easy to work with and you can remove it easily too!
CAN I SUB ANYTHING OUT?
Of course, you can! Choose any pieces that you’d like for a top and bottom, Bonus points if you thrift it or already have it at home!
It is really up to your preference on how to glue/tape the pom poms to the headband. I used a fabric headband so I used the fabric tape to tape on the pom poms to the headband with no issues. You can also use some glue or even sew it on!
DOES THE COSTUME LAST TO USE FOR THE FOLLOWING YEARS?
Yes, definitely! This costume is super low maintenance and if you glue the pom poms really well onto the headband, you should be good to go for years to come! Since this costume is so quick to create, you’ll have no problem just making it again if you plan to reuse it one day!
I generally reuse my materials so I never permanently glue things on however, if you want to make the pom poms permanently stick to the headband, you’ll want to opt out of the fabric tape and perhaps use fabric glue or even sew it on.
HOW LONG DOES IT TAKE TO MAKE?
This costume took me about 10 minutes MAXIMUM to make because it’s truly that easy to do. There is truly not much effort that goes into this video however, you will end up looking soo cute! I promise!
INSPIRATIONS FOR THIS COSTUME?
I was thinking of costumes to really easily make for little to no money and little to no effort and this was one I thought would be very cute! I scrolled through Pinterest trying to gain inspiration on what costumes I wanted to make this year and saw a few variations of this and knew that I could easily make this come to life with what I had at home! I’ve always thought Winnie The Pooh was super cute and have always wanted to the cute bear so this thought came in perfect!
I think it turned out so cute and so perfect and appropriate for any setting. Teachers/students can wear this to school, employees could wear this to the office, people can dress it up and wear it to a Halloween costume party, OR parents can wear something cute while taking the kiddos trick or treating!
STEPS TO DO THIS DIY WINNIE THE POOH COSTUME:
Step 1: Tape your 2 pom poms to your black headband to your desired width to look like Winnie The Pooh’s ears.
Step 2: Blow up a red balloon then either tape it onto yourself, use a balloon stick, or use helium and ribbon to allow it to float. You can tie this to your wrist if needed!
Step 3: Put on your outfit, bear ears headband, and cute shoes, and have a great night!
Xo,
Lynn
Are you adding this DIY Winnie The Pooh Costume to your list?! Don’t forget to tag me if you do!

This blog post is all the details on DIY Winnie The Pooh Costume.
P.S: If you haven’t read my most recent post, click here!
PIN DIY Winnie The Pooh Costume FOR LATER:
If you liked reading DIY Winnie The Pooh Costume, you might like these are well!
DIY Pumpkin Jack-O-Lantern Costume
Cute and Affordable DIY Ice Cream Costume
Easy DIY Despicable Me Minion Costume
Cute and Cheap DIY McDonald’s French Fries Costume
DIY Starbucks Frappuccino and Barista Costume
This is the end of DIY Winnie The Pooh Costume.


This is such a cute idea for a costume; I love how it’s fairly simple but does a great job as Winnie the Pooh! I have not had cause to make or wear something like this is the longest time, it makes me want to find a gathering or party to go to so that I can wear something like this!
This is very cute.
https://www.melodyjacob.com/2023/09/how-to-style-draped-sleeve-line-sweetheart-tulle-wedding-dress-for-christmas.html
Such a cute costume!
The Reluctant Blogger
This is so cute, so easy and totally affordable! Awesome idea, I may use it!