Hello! I'm Lynn.
  • About Me
  • Work With Me
  • Contact Me
  • Subscribe
  • Home
    • About
    • Contact
    • Disclaimer
    • Terms & Conditions
    • Privacy Policy
    • Subscribe
      • Work With Me
        • Media Kit
        • Portfolio and Samples
  • diy
  • lifestyle
    • home decor
  • recipes
  • gifts, parties & holidays
  • health & wellness with lynn

Lynn Mumbing Mejia

Crafting coziness, one recipe, DIY project, and holiday celebration at a time.

gifts/parties/holidays, diy · July 11, 2024

DIY Miss Universe Costume

*This post may contain affiliate or sponsored links, which means I may get paid or receive a commission if you purchase through my link, at no extra cost to you!*

Read more for all the details on how to put together a DIY Miss Universe Costume.

Halloween is my favourite time of year! One for the unlimited chocolates for breakfast, lunch and dinner and Two for the DIY costumes! I absolutely adore putting together my own easy costumes!

Creating a DIY Miss Universe costume is a fantastic way to stand out at any event, from Halloween parties to costume contests. With its glamorous and regal appeal, this costume embodies the elegance and confidence of a pageant queen while bringing out the gorgeous showcase of planets. Whether you’re channeling your inner beauty queen for a themed event or simply want to stand out at a gathering, a DIY Miss Universe costume is an excellent choice.

This guide will walk you through the steps to create a dazzling costume that captures the essence of the Miss Universe pageant.

PIN DIY Miss Universe Costume FOR LATER:
DIY Miss Universe Costume - Lynn Mumbing Mejia - Pin 1

This DIY Miss Universe Costume is accompanied by a YouTube Tutorial. If you haven’t subscribed to me on YouTube, don’t forget to!

Table of Contents

Toggle
  • HERE IS HOW TO MAKE A DIY MISS UNIVERSE COSTUME:
    • WHERE CAN YOU FIND THE MATERIALS TO MAKE THIS DIY MISS UNIVERSE COSTUME?
    • WHAT ARE THE MATERIALS NEEDED FOR THIS DIY MISS UNIVERSE COSTUME?
    • WHAT EQUIPMENT DO I NEED?
    • CAN I SUBSTITUTE ANY MATERIALS OUT?
    • DOES THE COSTUME LAST TO USE FOR THE FOLLOWING YEARS?
    • HOW LONG DOES IT TAKE TO PUT TOGETHER?
    • INSPIRATIONS FOR THIS COSTUME?
    • STEPS TO PUT TOGETHER THIS DIY MISS UNIVERSE COSTUME:

HERE IS HOW TO MAKE A DIY MISS UNIVERSE COSTUME:

WHERE CAN YOU FIND THE MATERIALS TO MAKE THIS DIY MISS UNIVERSE COSTUME?

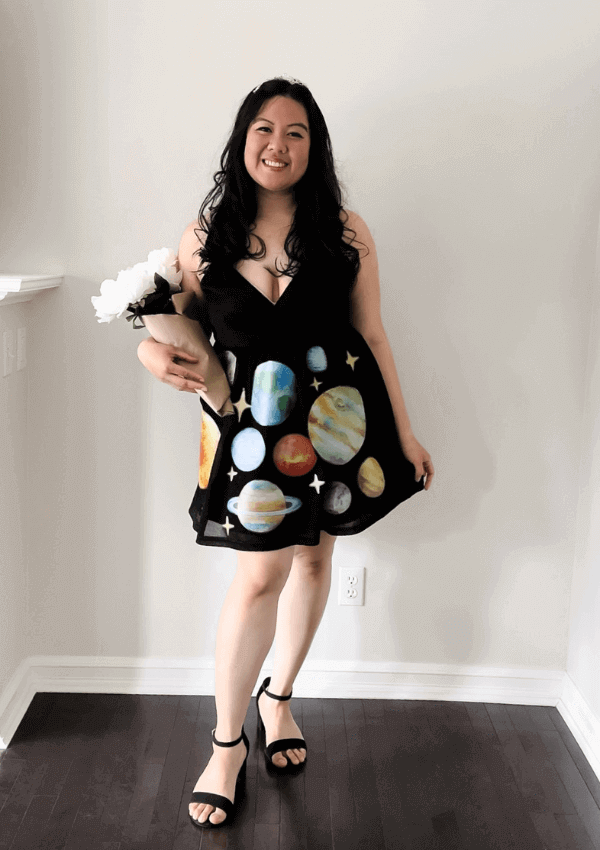
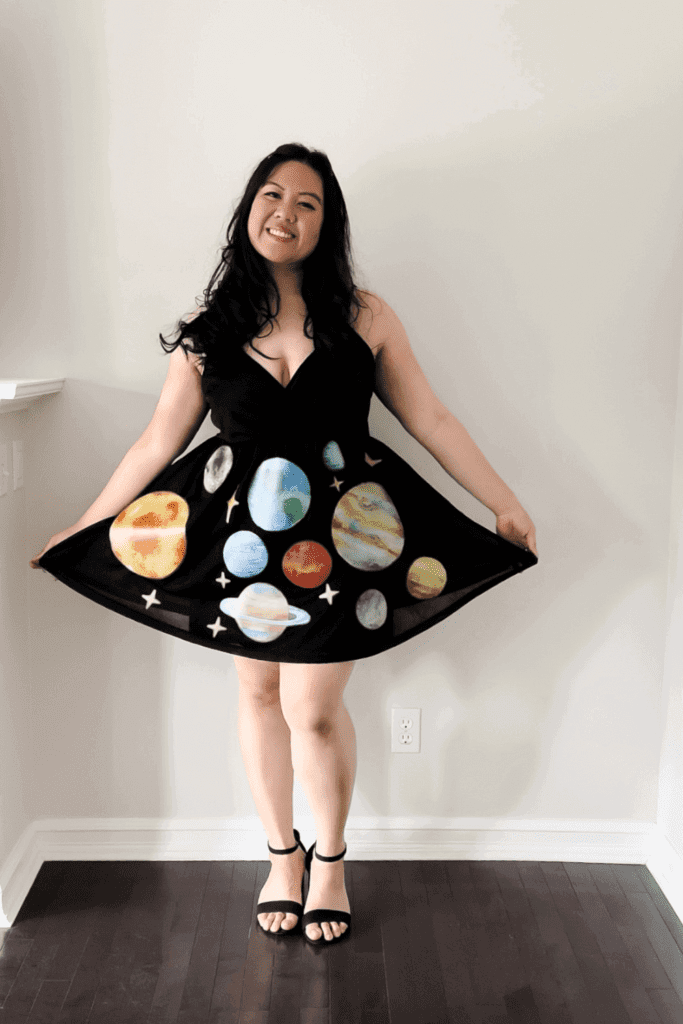
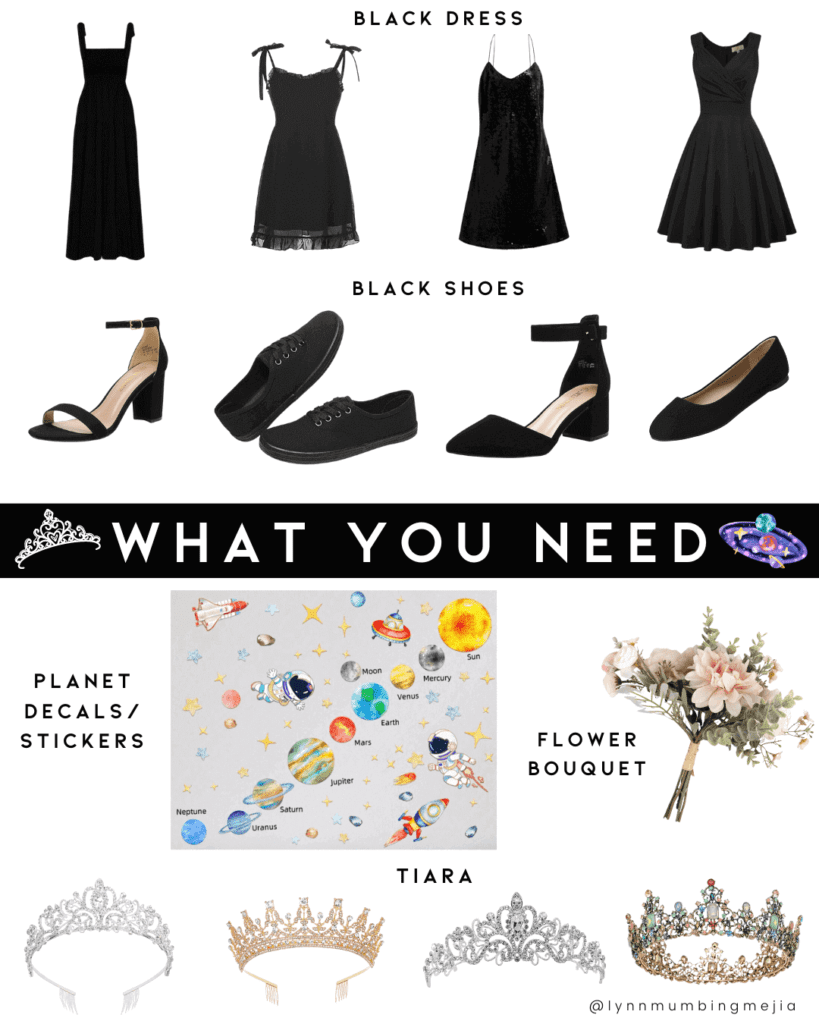
I absolutely loved putting this costume together! I already had the black dress, black heels and a faux bouquet of peonies so I just bought a tiara and planet decals. Of course, you can source these materials from many different stores but I like to find my items at craft stores like Michaels, dollar stores or, online from Amazon or Shein, and I buy my heels from Torrid!

DIY Miss Universe Costume - What You Need - Lynn Mumbing Mejia

WHAT ARE THE MATERIALS NEEDED FOR THIS DIY MISS UNIVERSE COSTUME?

To create this super easy and cute Miss Universe costume, you will need:

  • Black dress or top/pants
  • Black shoes (anything that you’d feel comfortable in!)
  • Planet decals/stickers
  • Real or faux flower bouquet
  • Tiara

Shop Here!

WHAT EQUIPMENT DO I NEED?

Thankfully, this DIY costume did not need any equipment at all. I bought planet decals so I ended up just sticking it on my dress directly and it held up well! I wrapped my flower bouquet in kraft paper but it is totally optional and if you use real flowers, the florist will be able to wrap them up for you!

Aside from this, you really just need to put your tiara, dress and shoes on so no equipment needed for this!

CAN I SUBSTITUTE ANY MATERIALS OUT?

You sure can! I love making DIY costumes and 100% encourage to use up what you have or can afford. That is my favorite part of these costumes! I love the ability to reuse or recreate costumes as much as I want and need. All the materials can be easily found at the dollar store or craft store except maybe the planet decals. I actually had a tough time finding what I wanted to use and searched the internet! I ended up finding this solar system wall stickers from Shein like I liked!

Alternatively, you can also print some stickers or paper and stick them on you. I was also debating possibly using paper planet cut outs to stick on me! It is a great substitution if you are wearing the costume and not really moving when wearing it as the paper isn’t as tough as decals or stickers but if you’re making this for kids or when you’ll be actively doing something, it is better to use sticks or even iron on patches or vinyl decals!

As mentioned, you can use faux or real flowers and really any tiara or crown that you can find!

DOES THE COSTUME LAST TO USE FOR THE FOLLOWING YEARS?

The stickers I bought seem to be really tough and great quality! I am confident that this will stick on my dress for years. With other materials, it may not last as long. Thankfully, this costume is so easy to make that if you ever had a year where you wanted to recreate this costume, you can quickly throw it together again with no issues!

HOW LONG DOES IT TAKE TO PUT TOGETHER?

The beauty of this costume is that the only work you really need to do is place the stickers on your dress! I put everything on and just placed the stickers in front of a mirror and it worked so well! I loved how quickly I can throw this on and it looks fantastic! I would say total of 10 minutes to throw together the whole costume on me!

INSPIRATIONS FOR THIS COSTUME?

I love looking for inspiration on Pinterest and I remember seeing a similar Miss Universe costume that was posted years back and I knew I wanted to throw it together as well! I believe this costume had a sash but I didn’t think it was needed and really wanted to showcase the dress with the planets on them!

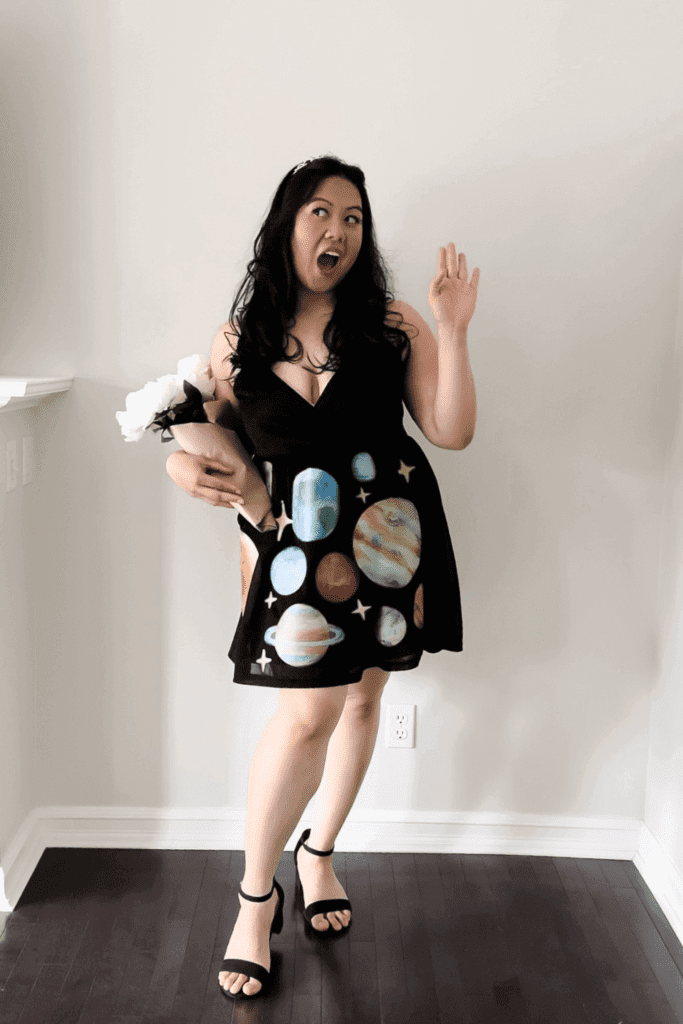
I was so nervous that the costume would not be thrown together nicely but am so happy with how it turned out! Such a great costume idea for anyone!

STEPS TO PUT TOGETHER THIS DIY MISS UNIVERSE COSTUME:

Step 1: Grab your black dress and place the planets and stars the way you’d like to showcase them on your dress

Step 2: Wear the dress, shoes, tiara and carry the flowers altogether

Step 3: Have fun in your costume!

Thank you so much for following this blog post on how to create a DIY Miss Universe costume!

Xo,

Lynn

Are you going to try making this DIY Miss Universe Costume?! Don’t forget to tag me if you do!

DIY Miss Universe Costume - Lynn Mumbing Mejia - Tag Us

This blog post is all the details on DIY Miss Universe Costume.

P.S: If you haven’t read my most recent post, click here!

PIN DIY Miss Universe Costume FOR LATER:
DIY Miss Universe Costume - Lynn Mumbing Mejia - Pin 2

If you liked reading DIY Miss Universe Costume, you might like these are well!

DIY Winnie The Pooh Costume

DIY Taro Boba Costume

DIY Pumpkin Jack-O-Lantern Costume

Cute and Affordable DIY Ice Cream Costume

Easy DIY Despicable Me Minion Costume

Cute and Cheap DIY McDonald’s French Fries Costume

DIY Starbucks Frappuccino and Barista Costume

This is the end of DIY Miss Universe Costume.

Shop The Post

Posted In: gifts/parties/holidays, diy · Tagged: costume diy, costume halloween, costume ideas, costume party ideas, diy costume, diy costumes for college, diy costumes for kids, diy costumes for teens, halloween costume, halloween costumes, last minute, miss universe, universe halloween costume

Get on the List

You’ll Also Love

DIY Mario Toad Costume
DIY Pacman Costume
DIY Scream Ghost Face Costume

Comments

  1. Karalee says

    July 14, 2024 at

    This is such a great idea for a costume! The costume is amazing, and the stickers look so good!

Trackbacks

  1. DIY Froot Loops Costume | Lynn Mumbing Mejia says:
    July 15, 2024 at

    […] P.S: If you haven’t read my most recent post, click here! […]

  2. DIY Popcorn Costume | Lynn Mumbing Mejia says:
    July 16, 2024 at

    […] DIY Miss Universe Costume […]

  3. DIY Strawberry Costume | Lynn Mumbing Mejia says:
    July 16, 2024 at

    […] DIY Miss Universe Costume […]

  4. DIY Tooth Fairy Costume | Lynn Mumbing Mejia says:
    July 17, 2024 at

    […] DIY Miss Universe Costume […]

Next Post >

Pistachio Pudding Cookies

About Photo
Hey there friend! My name is Lynn and I'm a Canadian Content Creator who's focused on Minimal & Neutral Home Decor Inspo, Simple & Budget Friendly DIY Projects, All Things Holidays and Quick & Easy Recipes. I'm so happy you're here and I hope you'll find something that you love!

Categories

follow lynn

  • Facebook
  • Instagram
  • Pinterest
  • Twitter
  • YouTube

Search

Join Us!

Trending Now

Popular Posts

Links

  • About
  • Contact
  • Disclaimer
  • Privacy Policy
  • Terms & Conditions

Socials

  • Instagram
  • Youtube
  • Facebook
  • Twitter
  • Pinterest

Shop

  • Home Wall Art
  • Recipe Cards
  • Greeting Cards
  • Planner Templates

JOIN THE INNER CIRCLE

Asian Sesame Vermicelli Salad 🥗 This Asian Sesam Asian Sesame Vermicelli Salad 🥗 

This Asian Sesame Vermicelli Salad is light, refreshing, and packed with flavor! Tender vermicelli noodles are tossed with crisp veggies and a savory sesame dressing for an easy, vibrant dish that’s perfect for lunches, meal prep, or summer gatherings.

INGREDIENTS
* 3 Bundles Vermicelli about 150g uncooked
* 1 Cup Purple Cabbage thinly shredded 
* 1 Cup Red Peppers thinly shredded 
* 1 Cup Carrots thinly shredded 
* 1/2 Cup Edamame
* 2 Stalks Green Onion thinly sliced 

Sauce
* 1 Clove Garlic grated
* 2 Tbsp Sesame Oil
* 1 tsp Sesame Oil
* 2 Tbsp Soy Sauce
* 1 Tbsp Brown Sugar
* 1 Tbsp Rice Vinegar

INSTRUCTIONS
* Cook the vermicelli noodles according to package instructions. Drain and rinse under cold water.
* In a large bowl, combine the cooked vermicelli, cabbage, red bell pepper, carrot, edamame, and green onions.
* In a small bowl, whisk together garlic, sesame oil, sesame seeds, soy sauce, brown sugar, and rice vinegar until well combined.
* Pour the sauce over the salad and toss until evenly coated.
* Chill in the fridge before serving for extra flavor for minimally 12 hours! Enjoy!

vietnamese vermicelli salad recipe, vermicelli noodle salad, vermicelli salad recipe, how to make vermicelli noodle salad, vermicelli noodles salad recipe, asian salad, asian salad dressing, how to make vietnamese vermicelli noodle salad recipe, asian noodle salad, asian salad recipe, easy sesame noodle salad, asian cold noodle salad, glass noodle salad with sesame dressing, bean vermicelli, ramen salad, vegan salad, vegetarian salad, sesame sauce, sesame sauce recipe
Poppy Seed Almond Muffins 🤎 Have you ever tried C Poppy Seed Almond Muffins 🤎

Have you ever tried Costco’s almond poppy seed muffins? If you have, this is a copycat version of it! It’s my fav muffin and I knew I had to recreate it at home!

These Poppy Seed Almond Muffins are soft, fluffy, and bursting with sweet almond flavor. With a tender crumb and delicate crunch from the poppy seeds, they’re the perfect cozy bakery-style treat for breakfast, snacking, or coffee breaks.

INGREDIENTS
* 2 1/4 Cups Flour
* 1/2 tsp Salt
* 1/2 tsp Baking Soda
* 1/2 tsp Baking Powder
* 3/4 Cup Oil 
* 1 Cup White Sugar
* 2 Eggs
* 1 tsp Vanilla Extract
* 1 Tbsp Almond Extract 
* 3/4 Cup Sour Cream
* 1/4 Cup Milk
* 2 Tbsp Poppy Seeds
* 1/4 Cup Slivered Almonds sprinkle on top

INSTRUCTIONS
* Preheat oven to 350°F and line a 12-cup muffin tin with liners or lightly grease it.
* In a large bowl, whisk together oil, sugar, eggs, vanilla extract, almond extract, sour cream, and milk until smooth.
* Add flour, salt, baking soda, and baking powder directly into the same bowl. Gently mix until just combined.
* Fold in the poppy seeds.
* Divide the batter evenly between the 12 muffin cups and sprinkle slivered almonds on top.
* Bake for 25 minutes, or until a toothpick inserted into the center comes out clean.
* Let cool slightly before serving.


almond poppy seed muffins, poppy seed muffins, costco copycat, costco copycat recipes, almond muffins, easy muffin recipes, simple muffins, poppy seed almond muffins
Spicy Canned Tuna Sushi Bake 🐟🍣 This Spicy Canned Spicy Canned Tuna Sushi Bake 🐟🍣

This Spicy Canned Tuna Sushi Bake is creamy, savory, and packed with bold flavor! Made with simple pantry ingredients, it’s an easy, budget-friendly twist on sushi! It is perfect for sharing, scooping with seaweed, and satisfying all your sushi cravings at home.

INGREDIENTS
* 1 Can Tuna drained
* 2 Tbsp Sriracha
* 1/4 Cup Mayo
* 1 Tbsp Sesame Oil
* 2 Tbsp Furikake
* 1 Cup White Rice cooked
* 1 tsp Sugar
* 1/2 Tbsp Rice Vinegar
* 1 Packet Seasoned Seaweed

INSTRUCTIONS
* Preheat your oven to 400F and prepare a 6-inch baking pan.
* In a bowl, add in your rice and heat it in the microwave for 1 minute. This is so it’s easier for the sugar and rice vinegar to soak in. Add in your rice vinegar and sugar and mix well.
* Next, add in the rice mixture to your baking pan in an even layer. Sprinkle furikake on top.
* Use the same bowl that you mixed up your rice in and add in your drained canned tuna, sesame oil, sriracha, and mayo and mix well.
* Add the layer of saucy tuna on your rice layer evenly on top. Sprinkle with furikake.
* Bake at 400F for 20-30 minutes or until the top is golden brown.
* Serve with a side of seasoned seaweed and enjoy!


sushi bake canned tuna, spicy tuna sushi bake, tuna sushi bake, spicy tuna sushi, sushi bake tuna, spicy tuna mayo sushi, canned tuna, sushi bake, easy sushi bake, sushi bake dish, sushi bake asmr, baked sushi, easy baked sushi, sushi bake tutorial, spicy tuna, easy sushi bake ideas, sushi bake steps, viral sushi bake, sushi bake how to, sushi bake trend, sushi baked recipe, easy sushi bake recipe, how to make a sushi bake, sushi bake recipe, tiktok sushi bake, sushi bake tiktok
Spicy Canned Tuna Sushi Bake 🐟🍣 This Spicy Canned Spicy Canned Tuna Sushi Bake 🐟🍣

This Spicy Canned Tuna Sushi Bake is creamy, savory, and packed with bold flavor! Made with simple pantry ingredients, it’s an easy, budget-friendly twist on sushi! It is perfect for sharing, scooping with seaweed, and satisfying all your sushi cravings at home.

INGREDIENTS
* 1 Can Tuna drained
* 2 Tbsp Sriracha
* 1/4 Cup Mayo
* 1 Tbsp Sesame Oil
* 2 Tbsp Furikake
* 1 Cup White Rice cooked
* 1 tsp Sugar
* 1/2 Tbsp Rice Vinegar
* 1 Packet Seasoned Seaweed

INSTRUCTIONS
* Preheat your oven to 400F and prepare a 6-inch baking pan.
* In a bowl, add in your rice and heat it in the microwave for 1 minute. This is so it’s easier for the sugar and rice vinegar to soak in. Add in your rice vinegar and sugar and mix well.
* Next, add in the rice mixture to your baking pan in an even layer. Sprinkle furikake on top.
* Use the same bowl that you mixed up your rice in and add in your drained canned tuna, sesame oil, sriracha, and mayo and mix well.
* Add the layer of saucy tuna on your rice layer evenly on top. Sprinkle with furikake.
* Bake at 400F for 20-30 minutes or until the top is golden brown.
* Serve with a side of seasoned seaweed and enjoy!�

sushi bake canned tuna, spicy tuna sushi bake, tuna sushi bake, spicy tuna sushi, sushi bake tuna, spicy tuna mayo sushi, canned tuna, sushi bake, easy sushi bake, sushi bake dish, sushi bake asmr, baked sushi, easy baked sushi, sushi bake tutorial, spicy tuna, easy sushi bake ideas, sushi bake steps, viral sushi bake, sushi bake how to, sushi bake trend, sushi baked recipe, easy sushi bake recipe, how to make a sushi bake, sushi bake recipe, tiktok sushi bake, sushi bake tiktok
Banana Bread Syrup 🍌 This Banana Bread Syrup is Banana Bread Syrup 🍌 

This Banana Bread Syrup is warm, sweet, and full of cozy flavor just like your favorite homemade loaf in liquid form! Perfect for coffee, pancakes, waffles, or desserts, it’s an easy homemade syrup that adds a comforting, bakery-style touch to any treat 💛

INGREDIENTS
* 1/2 Cup White Sugar
* 1/2 Cup Brown Sugar
* 1 Mashed Ripe Banana
* 1 tsp Vanilla Extract
* 1/2 tsp Cinnamon
* 1 Cup Water

INSTRUCTIONS
* In a small saucepan over medium heat, combine water, white sugar, and brown sugar.
* Stir until the sugars fully dissolve and the mixture begins to gently simmer.
* Add the mashed banana and cinnamon. Simmer for 5–8 minutes, stirring occasionally.
* Remove from heat and stir in the vanilla extract.
* Strain the syrup (optional for a smoother texture) and let cool.
* Transfer to a jar or bottle and store in the fridge.

banana bread syrup, banana bread, banana latte, banana bread latte, banana bread matcha latte, copycat starbucks banana bread matcha latte, banana bread breve, banana bread, copycat starbucks iced banana bread matcha latte, copycat starbucks banana bread matcha, copycat starbucks iced banana bread matcha recipe, iced latte, banana milk, banana coffee, banana coffee recipe, fun latte recipes, banana coffee syrup,
Banana Bread Syrup 🍌 This Banana Bread Syrup is Banana Bread Syrup 🍌 

This Banana Bread Syrup is warm, sweet, and full of cozy flavor just like your favorite homemade loaf in liquid form! Perfect for coffee, pancakes, waffles, or desserts, it’s an easy homemade syrup that adds a comforting, bakery-style touch to any treat 💛

INGREDIENTS
* 1/2 Cup White Sugar
* 1/2 Cup Brown Sugar
* 1 Mashed Ripe Banana
* 1 tsp Vanilla Extract
* 1/2 tsp Cinnamon
* 1 Cup Water

INSTRUCTIONS
* In a small saucepan over medium heat, combine water, white sugar, and brown sugar.
* Stir until the sugars fully dissolve and the mixture begins to gently simmer.
* Add the mashed banana and cinnamon. Simmer for 5–8 minutes, stirring occasionally.
* Remove from heat and stir in the vanilla extract.
* Strain the syrup (optional for a smoother texture) and let cool.
* Transfer to a jar or bottle and store in the fridge.�
banana bread syrup, banana bread, banana latte, banana bread latte, banana bread matcha latte, copycat starbucks banana bread matcha latte, banana bread breve, banana bread, copycat starbucks iced banana bread matcha latte, copycat starbucks banana bread matcha, copycat starbucks iced banana bread matcha recipe, iced latte, banana milk, banana coffee, banana coffee recipe, fun latte recipes, banana coffee syrup,

Copyright © 2026 Lynn Mumbing Mejia · Theme by 17th Avenue