Hello! I'm Lynn.
  • About Me
  • Work With Me
  • Contact Me
  • Subscribe
  • Home
    • About
    • Contact
    • Disclaimer
    • Terms & Conditions
    • Privacy Policy
    • Subscribe
      • Work With Me
        • Media Kit
        • Portfolio and Samples
  • diy
  • lifestyle
    • home decor
  • recipes
  • gifts, parties & holidays
  • health & wellness with lynn

Lynn Mumbing Mejia

Crafting coziness, one recipe, DIY project, and holiday celebration at a time.

gifts/parties/holidays, recipes · September 4, 2025

Halloween Ghost Brownies

*This post may contain affiliate or sponsored links, which means I may get paid or receive a commission if you purchase through my link, at no extra cost to you!*
Jump to Recipe Print Recipe

Read more for all the details on Halloween Ghost Brownies.

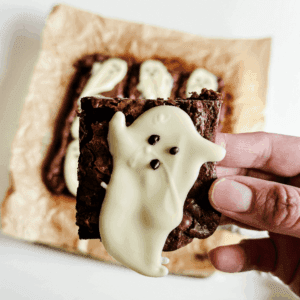
Do you love festive treats but can’t be bothered to do a full recipe from scratch? I got you! These Halloween Ghost Brownies are perfect! I love baking fresh treats from home, but I have to admit, box mixes just make everything so much easier for me! For these brownies, I used a brownie mix and followed the directions on the box, then I made my own little white chocolate ghosts.

PIN Halloween Ghost Brownies FOR LATER:
Halloween Ghost Brownies - Lynn Mumbing Mejia - Featured Blog Pin 1

This Halloween Ghost Brownies recipe is accompanied by a YouTube Tutorial. If you haven’t subscribed to me on YouTube, don’t forget to!

Table of Contents

Toggle
  • HERE IS HOW TO MAKE HALLOWEEN GHOST BROWNIES:
    • WHERE CAN I FIND THESE INGREDIENTS?
    • WHAT ARE THE INGREDIENTS?
    • WHAT EQUIPMENT DO I NEED?
    • CAN I SUBSTITUTE/ADD ANYTHING OUT?
    • WHAT DO HALLOWEEN GHOST BROWNIES TASTE LIKE?
    • HOW LONG DOES IT KEEP FOR?
    • INSPIRATIONS FOR THIS RECIPE?
    • ANY OTHER NOTES?
    • Halloween Ghost Brownies
      • Ingredients  
      • Instructions 

HERE IS HOW TO MAKE HALLOWEEN GHOST BROWNIES:

WHERE CAN I FIND THESE INGREDIENTS?

All of the ingredients listed here can be found at any local grocery store! You can, of course, make your own brownies from scratch, but I just find it more convenient to use a brownie mix! I very rarely make my own brownies from scratch. You’ll want to follow the brownie mix package instructions but you generally need water/milk, vegetable oil and an egg or two. Aside from this, to make your ghosts, you’ll want to have white chocolate and a black icing pen.

WHAT ARE THE INGREDIENTS?

The ingredients you need to make these cute Halloween Ghost Brownies are:

  • Fudgy Brownie Mix
  • Water
  • Vegetable Oil
  • Egg
  • White Chocolate
  • Black Icing Pen

WHAT EQUIPMENT DO I NEED?

Hopefully, you should already have baking equipment at home, but if you don’t, you’ll need just general baking equipment! Honestly, I just take the lazy way out and don’t even use proper equipment a lot of the time. I just use a bowl and spoon to mix everything together haha. You will need measuring cups for sure, a baking pan and some parchment paper! You can also just grease the pan if that is easier.

CAN I SUBSTITUTE/ADD ANYTHING OUT?

You sure can substitute or add anything you’d like! I am not an adventurous baker, so I have no idea what kind of dietary restrictions work, like vegan or gluten-free swaps, but if you do, feel free to swap things out! Here are some fun things you can do to spruce up this recipe:

  • Add some extra chocolate chips or m&m’s of your choice
  • Throw in some chopped nuts like walnuts, pistachios, almonds etc
  • Make a frosting for the ghosts to sit on top of
  • Put some Halloween-themed sprinkles on top

WHAT DO HALLOWEEN GHOST BROWNIES TASTE LIKE?

Since these are very classic brownies, that is exactly what they taste like! These brownies are an extremely sweet treat for sure! I can usually eat half of one at a time, but that is because I don’t have that strong of a sweet tooth. My husband has a huge sweet tooth and absolutely loved these! These brownies are rich, chocolatey and fudgey! Each bite just melts your mouth in fudgey goodness! The cute little ghosts on top are sweet and crackly! Such a fun treat to eat.

HOW LONG DOES IT KEEP FOR?

These brownies keep so well! Probably because of the amount of sugar thats in here keeps them preserved for longer 😂 I kept some of these on the counter in an airtight container for 3 days, then kept some in my fridge for 10 days. I didn’t notice a change in the quality at all, which is great! Brownies are also excellent frozen so you can freeze them as well for up to a month and just defrost them a couple of hours before enjoying or heat them up to some warm chocolatey goodness!

INSPIRATIONS FOR THIS RECIPE?

I love cutie ghosts so much! I have cutie ghosts on my slippers, crocs, phone case, haha, you name it! So, whenever Halloween rolls around, I will use any excuse to put a ghost on anything I do! I made these brownies for my family last year, and thought it would be great to put a post out on the blog! They loved it and we enjoyed it warm with some vanilla ice cream. Perfect!!! ♥

ANY OTHER NOTES?

Okay, I admit I was really impatient when doing these, so I didn’t let the brownies cool all the way before placing my white chocolate ghosts, and they ended up melting a little bit, haha. Please wait until your brownies are COMPLETELY COOLED down before placing your little ghosties on top! 👻

Halloween Ghost Brownies

Fudgy, fun & frightfully cute! These Halloween Ghost Brownies are the perfect spooky-sweet treat to make for your Halloween fun!
Print Recipe Pin Recipe
Prep Time 20 minutes mins
Cook Time 25 minutes mins
Chill Time 2 hours hrs
Course Dessert
Servings 9 Ghost Brownies

Ingredients
  

  • 1 Package Brownie Mix
  • 1/3 Cup Vegetable Oil
  • 1/4 Water
  • 1 Egg
  • 1 White Chocolate Bar
  • Black Icing Pen

Instructions
 

  • Preheat oven to 350F and line a 9"x9" pan with parchment paper.
  • In a medium mixing bowl, add in your brownie mix, oil, water and egg. Mix well together until there are no clumps.
  • Pour the batter into the 9"x9" pan and spread it in an even layer to the corners.
  • Bake in the oven for 25-30 minutes or until a toothpick is inserted in the middle of the pan and comes out almost clean.
  • Melt some white chocolate in a small bowl, and on a sheet of parchment paper, spread out small spoonfuls of white chocolate and roughly shape them into little ghosts. Add a mouth and cute eyes with the black icing pen and place in the freezer for 20 minutes to harden.
  • Once your brownies have cooled COMPLETELY, place each ghost on top!
  • Serve and enjoy!
Keyword Halloween Ghost Brownies

Thank you so much for reading this recipe! I hope you make it and enjoy your Halloween-themed celebration!

Xo,

Lynn

Are you going to try making this Halloween Ghost Brownies recipe?! Don’t forget to tag me if you do!

Halloween Ghost Brownies - Lynn Mumbing Mejia - Tag Us

This blog post is all the details on Halloween Ghost Brownies.

P.S: If you haven’t read my most recent post, click here!

PIN Halloween Ghost Brownies FOR LATER:
Halloween Ghost Brownies - Lynn Mumbing Mejia - Featured Blog Pin 2

If you liked reading Halloween Ghost Brownies, you might like these as well!

Halloween Pretzel Bark

Halloween Pillsbury Jalapeno Popper Mummies

Halloween Finger Hot Dogs

Easy Halloween Ice Cream Sandwich Graves

Halloween Eyeball Jello Cups

Halloween Ice Cream Sandwiches

Spooktacularly Easy Halloween Cake Mix Cookies

This is the end of Halloween Ghost Brownies.

Shop The Post

Posted In: gifts/parties/holidays, recipes · Tagged: brownie mix, easy ghost, easy ghost brownies, fun halloween snacks, ghost brownies, ghost desserts, ghost treats, Halloween Dessert, halloween desserts, halloween desserts kid-friendly, halloween foods, halloween ghost, halloween ghost brownies, halloween treats, melted chocolate

Get on the List

You’ll Also Love

Easy Halloween Dessert Dip
Easy Boo-Berry Ghost Hand Pies
Easy Rudolph Brownies

Trackbacks

  1. Halloween Painted Candles | Lynn Mumbing Mejia says:
    September 4, 2025 at

    […] P.S: If you haven’t read my most recent post, click here! […]

Next Post >

Easy Boo-Berry Ghost Hand Pies

About Photo
Hey there friend! My name is Lynn and I'm a Canadian Content Creator who's focused on Minimal & Neutral Home Decor Inspo, Simple & Budget Friendly DIY Projects, All Things Holidays and Quick & Easy Recipes. I'm so happy you're here and I hope you'll find something that you love!

Categories

follow lynn

  • Facebook
  • Instagram
  • Pinterest
  • Twitter
  • YouTube

Search

Join Us!

Trending Now

Popular Posts

Links

  • About
  • Contact
  • Disclaimer
  • Privacy Policy
  • Terms & Conditions

Socials

  • Instagram
  • Youtube
  • Facebook
  • Twitter
  • Pinterest

Shop

  • Home Wall Art
  • Recipe Cards
  • Greeting Cards
  • Planner Templates

JOIN THE INNER CIRCLE

Asian Sesame Vermicelli Salad 🥗 This Asian Sesam Asian Sesame Vermicelli Salad 🥗 

This Asian Sesame Vermicelli Salad is light, refreshing, and packed with flavor! Tender vermicelli noodles are tossed with crisp veggies and a savory sesame dressing for an easy, vibrant dish that’s perfect for lunches, meal prep, or summer gatherings.

INGREDIENTS
* 3 Bundles Vermicelli about 150g uncooked
* 1 Cup Purple Cabbage thinly shredded 
* 1 Cup Red Peppers thinly shredded 
* 1 Cup Carrots thinly shredded 
* 1/2 Cup Edamame
* 2 Stalks Green Onion thinly sliced 

Sauce
* 1 Clove Garlic grated
* 2 Tbsp Sesame Oil
* 1 tsp Sesame Oil
* 2 Tbsp Soy Sauce
* 1 Tbsp Brown Sugar
* 1 Tbsp Rice Vinegar

INSTRUCTIONS
* Cook the vermicelli noodles according to package instructions. Drain and rinse under cold water.
* In a large bowl, combine the cooked vermicelli, cabbage, red bell pepper, carrot, edamame, and green onions.
* In a small bowl, whisk together garlic, sesame oil, sesame seeds, soy sauce, brown sugar, and rice vinegar until well combined.
* Pour the sauce over the salad and toss until evenly coated.
* Chill in the fridge before serving for extra flavor for minimally 12 hours! Enjoy!

vietnamese vermicelli salad recipe, vermicelli noodle salad, vermicelli salad recipe, how to make vermicelli noodle salad, vermicelli noodles salad recipe, asian salad, asian salad dressing, how to make vietnamese vermicelli noodle salad recipe, asian noodle salad, asian salad recipe, easy sesame noodle salad, asian cold noodle salad, glass noodle salad with sesame dressing, bean vermicelli, ramen salad, vegan salad, vegetarian salad, sesame sauce, sesame sauce recipe
Poppy Seed Almond Muffins 🤎 Have you ever tried C Poppy Seed Almond Muffins 🤎

Have you ever tried Costco’s almond poppy seed muffins? If you have, this is a copycat version of it! It’s my fav muffin and I knew I had to recreate it at home!

These Poppy Seed Almond Muffins are soft, fluffy, and bursting with sweet almond flavor. With a tender crumb and delicate crunch from the poppy seeds, they’re the perfect cozy bakery-style treat for breakfast, snacking, or coffee breaks.

INGREDIENTS
* 2 1/4 Cups Flour
* 1/2 tsp Salt
* 1/2 tsp Baking Soda
* 1/2 tsp Baking Powder
* 3/4 Cup Oil 
* 1 Cup White Sugar
* 2 Eggs
* 1 tsp Vanilla Extract
* 1 Tbsp Almond Extract 
* 3/4 Cup Sour Cream
* 1/4 Cup Milk
* 2 Tbsp Poppy Seeds
* 1/4 Cup Slivered Almonds sprinkle on top

INSTRUCTIONS
* Preheat oven to 350°F and line a 12-cup muffin tin with liners or lightly grease it.
* In a large bowl, whisk together oil, sugar, eggs, vanilla extract, almond extract, sour cream, and milk until smooth.
* Add flour, salt, baking soda, and baking powder directly into the same bowl. Gently mix until just combined.
* Fold in the poppy seeds.
* Divide the batter evenly between the 12 muffin cups and sprinkle slivered almonds on top.
* Bake for 25 minutes, or until a toothpick inserted into the center comes out clean.
* Let cool slightly before serving.


almond poppy seed muffins, poppy seed muffins, costco copycat, costco copycat recipes, almond muffins, easy muffin recipes, simple muffins, poppy seed almond muffins
Spicy Canned Tuna Sushi Bake 🐟🍣 This Spicy Canned Spicy Canned Tuna Sushi Bake 🐟🍣

This Spicy Canned Tuna Sushi Bake is creamy, savory, and packed with bold flavor! Made with simple pantry ingredients, it’s an easy, budget-friendly twist on sushi! It is perfect for sharing, scooping with seaweed, and satisfying all your sushi cravings at home.

INGREDIENTS
* 1 Can Tuna drained
* 2 Tbsp Sriracha
* 1/4 Cup Mayo
* 1 Tbsp Sesame Oil
* 2 Tbsp Furikake
* 1 Cup White Rice cooked
* 1 tsp Sugar
* 1/2 Tbsp Rice Vinegar
* 1 Packet Seasoned Seaweed

INSTRUCTIONS
* Preheat your oven to 400F and prepare a 6-inch baking pan.
* In a bowl, add in your rice and heat it in the microwave for 1 minute. This is so it’s easier for the sugar and rice vinegar to soak in. Add in your rice vinegar and sugar and mix well.
* Next, add in the rice mixture to your baking pan in an even layer. Sprinkle furikake on top.
* Use the same bowl that you mixed up your rice in and add in your drained canned tuna, sesame oil, sriracha, and mayo and mix well.
* Add the layer of saucy tuna on your rice layer evenly on top. Sprinkle with furikake.
* Bake at 400F for 20-30 minutes or until the top is golden brown.
* Serve with a side of seasoned seaweed and enjoy!


sushi bake canned tuna, spicy tuna sushi bake, tuna sushi bake, spicy tuna sushi, sushi bake tuna, spicy tuna mayo sushi, canned tuna, sushi bake, easy sushi bake, sushi bake dish, sushi bake asmr, baked sushi, easy baked sushi, sushi bake tutorial, spicy tuna, easy sushi bake ideas, sushi bake steps, viral sushi bake, sushi bake how to, sushi bake trend, sushi baked recipe, easy sushi bake recipe, how to make a sushi bake, sushi bake recipe, tiktok sushi bake, sushi bake tiktok
Spicy Canned Tuna Sushi Bake 🐟🍣 This Spicy Canned Spicy Canned Tuna Sushi Bake 🐟🍣

This Spicy Canned Tuna Sushi Bake is creamy, savory, and packed with bold flavor! Made with simple pantry ingredients, it’s an easy, budget-friendly twist on sushi! It is perfect for sharing, scooping with seaweed, and satisfying all your sushi cravings at home.

INGREDIENTS
* 1 Can Tuna drained
* 2 Tbsp Sriracha
* 1/4 Cup Mayo
* 1 Tbsp Sesame Oil
* 2 Tbsp Furikake
* 1 Cup White Rice cooked
* 1 tsp Sugar
* 1/2 Tbsp Rice Vinegar
* 1 Packet Seasoned Seaweed

INSTRUCTIONS
* Preheat your oven to 400F and prepare a 6-inch baking pan.
* In a bowl, add in your rice and heat it in the microwave for 1 minute. This is so it’s easier for the sugar and rice vinegar to soak in. Add in your rice vinegar and sugar and mix well.
* Next, add in the rice mixture to your baking pan in an even layer. Sprinkle furikake on top.
* Use the same bowl that you mixed up your rice in and add in your drained canned tuna, sesame oil, sriracha, and mayo and mix well.
* Add the layer of saucy tuna on your rice layer evenly on top. Sprinkle with furikake.
* Bake at 400F for 20-30 minutes or until the top is golden brown.
* Serve with a side of seasoned seaweed and enjoy!�

sushi bake canned tuna, spicy tuna sushi bake, tuna sushi bake, spicy tuna sushi, sushi bake tuna, spicy tuna mayo sushi, canned tuna, sushi bake, easy sushi bake, sushi bake dish, sushi bake asmr, baked sushi, easy baked sushi, sushi bake tutorial, spicy tuna, easy sushi bake ideas, sushi bake steps, viral sushi bake, sushi bake how to, sushi bake trend, sushi baked recipe, easy sushi bake recipe, how to make a sushi bake, sushi bake recipe, tiktok sushi bake, sushi bake tiktok
Banana Bread Syrup 🍌 This Banana Bread Syrup is Banana Bread Syrup 🍌 

This Banana Bread Syrup is warm, sweet, and full of cozy flavor just like your favorite homemade loaf in liquid form! Perfect for coffee, pancakes, waffles, or desserts, it’s an easy homemade syrup that adds a comforting, bakery-style touch to any treat 💛

INGREDIENTS
* 1/2 Cup White Sugar
* 1/2 Cup Brown Sugar
* 1 Mashed Ripe Banana
* 1 tsp Vanilla Extract
* 1/2 tsp Cinnamon
* 1 Cup Water

INSTRUCTIONS
* In a small saucepan over medium heat, combine water, white sugar, and brown sugar.
* Stir until the sugars fully dissolve and the mixture begins to gently simmer.
* Add the mashed banana and cinnamon. Simmer for 5–8 minutes, stirring occasionally.
* Remove from heat and stir in the vanilla extract.
* Strain the syrup (optional for a smoother texture) and let cool.
* Transfer to a jar or bottle and store in the fridge.

banana bread syrup, banana bread, banana latte, banana bread latte, banana bread matcha latte, copycat starbucks banana bread matcha latte, banana bread breve, banana bread, copycat starbucks iced banana bread matcha latte, copycat starbucks banana bread matcha, copycat starbucks iced banana bread matcha recipe, iced latte, banana milk, banana coffee, banana coffee recipe, fun latte recipes, banana coffee syrup,
Banana Bread Syrup 🍌 This Banana Bread Syrup is Banana Bread Syrup 🍌 

This Banana Bread Syrup is warm, sweet, and full of cozy flavor just like your favorite homemade loaf in liquid form! Perfect for coffee, pancakes, waffles, or desserts, it’s an easy homemade syrup that adds a comforting, bakery-style touch to any treat 💛

INGREDIENTS
* 1/2 Cup White Sugar
* 1/2 Cup Brown Sugar
* 1 Mashed Ripe Banana
* 1 tsp Vanilla Extract
* 1/2 tsp Cinnamon
* 1 Cup Water

INSTRUCTIONS
* In a small saucepan over medium heat, combine water, white sugar, and brown sugar.
* Stir until the sugars fully dissolve and the mixture begins to gently simmer.
* Add the mashed banana and cinnamon. Simmer for 5–8 minutes, stirring occasionally.
* Remove from heat and stir in the vanilla extract.
* Strain the syrup (optional for a smoother texture) and let cool.
* Transfer to a jar or bottle and store in the fridge.�
banana bread syrup, banana bread, banana latte, banana bread latte, banana bread matcha latte, copycat starbucks banana bread matcha latte, banana bread breve, banana bread, copycat starbucks iced banana bread matcha latte, copycat starbucks banana bread matcha, copycat starbucks iced banana bread matcha recipe, iced latte, banana milk, banana coffee, banana coffee recipe, fun latte recipes, banana coffee syrup,

Copyright © 2026 Lynn Mumbing Mejia · Theme by 17th Avenue