Hello! I'm Lynn.
  • About Me
  • Work With Me
  • Contact Me
  • Subscribe
  • Home
    • About
    • Contact
    • Disclaimer
    • Terms & Conditions
    • Privacy Policy
    • Subscribe
      • Work With Me
        • Media Kit
        • Portfolio and Samples
  • diy
  • lifestyle
    • home decor
  • recipes
  • gifts, parties & holidays
  • health & wellness with lynn

Lynn Mumbing Mejia

Crafting coziness, one recipe, DIY project, and holiday celebration at a time.

diy, home decor · March 1, 2025

DIY Pretty Spring Wreath

*This post may contain affiliate or sponsored links, which means I may get paid or receive a commission if you purchase through my link, at no extra cost to you!*

Read more for all the details on DIY Spring Wreath.

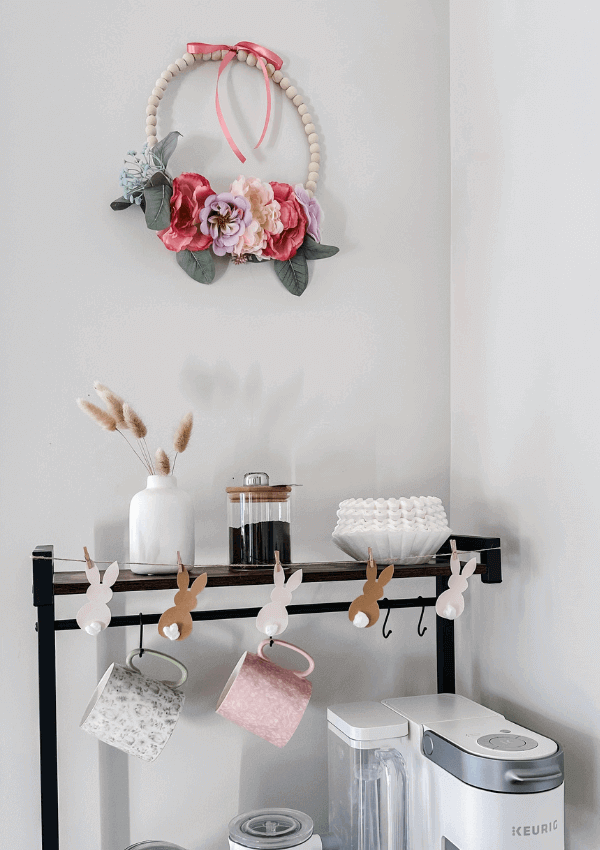
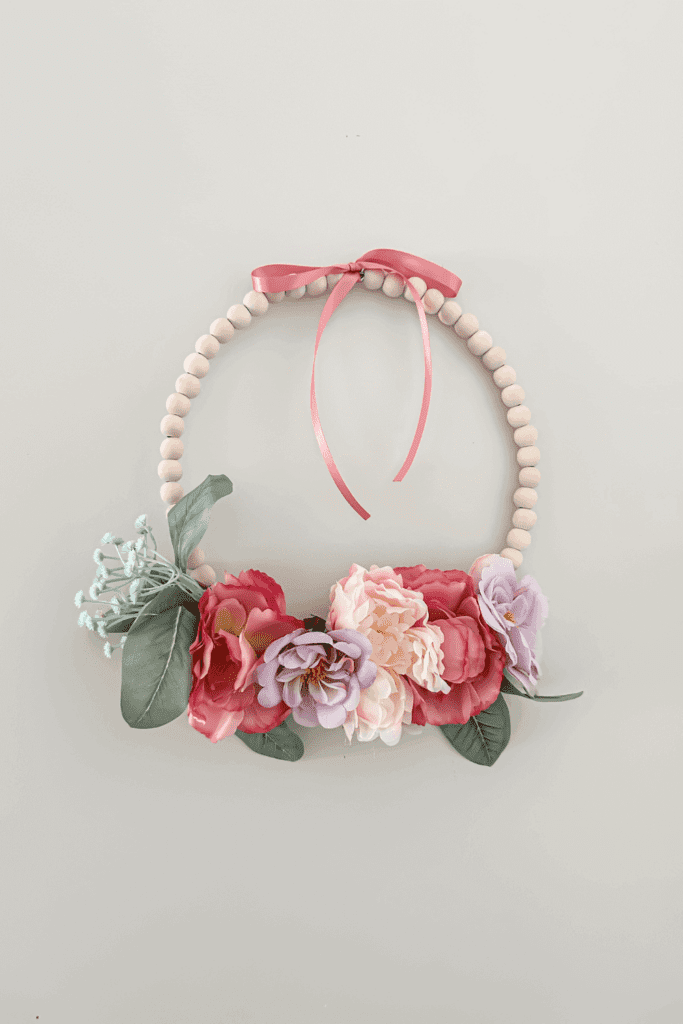
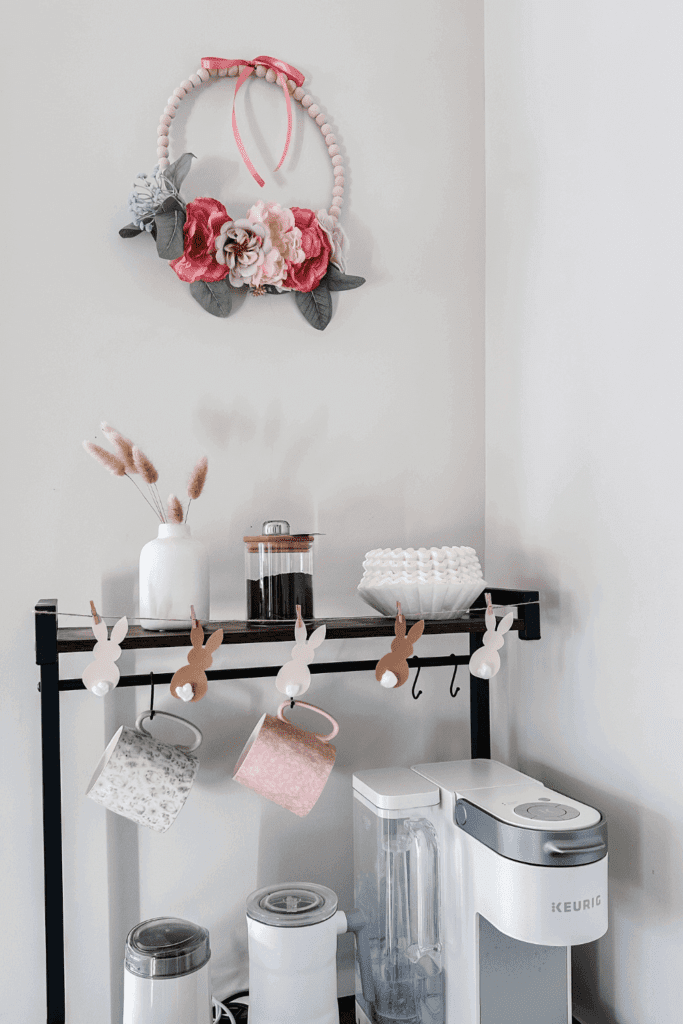
Step your home into spring! One thing I absolutely love about spring is that it feels like a breath of fresh air! The days are brighter and it feels like color is coming back into the world! After a long stretch of snowy, dark days, spring could not come any sooner! Pink is my fav color so I had to make a cute and easy spring DIY wreath!

PIN DIY Spring Wreath FOR LATER:
DIY Pretty Spring Wreath - Featured Blog Pin 1 - Lynn Mumbing Mejia

A YouTube Tutorial accompanies this DIY Pretty Spring Wreath. If you haven’t subscribed to me on YouTube, don’t forget to!

Table of Contents

Toggle
  • HERE IS HOW TO MAKE A DIY PRETTY SPRING WREATH:
    • WHERE CAN YOU FIND THE MATERIALS TO MAKE THIS DIY PRETTY SPRING WREATH?
    • WHAT ARE THE MATERIALS/EQUIPMENT NEEDED FOR THIS DIY PRETTY SPRING WREATH?
    • CAN I SUBSTITUTE ANY MATERIALS OUT?
    • DOES THE WREATH LAST TO USE FOR THE FOLLOWING YEARS?
    • HOW LONG DOES IT TAKE TO PUT TOGETHER?
    • INSPIRATIONS FOR THIS DIY?
    • STEPS TO PUT TOGETHER THIS DIY PRETTY SPRING WREATH:
      • Step 1: Prepare Hot Glue Gun
      • Step 2: Cut Your Preferred Ribbon Length
      • Step 3: Plan Out Flowers/Greenery On Wreath Frame
      • Step 4: Glue Flowers/Greenery Onto Wreath Frame
      • Step 5: Tie Pink Ribbon On Top Of Wreath

HERE IS HOW TO MAKE A DIY PRETTY SPRING WREATH:

WHERE CAN YOU FIND THE MATERIALS TO MAKE THIS DIY PRETTY SPRING WREATH?

This DIY is super easy! I found everything I needed at Michaels and the dollar store! You should also be able to find everything online as well!

WHAT ARE THE MATERIALS/EQUIPMENT NEEDED FOR THIS DIY PRETTY SPRING WREATH?

Here is what you will need for this super pretty Spring wreath!

  • Wood Bead Wreath Frame
  • Pretty Spring Flower Bouquet – you can use as many flowers as you’d like!
  • Pink Satin Ribbon – thickness of the ribbon is up to you! I used red thin ribbon for this 
  • Hot Glue Gun
  • Scissors

These are some of Amazon crafting favs!

CAN I SUBSTITUTE ANY MATERIALS OUT?

You sure can! I make a pink and purple accent wreath but you can use any flowers and colors you’d like! You can do yellow, blue, orange, white flowers etc! For the ribbon, I really love the satin look but you can also use any ribbon you’d like! Pink satin is just so dang pretty!

DOES THE WREATH LAST TO USE FOR THE FOLLOWING YEARS?

Yes! As long as you glue the flowers onto the wreath properly and take care of the wreath, it will last for years to come! I love this wreath and will be hanging it up every year! It brightens the house so nicely and I just adore pink so much!

HOW LONG DOES IT TAKE TO PUT TOGETHER?

This has to be the fastest DIY I’ve ever made! I don’t know if it was just the day but I was able to do this within 10 minutes! I guess I just had a vision and knew how I wanted the flowers to look! I would say generally speaking, this should not take you more than 20 minutes! So quick and easy I love it! I see wreaths sold online and in store for sometimes hundreds of dollars and can’t stomach spending that much!

INSPIRATIONS FOR THIS DIY?

I made this super cute Easy Dollar Tree Valentine Wreath and loved how it turned out! I love wreaths so much and I honestly hang them anywhere that has a nail in around my house haha. I know people only hang wreaths on doors but I truly do not care. I love wreaths but never want to spend a bunch of money on one so I took it into my own hands and have been making my own! I’m excited for more wreath making to come!

STEPS TO PUT TOGETHER THIS DIY PRETTY SPRING WREATH:

Step 1: Prepare Hot Glue Gun

Plug in your hot glue gun and give it time to warm up.

Step 2: Cut Your Preferred Ribbon Length

Cut how much ribbon you want to use on the top of your wreath.

Step 3: Plan Out Flowers/Greenery On Wreath Frame

I usually like to plan out the f;power placement to make sure I’m glueing it in the right places! I used all the flowers and greenery in a small bouquet I bought from Michaels for this DIY but you can use as many flowers as you’d like even filling up the wreath with flowers all around if you’d like!

Step 4: Glue Flowers/Greenery Onto Wreath Frame

Glue your flowers and greenery on the wreath frame.

Step 5: Tie Pink Ribbon On Top Of Wreath

Finally tie your ribbon on top and you’re done!

Thank you for making it to the end of this post! I hope that you enjoyed reading this and make your own easy DIY Spring Wreath! Wooohooo! Spring vibes, here we come!

Xo,

Lynn

Are you going to try making this DIY Pretty Spring Wreath?! Don’t forget to tag me if you do!

DIY Pretty Spring Wreath - Tag Us - Lynn Mumbing Mejia

This blog post is all the details on DIY Pretty Spring Wreath.

P.S: If you haven’t read my most recent post, click here!

PIN DIY Spring Wreath FOR LATER:
DIY Pretty Spring Wreath - Featured Blog Pin 2 - Lynn Mumbing Mejia

If you liked reading DIY Pretty Spring Wreath, you might like these as well!

Easy Dollar Tree Valentine Wreath

25+ Super Cute Boho Fall Wreath Ideas

DIY Dollar Tree Ornament Wreath

Christmas Vegetable Wreath

This is the end of DIY Spring Wreath.

Shop The Post

Posted In: diy, home decor · Tagged: DIY craft projects, diy craft trends, diy crafts, diy crafts for adults, DIY dollar tree, diy home decor, diy wreath, door wreath, home decor crafts, hoop wreath, spring wreath, spring wreath for door, spring wreaths, wood bead wreath, wreath for spring

Get on the List

You’ll Also Love

Easy DIY Cute Phone Charm
DIY All-year Round Neutral Wreath
Easy DIY Ribbon Garland
Next Post >

Easy Cinnabunnies

About Photo
Hey there friend! My name is Lynn and I'm a Canadian Content Creator who's focused on Minimal & Neutral Home Decor Inspo, Simple & Budget Friendly DIY Projects, All Things Holidays and Quick & Easy Recipes. I'm so happy you're here and I hope you'll find something that you love!

Categories

follow lynn

  • Facebook
  • Instagram
  • Pinterest
  • Twitter
  • YouTube

Search

Join Us!

Trending Now

Popular Posts

Links

  • About
  • Contact
  • Disclaimer
  • Privacy Policy
  • Terms & Conditions

Socials

  • Instagram
  • Youtube
  • Facebook
  • Twitter
  • Pinterest

Shop

  • Home Wall Art
  • Recipe Cards
  • Greeting Cards
  • Planner Templates

JOIN THE INNER CIRCLE

Asian Sesame Vermicelli Salad 🥗 This Asian Sesam Asian Sesame Vermicelli Salad 🥗 

This Asian Sesame Vermicelli Salad is light, refreshing, and packed with flavor! Tender vermicelli noodles are tossed with crisp veggies and a savory sesame dressing for an easy, vibrant dish that’s perfect for lunches, meal prep, or summer gatherings.

INGREDIENTS
* 3 Bundles Vermicelli about 150g uncooked
* 1 Cup Purple Cabbage thinly shredded 
* 1 Cup Red Peppers thinly shredded 
* 1 Cup Carrots thinly shredded 
* 1/2 Cup Edamame
* 2 Stalks Green Onion thinly sliced 

Sauce
* 1 Clove Garlic grated
* 2 Tbsp Sesame Oil
* 1 tsp Sesame Oil
* 2 Tbsp Soy Sauce
* 1 Tbsp Brown Sugar
* 1 Tbsp Rice Vinegar

INSTRUCTIONS
* Cook the vermicelli noodles according to package instructions. Drain and rinse under cold water.
* In a large bowl, combine the cooked vermicelli, cabbage, red bell pepper, carrot, edamame, and green onions.
* In a small bowl, whisk together garlic, sesame oil, sesame seeds, soy sauce, brown sugar, and rice vinegar until well combined.
* Pour the sauce over the salad and toss until evenly coated.
* Chill in the fridge before serving for extra flavor for minimally 12 hours! Enjoy!

vietnamese vermicelli salad recipe, vermicelli noodle salad, vermicelli salad recipe, how to make vermicelli noodle salad, vermicelli noodles salad recipe, asian salad, asian salad dressing, how to make vietnamese vermicelli noodle salad recipe, asian noodle salad, asian salad recipe, easy sesame noodle salad, asian cold noodle salad, glass noodle salad with sesame dressing, bean vermicelli, ramen salad, vegan salad, vegetarian salad, sesame sauce, sesame sauce recipe
Poppy Seed Almond Muffins 🤎 Have you ever tried C Poppy Seed Almond Muffins 🤎

Have you ever tried Costco’s almond poppy seed muffins? If you have, this is a copycat version of it! It’s my fav muffin and I knew I had to recreate it at home!

These Poppy Seed Almond Muffins are soft, fluffy, and bursting with sweet almond flavor. With a tender crumb and delicate crunch from the poppy seeds, they’re the perfect cozy bakery-style treat for breakfast, snacking, or coffee breaks.

INGREDIENTS
* 2 1/4 Cups Flour
* 1/2 tsp Salt
* 1/2 tsp Baking Soda
* 1/2 tsp Baking Powder
* 3/4 Cup Oil 
* 1 Cup White Sugar
* 2 Eggs
* 1 tsp Vanilla Extract
* 1 Tbsp Almond Extract 
* 3/4 Cup Sour Cream
* 1/4 Cup Milk
* 2 Tbsp Poppy Seeds
* 1/4 Cup Slivered Almonds sprinkle on top

INSTRUCTIONS
* Preheat oven to 350°F and line a 12-cup muffin tin with liners or lightly grease it.
* In a large bowl, whisk together oil, sugar, eggs, vanilla extract, almond extract, sour cream, and milk until smooth.
* Add flour, salt, baking soda, and baking powder directly into the same bowl. Gently mix until just combined.
* Fold in the poppy seeds.
* Divide the batter evenly between the 12 muffin cups and sprinkle slivered almonds on top.
* Bake for 25 minutes, or until a toothpick inserted into the center comes out clean.
* Let cool slightly before serving.


almond poppy seed muffins, poppy seed muffins, costco copycat, costco copycat recipes, almond muffins, easy muffin recipes, simple muffins, poppy seed almond muffins
Spicy Canned Tuna Sushi Bake 🐟🍣 This Spicy Canned Spicy Canned Tuna Sushi Bake 🐟🍣

This Spicy Canned Tuna Sushi Bake is creamy, savory, and packed with bold flavor! Made with simple pantry ingredients, it’s an easy, budget-friendly twist on sushi! It is perfect for sharing, scooping with seaweed, and satisfying all your sushi cravings at home.

INGREDIENTS
* 1 Can Tuna drained
* 2 Tbsp Sriracha
* 1/4 Cup Mayo
* 1 Tbsp Sesame Oil
* 2 Tbsp Furikake
* 1 Cup White Rice cooked
* 1 tsp Sugar
* 1/2 Tbsp Rice Vinegar
* 1 Packet Seasoned Seaweed

INSTRUCTIONS
* Preheat your oven to 400F and prepare a 6-inch baking pan.
* In a bowl, add in your rice and heat it in the microwave for 1 minute. This is so it’s easier for the sugar and rice vinegar to soak in. Add in your rice vinegar and sugar and mix well.
* Next, add in the rice mixture to your baking pan in an even layer. Sprinkle furikake on top.
* Use the same bowl that you mixed up your rice in and add in your drained canned tuna, sesame oil, sriracha, and mayo and mix well.
* Add the layer of saucy tuna on your rice layer evenly on top. Sprinkle with furikake.
* Bake at 400F for 20-30 minutes or until the top is golden brown.
* Serve with a side of seasoned seaweed and enjoy!


sushi bake canned tuna, spicy tuna sushi bake, tuna sushi bake, spicy tuna sushi, sushi bake tuna, spicy tuna mayo sushi, canned tuna, sushi bake, easy sushi bake, sushi bake dish, sushi bake asmr, baked sushi, easy baked sushi, sushi bake tutorial, spicy tuna, easy sushi bake ideas, sushi bake steps, viral sushi bake, sushi bake how to, sushi bake trend, sushi baked recipe, easy sushi bake recipe, how to make a sushi bake, sushi bake recipe, tiktok sushi bake, sushi bake tiktok
Spicy Canned Tuna Sushi Bake 🐟🍣 This Spicy Canned Spicy Canned Tuna Sushi Bake 🐟🍣

This Spicy Canned Tuna Sushi Bake is creamy, savory, and packed with bold flavor! Made with simple pantry ingredients, it’s an easy, budget-friendly twist on sushi! It is perfect for sharing, scooping with seaweed, and satisfying all your sushi cravings at home.

INGREDIENTS
* 1 Can Tuna drained
* 2 Tbsp Sriracha
* 1/4 Cup Mayo
* 1 Tbsp Sesame Oil
* 2 Tbsp Furikake
* 1 Cup White Rice cooked
* 1 tsp Sugar
* 1/2 Tbsp Rice Vinegar
* 1 Packet Seasoned Seaweed

INSTRUCTIONS
* Preheat your oven to 400F and prepare a 6-inch baking pan.
* In a bowl, add in your rice and heat it in the microwave for 1 minute. This is so it’s easier for the sugar and rice vinegar to soak in. Add in your rice vinegar and sugar and mix well.
* Next, add in the rice mixture to your baking pan in an even layer. Sprinkle furikake on top.
* Use the same bowl that you mixed up your rice in and add in your drained canned tuna, sesame oil, sriracha, and mayo and mix well.
* Add the layer of saucy tuna on your rice layer evenly on top. Sprinkle with furikake.
* Bake at 400F for 20-30 minutes or until the top is golden brown.
* Serve with a side of seasoned seaweed and enjoy!�

sushi bake canned tuna, spicy tuna sushi bake, tuna sushi bake, spicy tuna sushi, sushi bake tuna, spicy tuna mayo sushi, canned tuna, sushi bake, easy sushi bake, sushi bake dish, sushi bake asmr, baked sushi, easy baked sushi, sushi bake tutorial, spicy tuna, easy sushi bake ideas, sushi bake steps, viral sushi bake, sushi bake how to, sushi bake trend, sushi baked recipe, easy sushi bake recipe, how to make a sushi bake, sushi bake recipe, tiktok sushi bake, sushi bake tiktok
Banana Bread Syrup 🍌 This Banana Bread Syrup is Banana Bread Syrup 🍌 

This Banana Bread Syrup is warm, sweet, and full of cozy flavor just like your favorite homemade loaf in liquid form! Perfect for coffee, pancakes, waffles, or desserts, it’s an easy homemade syrup that adds a comforting, bakery-style touch to any treat 💛

INGREDIENTS
* 1/2 Cup White Sugar
* 1/2 Cup Brown Sugar
* 1 Mashed Ripe Banana
* 1 tsp Vanilla Extract
* 1/2 tsp Cinnamon
* 1 Cup Water

INSTRUCTIONS
* In a small saucepan over medium heat, combine water, white sugar, and brown sugar.
* Stir until the sugars fully dissolve and the mixture begins to gently simmer.
* Add the mashed banana and cinnamon. Simmer for 5–8 minutes, stirring occasionally.
* Remove from heat and stir in the vanilla extract.
* Strain the syrup (optional for a smoother texture) and let cool.
* Transfer to a jar or bottle and store in the fridge.

banana bread syrup, banana bread, banana latte, banana bread latte, banana bread matcha latte, copycat starbucks banana bread matcha latte, banana bread breve, banana bread, copycat starbucks iced banana bread matcha latte, copycat starbucks banana bread matcha, copycat starbucks iced banana bread matcha recipe, iced latte, banana milk, banana coffee, banana coffee recipe, fun latte recipes, banana coffee syrup,
Banana Bread Syrup 🍌 This Banana Bread Syrup is Banana Bread Syrup 🍌 

This Banana Bread Syrup is warm, sweet, and full of cozy flavor just like your favorite homemade loaf in liquid form! Perfect for coffee, pancakes, waffles, or desserts, it’s an easy homemade syrup that adds a comforting, bakery-style touch to any treat 💛

INGREDIENTS
* 1/2 Cup White Sugar
* 1/2 Cup Brown Sugar
* 1 Mashed Ripe Banana
* 1 tsp Vanilla Extract
* 1/2 tsp Cinnamon
* 1 Cup Water

INSTRUCTIONS
* In a small saucepan over medium heat, combine water, white sugar, and brown sugar.
* Stir until the sugars fully dissolve and the mixture begins to gently simmer.
* Add the mashed banana and cinnamon. Simmer for 5–8 minutes, stirring occasionally.
* Remove from heat and stir in the vanilla extract.
* Strain the syrup (optional for a smoother texture) and let cool.
* Transfer to a jar or bottle and store in the fridge.�
banana bread syrup, banana bread, banana latte, banana bread latte, banana bread matcha latte, copycat starbucks banana bread matcha latte, banana bread breve, banana bread, copycat starbucks iced banana bread matcha latte, copycat starbucks banana bread matcha, copycat starbucks iced banana bread matcha recipe, iced latte, banana milk, banana coffee, banana coffee recipe, fun latte recipes, banana coffee syrup,

Copyright © 2026 Lynn Mumbing Mejia · Theme by 17th Avenue