Hello! I'm Lynn.
  • About Me
  • Work With Me
  • Contact Me
  • Subscribe
  • Home
    • About
    • Contact
    • Disclaimer
    • Terms & Conditions
    • Privacy Policy
    • Subscribe
      • Work With Me
        • Media Kit
        • Portfolio and Samples
  • diy
  • lifestyle
    • home decor
  • recipes
  • gifts, parties & holidays
  • health & wellness with lynn

Lynn Mumbing Mejia

Crafting coziness, one recipe, DIY project, and holiday celebration at a time.

gifts/parties/holidays, recipes · February 25, 2025

Easy Cinnabunnies

*This post may contain affiliate or sponsored links, which means I may get paid or receive a commission if you purchase through my link, at no extra cost to you!*
Jump to Recipe Print Recipe

Read more for all the details on Easy Cinnabunnies.

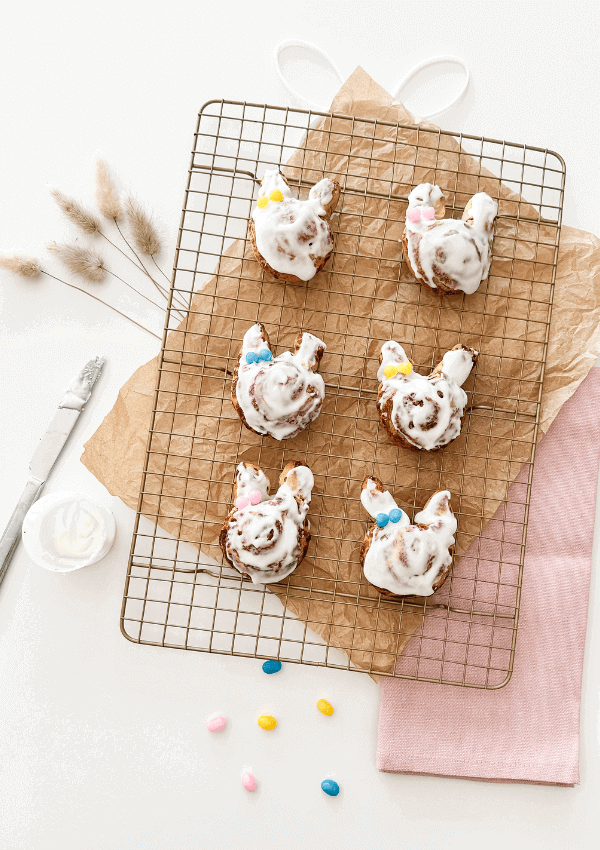
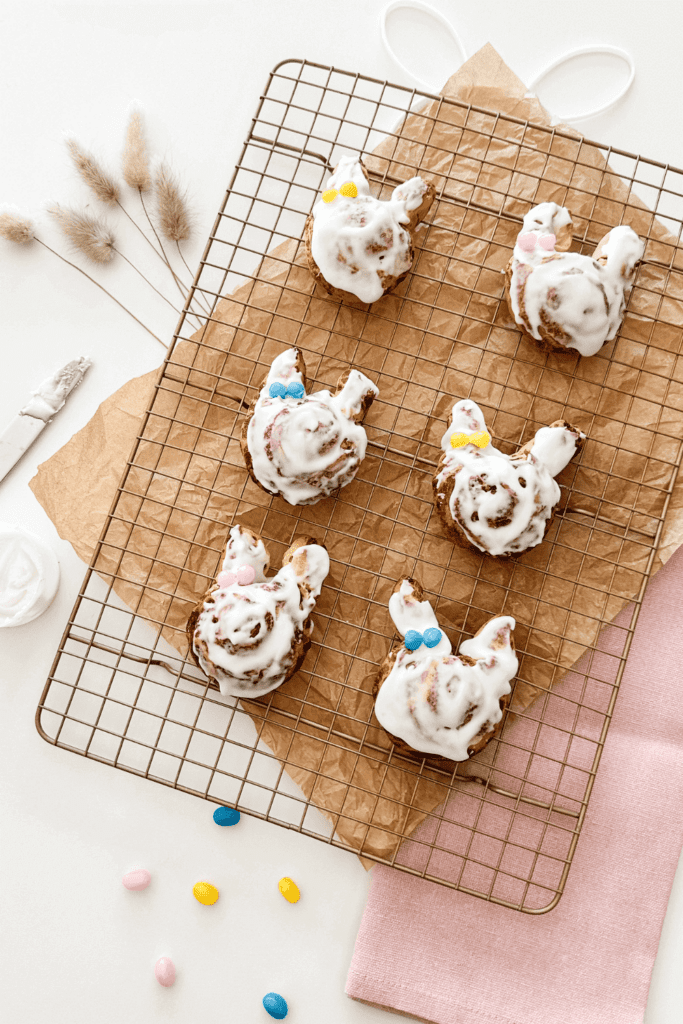
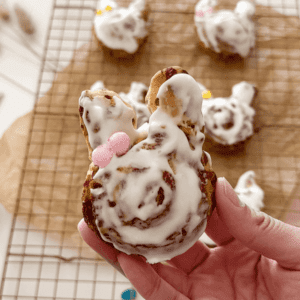
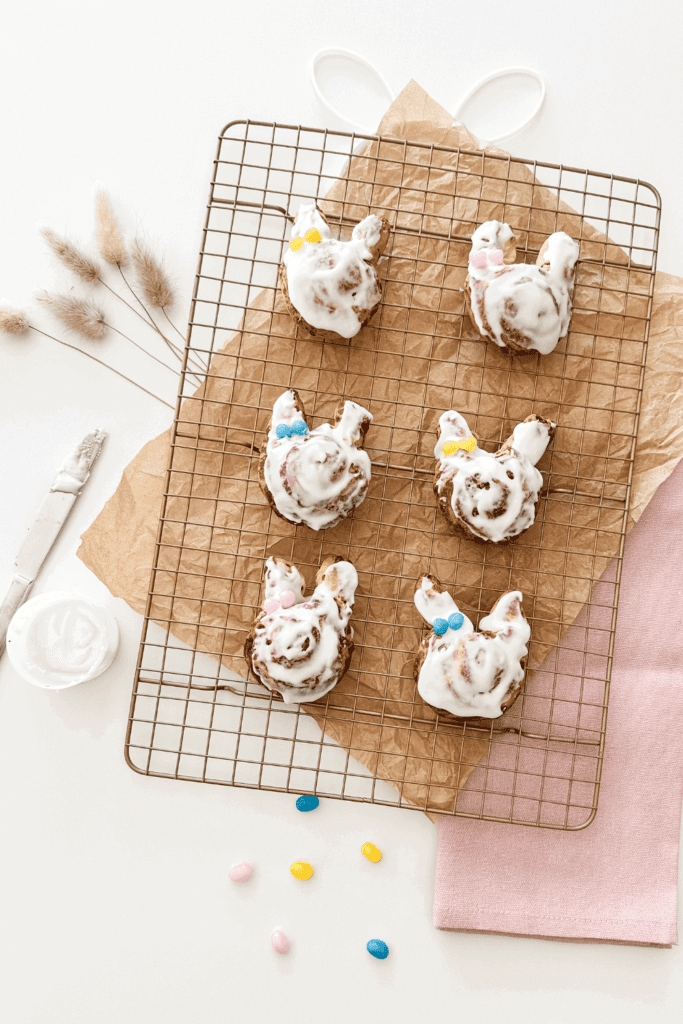
I am a huge fan of all things cute so easter is always something I look forward to! Just like Valentine’s day with heart shaped foods, bunny shaped foods are also a big hit in my household! I love these easy bunny cinnamon buns and they make eating cinnamon buns that much cuter! Only two ingredients used for this recipe and is ready within half an hour!

PIN Easy Cinnabunnies FOR LATER:
Easy Cinnabunnies - Featured Blog Pin 1 Image - Lynn Mumbing Mejia

This Easy Cinnabunnies recipe is accompanied by a YouTube Tutorial. If you haven’t subscribed to me on YouTube, don’t forget to!

Table of Contents

Toggle
  • HERE IS HOW TO MAKE EASY CINNABUNNIES:
    • WHERE CAN I FIND THESE INGREDIENTS?
    • WHAT ARE THE INGREDIENTS?
    • WHAT EQUIPMENT DO I NEED?
    • CAN I SUBSTITUTE/ADD ANYTHING OUT?
    • WHAT DO EASY CINNABUNNIES TASTE LIKE?
    • HOW LONG DOES IT KEEP FOR?
    • INSPIRATIONS FOR THIS RECIPE?
    • ANY OTHER NOTES?
    • Easy Cinnabunnies
      • Ingredients  
      • Instructions 

HERE IS HOW TO MAKE EASY CINNABUNNIES:

WHERE CAN I FIND THESE INGREDIENTS?

The ingredients to make these delicious cinnabunnies can be found at your local grocery store. You’ll just need pre-made cinnamon roll dough and some easter candy! I just used jelly beans because I loved the cute pastel colors it came in but you can use chocolates or other candy that is available at the store!

WHAT ARE THE INGREDIENTS?

This recipe has only 2 ingredients! Woohoo! We love two ingredient recipes but to make bunny shaped cinnamon buns, you will need:

  • Pillsbury Cinnamon Rolls With Icing
  • Easter Candy

WHAT EQUIPMENT DO I NEED?

The equipment needed for this recipe is super minimal! All you really need is basic kitchen items like a baking tray, parchment paper, a spoon, knife and that’s pretty much it!

Here are my fav Amazon kitchen items!

CAN I SUBSTITUTE/ADD ANYTHING OUT?

You can of course do what you’d like to this recipe! These cinnabunnies are meant to be a super fun recipe that’s easy and affordable! Some recipes require lots of ingredients which honestly can add up so quick! If you do want to make any changes to this recipe or use it as inspo, please do! Here are a few creative ways to change up this recipe!

  • Add some food color to the icing! I just kept it white but to make it extra fun, you can add some pink, yellow, pruple, blue or green food coloring to make it extra colorful!
  • Add some colorful sprinkle son top
  • Add some chocolate chips, mini marshmallows or other toppings
  • Add some jam or fruity syrup on top

WHAT DO EASY CINNABUNNIES TASTE LIKE?

If you’ve ever had ready-made cinnamon bun dough, you already know what it tastes like but I feel like Pillsbury products have a very distinct dough taste! These cinnamon buns are soft and delicious paired with a nice sugary icing!

HOW LONG DOES IT KEEP FOR?

I recommend enjoying this fresh but if you do have leftovers, they are good for 3 days. Just keep them in an airtight container in the fridge and warm in the microwave or toaster for 30 secs to 1 minute to enjoy again!

INSPIRATIONS FOR THIS RECIPE?

I love cinnamon buns but I’m not the strongest baker! I really enjoyed making these because they were so easy and I could to enjoy a cute treat without stressing about making everything from scratch. The bunny shapes just made everything even cuter and makes this the perfect easter treat!

ANY OTHER NOTES?

No other notes for this one! Enjoy and happy easter!

Easy Cinnabunnies

These cinnabunnies are an easy and cute Easter treat to enjoy! Soft and chewy cinnamon buns topped with delicious icing sugar make it the perfect sweet treat this Easter!
Print Recipe Pin Recipe
Prep Time 15 minutes mins
Cook Time 25 minutes mins
Course Dessert
Servings 8 cinnabunnies

Ingredients
  

  • 1 Package Pillsbury Cinnamon Buns with Icing
  • Easter Candy for bows I used 12 jelly beans and cut them in halves

Instructions
 

  • Preheat your oven as per your cinnamon bun package instructions and prepare a baking tray lined with parchment paper.
  • Open your cinnamon buns package and lay each cinnamon bun on a baking tray. Cut the first layer of the cinnamon bun off to form bunny ears and stick them on the top of the cinnamon bun.
  • Bake cinnamon buns as per package instructions then let cool.
  • Once the cinnamon buns are cool, spread a nice layer of icing on top.
  • Place your Easter candy to make bows on each bunny and make the icing harden.
  • Serve and enjoy!
Keyword Cinnabunnies

Thank you so much for reading this fun little recipe on cinnabunnies! Happy Easter! 👀🐰

Xo,

Lynn

Are you going to try making this Easy Cinnabunnies recipe?! Don’t forget to tag me if you do!

Easy Cinnabunnies - Tag Us - Lynn Mumbing Mejia

This blog post is all the details on Easy Cinnabunnies.

P.S: If you haven’t read my most recent post, click here!

PIN Easy Cinnabunnies FOR LATER:
Easy Cinnabunnies - Featured Blog Pin 2 Image - Lynn Mumbing Mejia

If you liked reading Easy Cinnabunnies, you might like these as well!

Cute Paper Easter Bunny Garland – Easy DIY!

Easter Oreos

DIY Dainty Painted Easter Eggs – Easy Easter Dollar Store Craft!

Easter Cake Mix Cookies

Easter Veggie Tray – Carrot Themed

Easter Mini Egg Cookies

This is the end of Easy Cinnabunnies.

Shop The Post

Posted In: gifts/parties/holidays, recipes · Tagged: bunny cinnamon, bunny cinnamon rolls, bunny shaped cinnamon rolls, cinnamon roll, cinnamon roll bunnies, cinnamon rolls, easter brunch, easter bunny, easter desserts, easter recipes, easter treats, easy easter, pillsbury cinnamon rolls

Get on the List

You’ll Also Love

Easter Chocolate Bark
Easter Oreos
Easter Cake Mix Cookies

Trackbacks

  1. DIY Easy Spring Stickers | Lynn Mumbing Mejia says:
    March 1, 2025 at

    […] P.S: If you haven’t read my most recent post, click here! […]

Next Post >

Easter Chocolate Bark

About Photo
Hey there friend! My name is Lynn and I'm a Canadian Content Creator who's focused on Minimal & Neutral Home Decor Inspo, Simple & Budget Friendly DIY Projects, All Things Holidays and Quick & Easy Recipes. I'm so happy you're here and I hope you'll find something that you love!

Categories

follow lynn

  • Facebook
  • Instagram
  • Pinterest
  • Twitter
  • YouTube

Search

Join Us!

Trending Now

Popular Posts

Links

  • About
  • Contact
  • Disclaimer
  • Privacy Policy
  • Terms & Conditions

Socials

  • Instagram
  • Youtube
  • Facebook
  • Twitter
  • Pinterest

Shop

  • Home Wall Art
  • Recipe Cards
  • Greeting Cards
  • Planner Templates

JOIN THE INNER CIRCLE

Asian Sesame Vermicelli Salad 🥗 This Asian Sesam Asian Sesame Vermicelli Salad 🥗 

This Asian Sesame Vermicelli Salad is light, refreshing, and packed with flavor! Tender vermicelli noodles are tossed with crisp veggies and a savory sesame dressing for an easy, vibrant dish that’s perfect for lunches, meal prep, or summer gatherings.

INGREDIENTS
* 3 Bundles Vermicelli about 150g uncooked
* 1 Cup Purple Cabbage thinly shredded 
* 1 Cup Red Peppers thinly shredded 
* 1 Cup Carrots thinly shredded 
* 1/2 Cup Edamame
* 2 Stalks Green Onion thinly sliced 

Sauce
* 1 Clove Garlic grated
* 2 Tbsp Sesame Oil
* 1 tsp Sesame Oil
* 2 Tbsp Soy Sauce
* 1 Tbsp Brown Sugar
* 1 Tbsp Rice Vinegar

INSTRUCTIONS
* Cook the vermicelli noodles according to package instructions. Drain and rinse under cold water.
* In a large bowl, combine the cooked vermicelli, cabbage, red bell pepper, carrot, edamame, and green onions.
* In a small bowl, whisk together garlic, sesame oil, sesame seeds, soy sauce, brown sugar, and rice vinegar until well combined.
* Pour the sauce over the salad and toss until evenly coated.
* Chill in the fridge before serving for extra flavor for minimally 12 hours! Enjoy!

vietnamese vermicelli salad recipe, vermicelli noodle salad, vermicelli salad recipe, how to make vermicelli noodle salad, vermicelli noodles salad recipe, asian salad, asian salad dressing, how to make vietnamese vermicelli noodle salad recipe, asian noodle salad, asian salad recipe, easy sesame noodle salad, asian cold noodle salad, glass noodle salad with sesame dressing, bean vermicelli, ramen salad, vegan salad, vegetarian salad, sesame sauce, sesame sauce recipe
Poppy Seed Almond Muffins 🤎 Have you ever tried C Poppy Seed Almond Muffins 🤎

Have you ever tried Costco’s almond poppy seed muffins? If you have, this is a copycat version of it! It’s my fav muffin and I knew I had to recreate it at home!

These Poppy Seed Almond Muffins are soft, fluffy, and bursting with sweet almond flavor. With a tender crumb and delicate crunch from the poppy seeds, they’re the perfect cozy bakery-style treat for breakfast, snacking, or coffee breaks.

INGREDIENTS
* 2 1/4 Cups Flour
* 1/2 tsp Salt
* 1/2 tsp Baking Soda
* 1/2 tsp Baking Powder
* 3/4 Cup Oil 
* 1 Cup White Sugar
* 2 Eggs
* 1 tsp Vanilla Extract
* 1 Tbsp Almond Extract 
* 3/4 Cup Sour Cream
* 1/4 Cup Milk
* 2 Tbsp Poppy Seeds
* 1/4 Cup Slivered Almonds sprinkle on top

INSTRUCTIONS
* Preheat oven to 350°F and line a 12-cup muffin tin with liners or lightly grease it.
* In a large bowl, whisk together oil, sugar, eggs, vanilla extract, almond extract, sour cream, and milk until smooth.
* Add flour, salt, baking soda, and baking powder directly into the same bowl. Gently mix until just combined.
* Fold in the poppy seeds.
* Divide the batter evenly between the 12 muffin cups and sprinkle slivered almonds on top.
* Bake for 25 minutes, or until a toothpick inserted into the center comes out clean.
* Let cool slightly before serving.


almond poppy seed muffins, poppy seed muffins, costco copycat, costco copycat recipes, almond muffins, easy muffin recipes, simple muffins, poppy seed almond muffins
Spicy Canned Tuna Sushi Bake 🐟🍣 This Spicy Canned Spicy Canned Tuna Sushi Bake 🐟🍣

This Spicy Canned Tuna Sushi Bake is creamy, savory, and packed with bold flavor! Made with simple pantry ingredients, it’s an easy, budget-friendly twist on sushi! It is perfect for sharing, scooping with seaweed, and satisfying all your sushi cravings at home.

INGREDIENTS
* 1 Can Tuna drained
* 2 Tbsp Sriracha
* 1/4 Cup Mayo
* 1 Tbsp Sesame Oil
* 2 Tbsp Furikake
* 1 Cup White Rice cooked
* 1 tsp Sugar
* 1/2 Tbsp Rice Vinegar
* 1 Packet Seasoned Seaweed

INSTRUCTIONS
* Preheat your oven to 400F and prepare a 6-inch baking pan.
* In a bowl, add in your rice and heat it in the microwave for 1 minute. This is so it’s easier for the sugar and rice vinegar to soak in. Add in your rice vinegar and sugar and mix well.
* Next, add in the rice mixture to your baking pan in an even layer. Sprinkle furikake on top.
* Use the same bowl that you mixed up your rice in and add in your drained canned tuna, sesame oil, sriracha, and mayo and mix well.
* Add the layer of saucy tuna on your rice layer evenly on top. Sprinkle with furikake.
* Bake at 400F for 20-30 minutes or until the top is golden brown.
* Serve with a side of seasoned seaweed and enjoy!


sushi bake canned tuna, spicy tuna sushi bake, tuna sushi bake, spicy tuna sushi, sushi bake tuna, spicy tuna mayo sushi, canned tuna, sushi bake, easy sushi bake, sushi bake dish, sushi bake asmr, baked sushi, easy baked sushi, sushi bake tutorial, spicy tuna, easy sushi bake ideas, sushi bake steps, viral sushi bake, sushi bake how to, sushi bake trend, sushi baked recipe, easy sushi bake recipe, how to make a sushi bake, sushi bake recipe, tiktok sushi bake, sushi bake tiktok
Spicy Canned Tuna Sushi Bake 🐟🍣 This Spicy Canned Spicy Canned Tuna Sushi Bake 🐟🍣

This Spicy Canned Tuna Sushi Bake is creamy, savory, and packed with bold flavor! Made with simple pantry ingredients, it’s an easy, budget-friendly twist on sushi! It is perfect for sharing, scooping with seaweed, and satisfying all your sushi cravings at home.

INGREDIENTS
* 1 Can Tuna drained
* 2 Tbsp Sriracha
* 1/4 Cup Mayo
* 1 Tbsp Sesame Oil
* 2 Tbsp Furikake
* 1 Cup White Rice cooked
* 1 tsp Sugar
* 1/2 Tbsp Rice Vinegar
* 1 Packet Seasoned Seaweed

INSTRUCTIONS
* Preheat your oven to 400F and prepare a 6-inch baking pan.
* In a bowl, add in your rice and heat it in the microwave for 1 minute. This is so it’s easier for the sugar and rice vinegar to soak in. Add in your rice vinegar and sugar and mix well.
* Next, add in the rice mixture to your baking pan in an even layer. Sprinkle furikake on top.
* Use the same bowl that you mixed up your rice in and add in your drained canned tuna, sesame oil, sriracha, and mayo and mix well.
* Add the layer of saucy tuna on your rice layer evenly on top. Sprinkle with furikake.
* Bake at 400F for 20-30 minutes or until the top is golden brown.
* Serve with a side of seasoned seaweed and enjoy!�

sushi bake canned tuna, spicy tuna sushi bake, tuna sushi bake, spicy tuna sushi, sushi bake tuna, spicy tuna mayo sushi, canned tuna, sushi bake, easy sushi bake, sushi bake dish, sushi bake asmr, baked sushi, easy baked sushi, sushi bake tutorial, spicy tuna, easy sushi bake ideas, sushi bake steps, viral sushi bake, sushi bake how to, sushi bake trend, sushi baked recipe, easy sushi bake recipe, how to make a sushi bake, sushi bake recipe, tiktok sushi bake, sushi bake tiktok
Banana Bread Syrup 🍌 This Banana Bread Syrup is Banana Bread Syrup 🍌 

This Banana Bread Syrup is warm, sweet, and full of cozy flavor just like your favorite homemade loaf in liquid form! Perfect for coffee, pancakes, waffles, or desserts, it’s an easy homemade syrup that adds a comforting, bakery-style touch to any treat 💛

INGREDIENTS
* 1/2 Cup White Sugar
* 1/2 Cup Brown Sugar
* 1 Mashed Ripe Banana
* 1 tsp Vanilla Extract
* 1/2 tsp Cinnamon
* 1 Cup Water

INSTRUCTIONS
* In a small saucepan over medium heat, combine water, white sugar, and brown sugar.
* Stir until the sugars fully dissolve and the mixture begins to gently simmer.
* Add the mashed banana and cinnamon. Simmer for 5–8 minutes, stirring occasionally.
* Remove from heat and stir in the vanilla extract.
* Strain the syrup (optional for a smoother texture) and let cool.
* Transfer to a jar or bottle and store in the fridge.

banana bread syrup, banana bread, banana latte, banana bread latte, banana bread matcha latte, copycat starbucks banana bread matcha latte, banana bread breve, banana bread, copycat starbucks iced banana bread matcha latte, copycat starbucks banana bread matcha, copycat starbucks iced banana bread matcha recipe, iced latte, banana milk, banana coffee, banana coffee recipe, fun latte recipes, banana coffee syrup,
Banana Bread Syrup 🍌 This Banana Bread Syrup is Banana Bread Syrup 🍌 

This Banana Bread Syrup is warm, sweet, and full of cozy flavor just like your favorite homemade loaf in liquid form! Perfect for coffee, pancakes, waffles, or desserts, it’s an easy homemade syrup that adds a comforting, bakery-style touch to any treat 💛

INGREDIENTS
* 1/2 Cup White Sugar
* 1/2 Cup Brown Sugar
* 1 Mashed Ripe Banana
* 1 tsp Vanilla Extract
* 1/2 tsp Cinnamon
* 1 Cup Water

INSTRUCTIONS
* In a small saucepan over medium heat, combine water, white sugar, and brown sugar.
* Stir until the sugars fully dissolve and the mixture begins to gently simmer.
* Add the mashed banana and cinnamon. Simmer for 5–8 minutes, stirring occasionally.
* Remove from heat and stir in the vanilla extract.
* Strain the syrup (optional for a smoother texture) and let cool.
* Transfer to a jar or bottle and store in the fridge.�
banana bread syrup, banana bread, banana latte, banana bread latte, banana bread matcha latte, copycat starbucks banana bread matcha latte, banana bread breve, banana bread, copycat starbucks iced banana bread matcha latte, copycat starbucks banana bread matcha, copycat starbucks iced banana bread matcha recipe, iced latte, banana milk, banana coffee, banana coffee recipe, fun latte recipes, banana coffee syrup,

Copyright © 2026 Lynn Mumbing Mejia · Theme by 17th Avenue