Hello! I'm Lynn.
  • About Me
  • Work With Me
  • Contact Me
  • Subscribe
  • Home
    • About
    • Contact
    • Disclaimer
    • Terms & Conditions
    • Privacy Policy
    • Subscribe
      • Work With Me
        • Media Kit
        • Portfolio and Samples
  • diy
  • lifestyle
    • home decor
  • recipes
  • gifts, parties & holidays
  • health & wellness with lynn

Lynn Mumbing Mejia

Crafting coziness, one recipe, DIY project, and holiday celebration at a time.

diy · February 23, 2026

DIY Watercolor Home Cafe Sign

*This post may contain affiliate or sponsored links, which means I may get paid or receive a commission if you purchase through my link, at no extra cost to you!*

Read more for all the details on DIY Watercolor Home Cafe Sign.

I will never shy away from DIY decor and art! There is just something about hanging and displaying my homemade art that I love so much! It truly makes my house feel like MY HOME and it always makes me so proud!! If you’re into watercolor painting, you need to make your own DIY coffee station sign! A very low budget yet fun DIY to make!

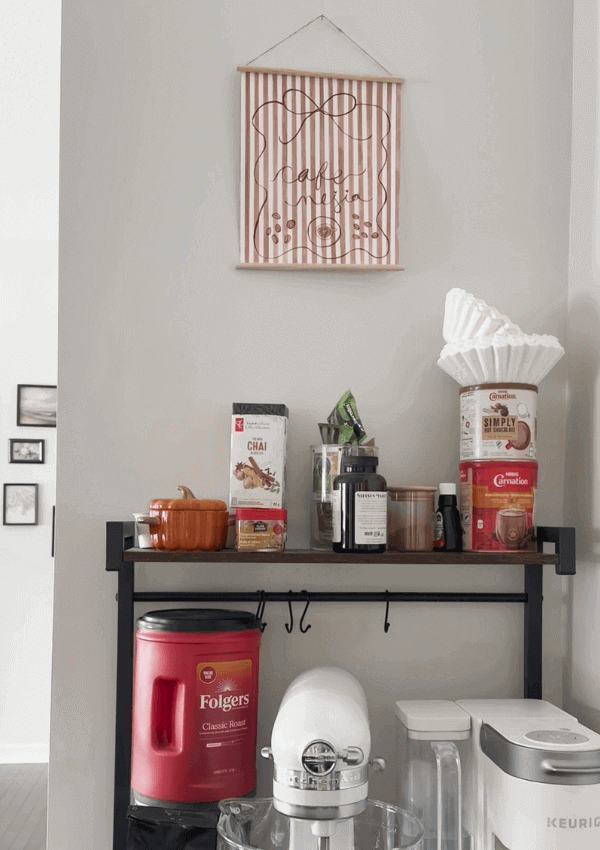
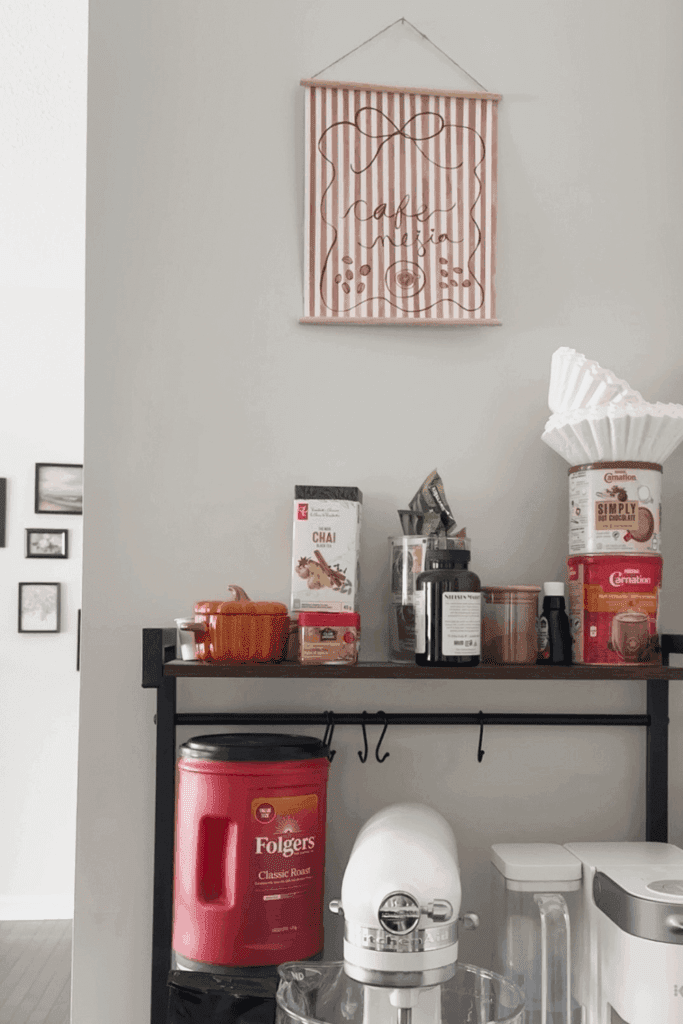
Create your own cozy coffee corner with this DIY Watercolor Home Café Sign! This easy, budget-friendly craft adds a soft, artistic touch to your space and is perfect for decorating your kitchen, coffee bar, or home café setup.

PIN DIY Watercolor Home Cafe Sign FOR LATER:

This DIY Watercolor Home Cafe Sign tutorial is accompanied by a YouTube Tutorial. If you haven’t subscribed to me on YouTube, don’t forget to!

Table of Contents

Toggle
  • HERE IS HOW TO MAKE A DIY WATERCOLOR HOME CAFE SIGN:
    • WHERE CAN YOU FIND THE MATERIALS TO MAKE THIS DIY WATERCOLOR HOME CAFE SIGN?
    • WHAT ARE THE MATERIALS/EQUIPMENT NEEDED FOR THIS DIY WATERCOLOR HOME CAFE SIGN?
    • CAN I SUBSTITUTE ANY MATERIALS OUT?
    • DOES THIS DIY LAST TO USE FOR THE FOLLOWING YEARS?
    • HOW LONG DOES IT TAKE TO PUT TOGETHER?
    • INSPIRATIONS FOR THIS DIY?
    • STEPS TO MAKE THIS DIY WATERCOLOR HOME CAFE SIGN:
      • Step 1: Tape up lines with thin painters tape
      • Step 2: Mix the colors that you’d like and paint
      • Step 3: Remove tape, mix darker colors and paint your cafe wording and accent icons
    • Step 4: Hang and enjoy!

HERE IS HOW TO MAKE A DIY WATERCOLOR HOME CAFE SIGN:

WHERE CAN YOU FIND THE MATERIALS TO MAKE THIS DIY WATERCOLOR HOME CAFE SIGN?

I got all my materials from Amazon! I took up watercolor painting back in 2020 and I can assure you that I am not any good however, I always love how watercolor looks and know that I’ll get better in time hehe I use cotton paper as it stops the paint bleed way better!

With watercolor painting, since it is water, the color often blooms so cotton paper stops that so you can better control your painting!

WHAT ARE THE MATERIALS/EQUIPMENT NEEDED FOR THIS DIY WATERCOLOR HOME CAFE SIGN?

Here is everything I used for this cute home cafe sign! To hang the sign, you can use a picture frame, tape or adhesive for the walls. I had a thin wooden dowel for a project that I never ended up doing and some twine so I used that and made a cute sign!

These are my materials I bought from Amazon! My original watercolor set is no longer available but this one is similar:

CAN I SUBSTITUTE ANY MATERIALS OUT?

Since I’m not an expert at watercolor painting, I really couldn’t be confident in any swaps for this! I also own an acrylic paint set so you can totally make this sign with different paint instead! The only thing with acrylic paint is that it takes a bit longer to dry so you’ll have to leave some time for it to dry, of course!

DOES THIS DIY LAST TO USE FOR THE FOLLOWING YEARS?

Yes!! As long as you take care of your painting, it can take for years and years! You’ll want to make sure that you don’t get it wet or bend it in any way. Hanging anything hand-painted in a frame is the best way to preserve a painting!

HOW LONG DOES IT TAKE TO PUT TOGETHER?

This took me a total of 3 hours however, I used thin painters tape for the striped lines and taping up my paper took longer than I thought it would. Aside from that, mixing colors to get to that perfect shade can also take some time and allowing it to dry!

I also had to hot glue the dowels and twine onto the painting before hanging but I’m sure this DIY can be under 3 hours!

INSPIRATIONS FOR THIS DIY?

When I bought my house, I knew I wanted to showcase a lot of DIY! I love creating and making things so this brought me so much joy to make! I love coffee so much and having a little cozy coffee and drink station is one of my favorite things. I usually hang something seasonal for Fall, Halloween and Christmas but I realized I didn’t have something all year round to hang in my coffee station so I decided to make a sign myself!

STEPS TO MAKE THIS DIY WATERCOLOR HOME CAFE SIGN:

Step 1: Tape up lines with thin painters tape

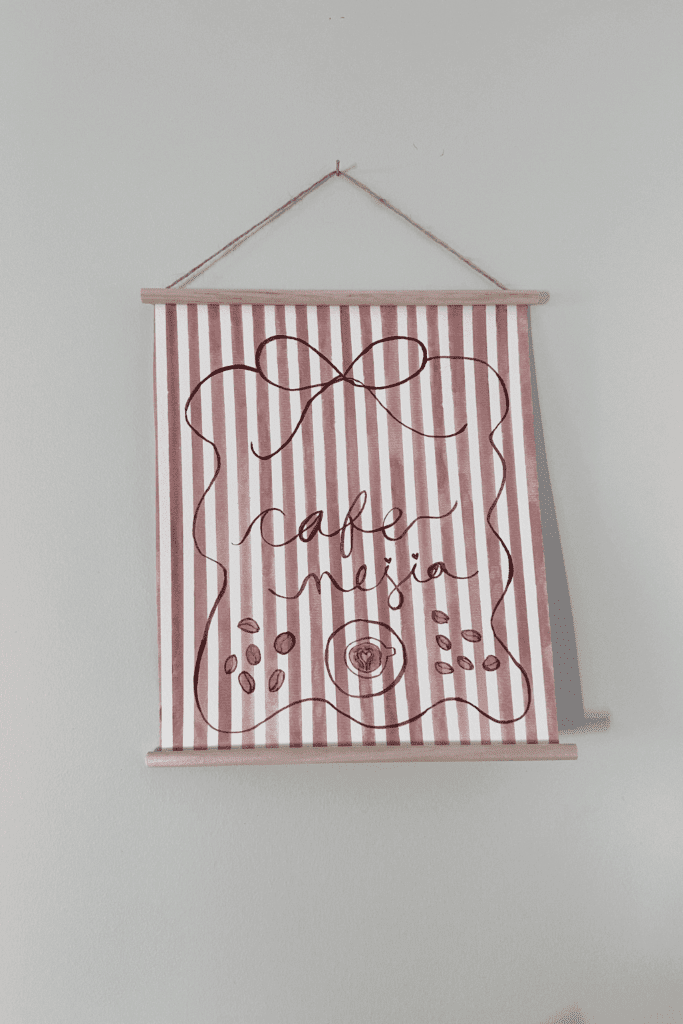
For this DIY, I wanted to do thin stripes so I bought thin painters tape from Amazon so it would be easier for me to paint lines! You can use a ruler to be precise but I just winged it! I didn’t care about the line spacing itself but just wanted the lines to be straight as I could get them.

Step 2: Mix the colors that you’d like and paint

Choose the color you’d like to paint the stripes. I wanted to keep a coffee/beige theme so I did light brown. Paint in between the painter tape and let dry for 15 mins!

Step 3: Remove tape, mix darker colors and paint your cafe wording and accent icons

Once the paint has dried a bit, you can remove the tape. Next, mix a darker color than the background and paint your cafe wording. I used a pencil first to trace it out as I’m not super confident in free-handing anything but you can do either! I chose Cafe Mejia as it’s my last name in kind of a cursive kind of not writing haha and write a latte and some coffee beans!

Step 4: Hang and enjoy!

Hang the painting however you choose and enjoy!

Thank you so much for following this blog post on how to make a DIY Watercolor Home Cafe Sign!

Xo,

Lynn

Are you going to try making this DIY Watercolor Home Cafe Sign?! Don’t forget to tag me if you do!

DIY Watercolor Home Cafe Sign - Tag Us - Lynn Mumbing Mejia

This blog post is all the details on DIY Watercolor Home Cafe Sign.

P.S: If you haven’t read my most recent post, click here!

PIN DIY Watercolor Home Cafe Sign FOR LATER:

If you liked reading DIY Watercolor Home Cafe Sign, you might like these as well!

Easy DIY Ribbon Garland

DIY Pretty Spring Wreath

DIY Pretty Spring Wreath

This is the end of DIY Watercolor Home Cafe Sign.

Shop The Post

Posted In: diy · Tagged: coffee station, coffee station at home, DIY, diy coffee station, diy wall art, diy watercolor, diy watercolor art, easy DIY wall art projects, home cafe sign, how to make wall art prints, wall art, wall decor, watercolor paint, watercolor painting

Get on the List

You’ll Also Love

10+ Coffee Bar Styling Ideas
How You Can Make Paper Crafts Last For a Long Time | GUEST POST
How To Develop Patience When Doing DIY Crafts | GUEST POST
Next Post >

Kimchi Avocado Toast

About Photo
Hey there friend! My name is Lynn and I'm a Canadian Content Creator who's focused on Minimal & Neutral Home Decor Inspo, Simple & Budget Friendly DIY Projects, All Things Holidays and Quick & Easy Recipes. I'm so happy you're here and I hope you'll find something that you love!

Categories

follow lynn

  • Facebook
  • Instagram
  • Pinterest
  • Twitter
  • YouTube

Search

Join Us!

Trending Now

Popular Posts

Links

  • About
  • Contact
  • Disclaimer
  • Privacy Policy
  • Terms & Conditions

Socials

  • Instagram
  • Youtube
  • Facebook
  • Twitter
  • Pinterest

Shop

  • Home Wall Art
  • Recipe Cards
  • Greeting Cards
  • Planner Templates

JOIN THE INNER CIRCLE

Asian Sesame Vermicelli Salad 🥗 This Asian Sesam Asian Sesame Vermicelli Salad 🥗 

This Asian Sesame Vermicelli Salad is light, refreshing, and packed with flavor! Tender vermicelli noodles are tossed with crisp veggies and a savory sesame dressing for an easy, vibrant dish that’s perfect for lunches, meal prep, or summer gatherings.

INGREDIENTS
* 3 Bundles Vermicelli about 150g uncooked
* 1 Cup Purple Cabbage thinly shredded 
* 1 Cup Red Peppers thinly shredded 
* 1 Cup Carrots thinly shredded 
* 1/2 Cup Edamame
* 2 Stalks Green Onion thinly sliced 

Sauce
* 1 Clove Garlic grated
* 2 Tbsp Sesame Oil
* 1 tsp Sesame Oil
* 2 Tbsp Soy Sauce
* 1 Tbsp Brown Sugar
* 1 Tbsp Rice Vinegar

INSTRUCTIONS
* Cook the vermicelli noodles according to package instructions. Drain and rinse under cold water.
* In a large bowl, combine the cooked vermicelli, cabbage, red bell pepper, carrot, edamame, and green onions.
* In a small bowl, whisk together garlic, sesame oil, sesame seeds, soy sauce, brown sugar, and rice vinegar until well combined.
* Pour the sauce over the salad and toss until evenly coated.
* Chill in the fridge before serving for extra flavor for minimally 12 hours! Enjoy!

vietnamese vermicelli salad recipe, vermicelli noodle salad, vermicelli salad recipe, how to make vermicelli noodle salad, vermicelli noodles salad recipe, asian salad, asian salad dressing, how to make vietnamese vermicelli noodle salad recipe, asian noodle salad, asian salad recipe, easy sesame noodle salad, asian cold noodle salad, glass noodle salad with sesame dressing, bean vermicelli, ramen salad, vegan salad, vegetarian salad, sesame sauce, sesame sauce recipe
Poppy Seed Almond Muffins 🤎 Have you ever tried C Poppy Seed Almond Muffins 🤎

Have you ever tried Costco’s almond poppy seed muffins? If you have, this is a copycat version of it! It’s my fav muffin and I knew I had to recreate it at home!

These Poppy Seed Almond Muffins are soft, fluffy, and bursting with sweet almond flavor. With a tender crumb and delicate crunch from the poppy seeds, they’re the perfect cozy bakery-style treat for breakfast, snacking, or coffee breaks.

INGREDIENTS
* 2 1/4 Cups Flour
* 1/2 tsp Salt
* 1/2 tsp Baking Soda
* 1/2 tsp Baking Powder
* 3/4 Cup Oil 
* 1 Cup White Sugar
* 2 Eggs
* 1 tsp Vanilla Extract
* 1 Tbsp Almond Extract 
* 3/4 Cup Sour Cream
* 1/4 Cup Milk
* 2 Tbsp Poppy Seeds
* 1/4 Cup Slivered Almonds sprinkle on top

INSTRUCTIONS
* Preheat oven to 350°F and line a 12-cup muffin tin with liners or lightly grease it.
* In a large bowl, whisk together oil, sugar, eggs, vanilla extract, almond extract, sour cream, and milk until smooth.
* Add flour, salt, baking soda, and baking powder directly into the same bowl. Gently mix until just combined.
* Fold in the poppy seeds.
* Divide the batter evenly between the 12 muffin cups and sprinkle slivered almonds on top.
* Bake for 25 minutes, or until a toothpick inserted into the center comes out clean.
* Let cool slightly before serving.


almond poppy seed muffins, poppy seed muffins, costco copycat, costco copycat recipes, almond muffins, easy muffin recipes, simple muffins, poppy seed almond muffins
Spicy Canned Tuna Sushi Bake 🐟🍣 This Spicy Canned Spicy Canned Tuna Sushi Bake 🐟🍣

This Spicy Canned Tuna Sushi Bake is creamy, savory, and packed with bold flavor! Made with simple pantry ingredients, it’s an easy, budget-friendly twist on sushi! It is perfect for sharing, scooping with seaweed, and satisfying all your sushi cravings at home.

INGREDIENTS
* 1 Can Tuna drained
* 2 Tbsp Sriracha
* 1/4 Cup Mayo
* 1 Tbsp Sesame Oil
* 2 Tbsp Furikake
* 1 Cup White Rice cooked
* 1 tsp Sugar
* 1/2 Tbsp Rice Vinegar
* 1 Packet Seasoned Seaweed

INSTRUCTIONS
* Preheat your oven to 400F and prepare a 6-inch baking pan.
* In a bowl, add in your rice and heat it in the microwave for 1 minute. This is so it’s easier for the sugar and rice vinegar to soak in. Add in your rice vinegar and sugar and mix well.
* Next, add in the rice mixture to your baking pan in an even layer. Sprinkle furikake on top.
* Use the same bowl that you mixed up your rice in and add in your drained canned tuna, sesame oil, sriracha, and mayo and mix well.
* Add the layer of saucy tuna on your rice layer evenly on top. Sprinkle with furikake.
* Bake at 400F for 20-30 minutes or until the top is golden brown.
* Serve with a side of seasoned seaweed and enjoy!


sushi bake canned tuna, spicy tuna sushi bake, tuna sushi bake, spicy tuna sushi, sushi bake tuna, spicy tuna mayo sushi, canned tuna, sushi bake, easy sushi bake, sushi bake dish, sushi bake asmr, baked sushi, easy baked sushi, sushi bake tutorial, spicy tuna, easy sushi bake ideas, sushi bake steps, viral sushi bake, sushi bake how to, sushi bake trend, sushi baked recipe, easy sushi bake recipe, how to make a sushi bake, sushi bake recipe, tiktok sushi bake, sushi bake tiktok
Spicy Canned Tuna Sushi Bake 🐟🍣 This Spicy Canned Spicy Canned Tuna Sushi Bake 🐟🍣

This Spicy Canned Tuna Sushi Bake is creamy, savory, and packed with bold flavor! Made with simple pantry ingredients, it’s an easy, budget-friendly twist on sushi! It is perfect for sharing, scooping with seaweed, and satisfying all your sushi cravings at home.

INGREDIENTS
* 1 Can Tuna drained
* 2 Tbsp Sriracha
* 1/4 Cup Mayo
* 1 Tbsp Sesame Oil
* 2 Tbsp Furikake
* 1 Cup White Rice cooked
* 1 tsp Sugar
* 1/2 Tbsp Rice Vinegar
* 1 Packet Seasoned Seaweed

INSTRUCTIONS
* Preheat your oven to 400F and prepare a 6-inch baking pan.
* In a bowl, add in your rice and heat it in the microwave for 1 minute. This is so it’s easier for the sugar and rice vinegar to soak in. Add in your rice vinegar and sugar and mix well.
* Next, add in the rice mixture to your baking pan in an even layer. Sprinkle furikake on top.
* Use the same bowl that you mixed up your rice in and add in your drained canned tuna, sesame oil, sriracha, and mayo and mix well.
* Add the layer of saucy tuna on your rice layer evenly on top. Sprinkle with furikake.
* Bake at 400F for 20-30 minutes or until the top is golden brown.
* Serve with a side of seasoned seaweed and enjoy!�

sushi bake canned tuna, spicy tuna sushi bake, tuna sushi bake, spicy tuna sushi, sushi bake tuna, spicy tuna mayo sushi, canned tuna, sushi bake, easy sushi bake, sushi bake dish, sushi bake asmr, baked sushi, easy baked sushi, sushi bake tutorial, spicy tuna, easy sushi bake ideas, sushi bake steps, viral sushi bake, sushi bake how to, sushi bake trend, sushi baked recipe, easy sushi bake recipe, how to make a sushi bake, sushi bake recipe, tiktok sushi bake, sushi bake tiktok
Banana Bread Syrup 🍌 This Banana Bread Syrup is Banana Bread Syrup 🍌 

This Banana Bread Syrup is warm, sweet, and full of cozy flavor just like your favorite homemade loaf in liquid form! Perfect for coffee, pancakes, waffles, or desserts, it’s an easy homemade syrup that adds a comforting, bakery-style touch to any treat 💛

INGREDIENTS
* 1/2 Cup White Sugar
* 1/2 Cup Brown Sugar
* 1 Mashed Ripe Banana
* 1 tsp Vanilla Extract
* 1/2 tsp Cinnamon
* 1 Cup Water

INSTRUCTIONS
* In a small saucepan over medium heat, combine water, white sugar, and brown sugar.
* Stir until the sugars fully dissolve and the mixture begins to gently simmer.
* Add the mashed banana and cinnamon. Simmer for 5–8 minutes, stirring occasionally.
* Remove from heat and stir in the vanilla extract.
* Strain the syrup (optional for a smoother texture) and let cool.
* Transfer to a jar or bottle and store in the fridge.

banana bread syrup, banana bread, banana latte, banana bread latte, banana bread matcha latte, copycat starbucks banana bread matcha latte, banana bread breve, banana bread, copycat starbucks iced banana bread matcha latte, copycat starbucks banana bread matcha, copycat starbucks iced banana bread matcha recipe, iced latte, banana milk, banana coffee, banana coffee recipe, fun latte recipes, banana coffee syrup,
Banana Bread Syrup 🍌 This Banana Bread Syrup is Banana Bread Syrup 🍌 

This Banana Bread Syrup is warm, sweet, and full of cozy flavor just like your favorite homemade loaf in liquid form! Perfect for coffee, pancakes, waffles, or desserts, it’s an easy homemade syrup that adds a comforting, bakery-style touch to any treat 💛

INGREDIENTS
* 1/2 Cup White Sugar
* 1/2 Cup Brown Sugar
* 1 Mashed Ripe Banana
* 1 tsp Vanilla Extract
* 1/2 tsp Cinnamon
* 1 Cup Water

INSTRUCTIONS
* In a small saucepan over medium heat, combine water, white sugar, and brown sugar.
* Stir until the sugars fully dissolve and the mixture begins to gently simmer.
* Add the mashed banana and cinnamon. Simmer for 5–8 minutes, stirring occasionally.
* Remove from heat and stir in the vanilla extract.
* Strain the syrup (optional for a smoother texture) and let cool.
* Transfer to a jar or bottle and store in the fridge.�
banana bread syrup, banana bread, banana latte, banana bread latte, banana bread matcha latte, copycat starbucks banana bread matcha latte, banana bread breve, banana bread, copycat starbucks iced banana bread matcha latte, copycat starbucks banana bread matcha, copycat starbucks iced banana bread matcha recipe, iced latte, banana milk, banana coffee, banana coffee recipe, fun latte recipes, banana coffee syrup,

Copyright © 2026 Lynn Mumbing Mejia · Theme by 17th Avenue