Hello! I'm Lynn.
  • About Me
  • Work With Me
  • Contact Me
  • Subscribe
  • Home
    • About
    • Contact
    • Disclaimer
    • Terms & Conditions
    • Privacy Policy
    • Subscribe
      • Work With Me
        • Media Kit
        • Portfolio and Samples
  • diy
  • lifestyle
    • home decor
  • recipes
  • gifts, parties & holidays
  • health & wellness with lynn

Lynn Mumbing Mejia

Crafting coziness, one recipe, DIY project, and holiday celebration at a time.

gifts/parties/holidays, recipes · August 22, 2024

Mummy Garlic Bread

*This post may contain affiliate or sponsored links, which means I may get paid or receive a commission if you purchase through my link, at no extra cost to you!*
Jump to Recipe Print Recipe

Read more for all the details on Mummy Garlic Bread.

Halloween is such a fun time of year! It is my 2nd favourite holiday 1st of course, being Thanksgiving! I love that Halloween really gets your creativity out especially when it comes to food!

If you’re looking for a spooky yet delicious appetizer to serve at your next Halloween party, Mummy Garlic Bread is the perfect choice! Combining the classic flavors of garlic bread with a fun and festive twist, this easy-to-make recipe is sure to impress both kids and adults alike. With just a few simple ingredients, you can transform ordinary garlic bread into a ghoulish treat that’s as visually appealing as it is tasty.

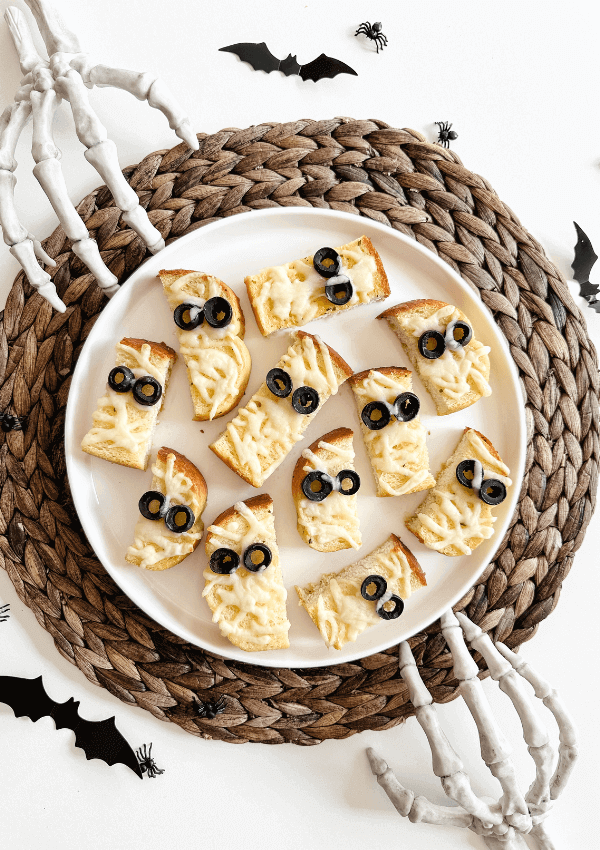
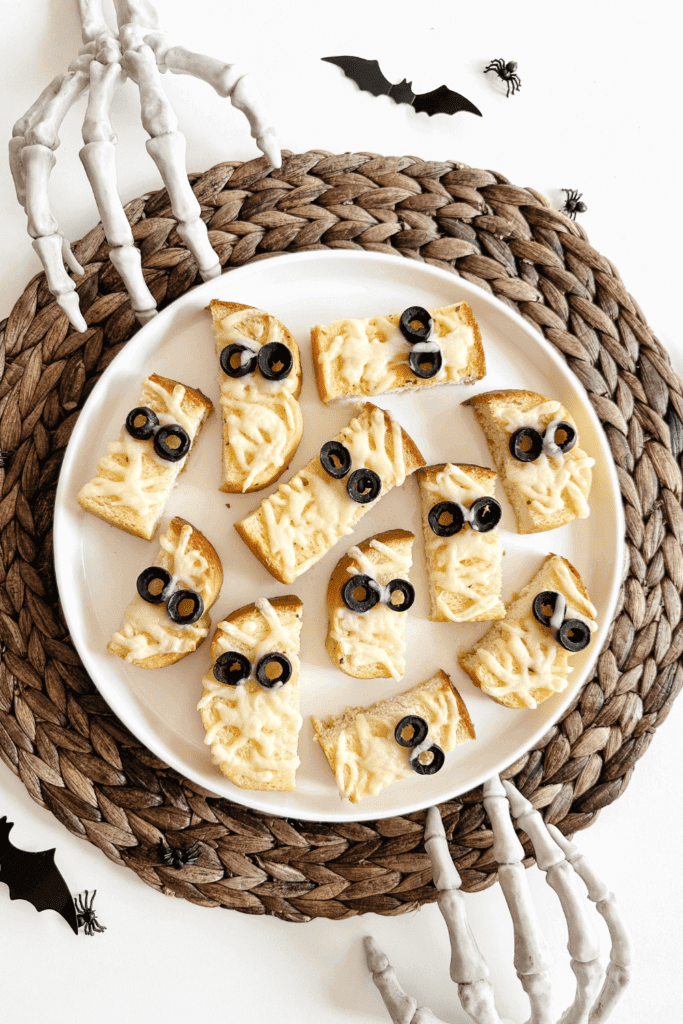
The magic of Mummy Garlic Bread lies in its creative presentation. By placing strips of shredded mozzarella cheese a slice of garlic bread and adding two little olive slices for eyes, you’ll create a snack that looks like a mummy peeking out from its bandages. The gooey, melted cheese gives it that authentic “wrapped” look, while the garlic butter base ensures every bite is packed with flavor. This recipe is not only fun to make but also incredibly versatile—perfect for serving alongside your favorite soups, pasta dishes, or as a standalone snack.

Mummy Garlic Bread is also an excellent way to get the kids involved in the kitchen. They’ll love helping to assemble the “mummies” and watching them transform into crispy, cheesy delights in the oven. Whether you’re hosting a Halloween gathering or simply want to add a bit of seasonal flair to your dinner table, Mummy Garlic Bread is the go-to recipe that combines spooky fun with delicious flavor.

PIN Mummy Garlic Bread FOR LATER:
Mummy Garlic Bread - Lynn Mumbing Mejia - Pin 1

This Mummy Garlic Bread recipe is accompanied by a YouTube Tutorial. If you haven’t subscribed to me on YouTube, don’t forget to!

Table of Contents

Toggle
  • HERE IS HOW TO MAKE MUMMY GARLIC BREAD:
    • WHERE CAN I FIND THESE INGREDIENTS?
    • WHAT ARE THE INGREDIENTS?
    • WHAT EQUIPMENT DO I NEED?
    • CAN I SUBSTITUTE/ADD ANYTHING OUT?
    • WHAT DOES MUMMY GARLIC BREAD TASTE LIKE?
    • HOW LONG DOES IT KEEP FOR?
    • INSPIRATIONS FOR THIS RECIPE?
    • ANY OTHER NOTES?
    • Mummy Garlic Bread
      • Ingredients  
      • Instructions 

HERE IS HOW TO MAKE MUMMY GARLIC BREAD:

WHERE CAN I FIND THESE INGREDIENTS?

You can easily find the ingredients to make Mummy Garlic Bread at your local grocery store. The recipe only has 3 ingredients which are garlic bread toasts, black olives and shredded mozzarella cheese which are typically available in the bakery or refrigerated sections. The “mummy” effect comes from the mozzarella cheese, which can be found in the dairy section. The black olives are used for the eyes! Most of these items are common and can be found at any large supermarket or even at smaller neighborhood stores.

WHAT ARE THE INGREDIENTS?

The ingredients to make this delicious Mummy Garlic Bread are:

  • Garlic Bread or Texas Toast
  • Shredded Mozzarella
  • Sliced Black Olives

WHAT EQUIPMENT DO I NEED?

Oh man, this recipe is so easy! All you’ll really need is a baking tray or you can even pop these in the air fryer if you’d like! You’ll need to cut the garlic bread into smaller slices so all you’ll really need is a cutting board and knife to achieve this. Since you’ll already be getting pitted and sliced black olives, no cutting is required for this. You’ll also want a baking tray so that you can bake these in the oven!

Here are my personal Amazon favorite kitchen items!

CAN I SUBSTITUTE/ADD ANYTHING OUT?

Since this recipe is only 3 ingredients, there isn’t really much that comes to mind with substitutions here! The only thing I can suggest that you can swap out is perhaps the bread. You can choose any bread that you already have on hand really but of course, garlic bread is the yummiest!

If you hate olives as I know not everyone loves olives, you can swap out the eyes for something else. You can making just do two dots of black cookie icing or make cut out two small circles out of seaweed/nori sheets!

WHAT DOES MUMMY GARLIC BREAD TASTE LIKE?

Mummy Garlic Bread offers a delicious combination of flavors and textures. The garlic bread creates a rich and savory base, while the melted mozzarella cheese adds a creamy and gooey element. The bread itself is crispy on the outside and soft on the inside, providing a satisfying crunch and chewiness. The black olives used for the “eyes” add a slight briny contrast that enhances the overall flavor profile. The combination of garlic, butter, and cheese makes for a savory and indulgent treat that’s perfect for Halloween or any time you want a fun and tasty snack.

It honestly tastes like a pizza so you can enjoy this with a side of marinara or ranch sauce!

HOW LONG DOES IT KEEP FOR?

Mummy Garlic Bread typically lasts for about 2 to 3 days when stored in an airtight container at room temperature. For the best freshness, it’s recommended to eat it within this time frame. If you want to keep it longer, you can freeze it for up to 1 month. To reheat, simply pop it back in the oven or toaster oven.

Honestly, you don’t even really need to prepare these ahead of time because they are so easy and require very little preparation. I would highly recommend just putting these together right before your meal!

INSPIRATIONS FOR THIS RECIPE?

No specific inspiration for this recipe but I saw similar recipes on Pinterest and knew I wanted to recreate it too! I LOVE recipes that require so little ingredients so as soon as I saw how easy this was, I knew I wanted to make my own version as well!

Halloween is so fun and I love being creative with my food!

ANY OTHER NOTES?

No other notes for this one! Enjoy this easy and spooky Halloween recipe!

Mummy Garlic Bread

Mummy Garlic Bread: Crispy, buttery bread with gooey mozzarella "bandages" and olive "eyes," offering a fun and savory Halloween-inspired treat.
Print Recipe Pin Recipe
Prep Time 5 minutes mins
Cook Time 5 minutes mins
Course Side Dish
Servings 12 Mummy Slices

Ingredients
  

  • 4 Garlic Bread or Texas Toasts
  • 24 Pieces Sliced Black Olives
  • 2/3 Cup Shredded Mozzarella

Instructions
 

  • Preheat your oven to 400F and prepare a baking sheet.
  • Slice each of the garlic bread of texas toasts into 3 equal pieces and place them on your baking sheet.
  • Add two olive eyes on top of each toast slice.
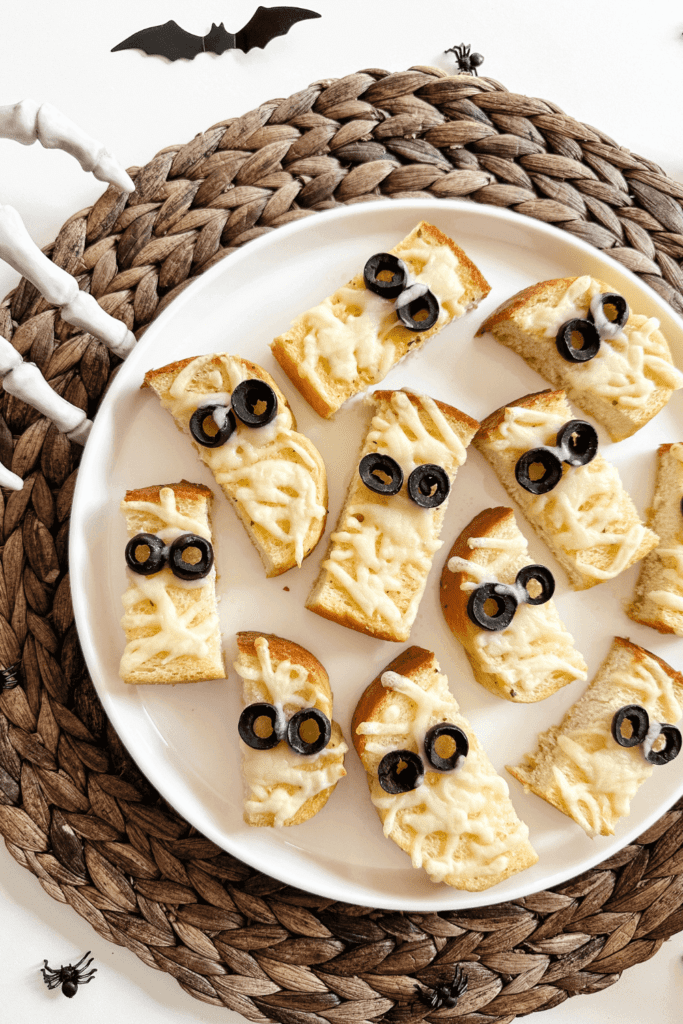
  • Add your shredded mozzarella in different patterns to resemble mummy bandages.
  • Bake in the oven for 3-5 minutes or until the cheese has melted slightly.
  • Cool, serve and enjoy!
Keyword Mummy Garlic Bread

Add a spooky twist to your Halloween with Mummy Garlic Bread! These fun and flavorful bites are sure to be a hit with guests of all ages. Perfect as an appetizer or snack, they’re easy to make and even more fun to eat. Give them a try today!

Xo,

Lynn

Are you going to try making this Mummy Garlic Bread recipe?! Don’t forget to tag me if you do!

Tag Us - Mummy Garlic Bread - Lynn Mumbing Mejia

This blog post is all the details on Mummy Garlic Bread.

P.S: If you haven’t read my most recent post, click here!

PIN Mummy Garlic Bread FOR LATER:
Mummy Garlic Bread - Lynn Mumbing Mejia - Pin 2

If you liked reading Mummy Garlic Bread, you might like these are well!

Halloween Pillsbury Jalapeno Popper Mummies

Halloween Finger Hot Dogs

Easy Halloween Ice Cream Sandwich Graves

Halloween Eyeball Jello Cups

Halloween Ice Cream Sandwiches

Halloween Candy Corn Pretzels

Spooktacularly Easy Halloween Cake Mix Cookies

Easy Halloween Fruit Tray – Pumpkin Shaped

Baked Healthy Halloween Corn Tortilla Chips

Easy Halloween Treat Board

Halloween Party Punch with Fruity Eyeballs

This is the end of Mummy Garlic Bread.

Shop The Post

Posted In: gifts/parties/holidays, recipes · Tagged: frozen garlic bread, halloween garlic bread, halloween party, halloween recipe, mummified garlic bread, mummy garlic bread, texas toast garlic bread

Get on the List

You’ll Also Love

Easy Halloween Dessert Dip
How to Plan the Ultimate Summerween Party: Spooky Fun in the Sun!
Halloween Pillsbury Jalapeno Popper Mummies

Comments

  1. Sydney says

    August 24, 2024 at

    Okay this recipe is too cute! What a creative way to prepare garlic bread while keeping with the Halloween theme. I’m sure this recipe would be very popular with kids!

    xoxo,
    Sydney

    http://www.thelotuslist.com

Trackbacks

  1. How to Plan the Ultimate Summerween Party: Spooky Fun in the Sun! | Lynn Mumbing Mejia says:
    June 19, 2025 at

    […] Mummy Garlic Bread […]

Next Post >

Pumpkin Smores Cookies

About Photo
Hey there friend! My name is Lynn and I'm a Canadian Content Creator who's focused on Minimal & Neutral Home Decor Inspo, Simple & Budget Friendly DIY Projects, All Things Holidays and Quick & Easy Recipes. I'm so happy you're here and I hope you'll find something that you love!

Categories

follow lynn

  • Facebook
  • Instagram
  • Pinterest
  • Twitter
  • YouTube

Search

Join Us!

Trending Now

Popular Posts

Links

  • About
  • Contact
  • Disclaimer
  • Privacy Policy
  • Terms & Conditions

Socials

  • Instagram
  • Youtube
  • Facebook
  • Twitter
  • Pinterest

Shop

  • Home Wall Art
  • Recipe Cards
  • Greeting Cards
  • Planner Templates

JOIN THE INNER CIRCLE

Asian Sesame Vermicelli Salad 🥗 This Asian Sesam Asian Sesame Vermicelli Salad 🥗 

This Asian Sesame Vermicelli Salad is light, refreshing, and packed with flavor! Tender vermicelli noodles are tossed with crisp veggies and a savory sesame dressing for an easy, vibrant dish that’s perfect for lunches, meal prep, or summer gatherings.

INGREDIENTS
* 3 Bundles Vermicelli about 150g uncooked
* 1 Cup Purple Cabbage thinly shredded 
* 1 Cup Red Peppers thinly shredded 
* 1 Cup Carrots thinly shredded 
* 1/2 Cup Edamame
* 2 Stalks Green Onion thinly sliced 

Sauce
* 1 Clove Garlic grated
* 2 Tbsp Sesame Oil
* 1 tsp Sesame Oil
* 2 Tbsp Soy Sauce
* 1 Tbsp Brown Sugar
* 1 Tbsp Rice Vinegar

INSTRUCTIONS
* Cook the vermicelli noodles according to package instructions. Drain and rinse under cold water.
* In a large bowl, combine the cooked vermicelli, cabbage, red bell pepper, carrot, edamame, and green onions.
* In a small bowl, whisk together garlic, sesame oil, sesame seeds, soy sauce, brown sugar, and rice vinegar until well combined.
* Pour the sauce over the salad and toss until evenly coated.
* Chill in the fridge before serving for extra flavor for minimally 12 hours! Enjoy!

vietnamese vermicelli salad recipe, vermicelli noodle salad, vermicelli salad recipe, how to make vermicelli noodle salad, vermicelli noodles salad recipe, asian salad, asian salad dressing, how to make vietnamese vermicelli noodle salad recipe, asian noodle salad, asian salad recipe, easy sesame noodle salad, asian cold noodle salad, glass noodle salad with sesame dressing, bean vermicelli, ramen salad, vegan salad, vegetarian salad, sesame sauce, sesame sauce recipe
Poppy Seed Almond Muffins 🤎 Have you ever tried C Poppy Seed Almond Muffins 🤎

Have you ever tried Costco’s almond poppy seed muffins? If you have, this is a copycat version of it! It’s my fav muffin and I knew I had to recreate it at home!

These Poppy Seed Almond Muffins are soft, fluffy, and bursting with sweet almond flavor. With a tender crumb and delicate crunch from the poppy seeds, they’re the perfect cozy bakery-style treat for breakfast, snacking, or coffee breaks.

INGREDIENTS
* 2 1/4 Cups Flour
* 1/2 tsp Salt
* 1/2 tsp Baking Soda
* 1/2 tsp Baking Powder
* 3/4 Cup Oil 
* 1 Cup White Sugar
* 2 Eggs
* 1 tsp Vanilla Extract
* 1 Tbsp Almond Extract 
* 3/4 Cup Sour Cream
* 1/4 Cup Milk
* 2 Tbsp Poppy Seeds
* 1/4 Cup Slivered Almonds sprinkle on top

INSTRUCTIONS
* Preheat oven to 350°F and line a 12-cup muffin tin with liners or lightly grease it.
* In a large bowl, whisk together oil, sugar, eggs, vanilla extract, almond extract, sour cream, and milk until smooth.
* Add flour, salt, baking soda, and baking powder directly into the same bowl. Gently mix until just combined.
* Fold in the poppy seeds.
* Divide the batter evenly between the 12 muffin cups and sprinkle slivered almonds on top.
* Bake for 25 minutes, or until a toothpick inserted into the center comes out clean.
* Let cool slightly before serving.


almond poppy seed muffins, poppy seed muffins, costco copycat, costco copycat recipes, almond muffins, easy muffin recipes, simple muffins, poppy seed almond muffins
Spicy Canned Tuna Sushi Bake 🐟🍣 This Spicy Canned Spicy Canned Tuna Sushi Bake 🐟🍣

This Spicy Canned Tuna Sushi Bake is creamy, savory, and packed with bold flavor! Made with simple pantry ingredients, it’s an easy, budget-friendly twist on sushi! It is perfect for sharing, scooping with seaweed, and satisfying all your sushi cravings at home.

INGREDIENTS
* 1 Can Tuna drained
* 2 Tbsp Sriracha
* 1/4 Cup Mayo
* 1 Tbsp Sesame Oil
* 2 Tbsp Furikake
* 1 Cup White Rice cooked
* 1 tsp Sugar
* 1/2 Tbsp Rice Vinegar
* 1 Packet Seasoned Seaweed

INSTRUCTIONS
* Preheat your oven to 400F and prepare a 6-inch baking pan.
* In a bowl, add in your rice and heat it in the microwave for 1 minute. This is so it’s easier for the sugar and rice vinegar to soak in. Add in your rice vinegar and sugar and mix well.
* Next, add in the rice mixture to your baking pan in an even layer. Sprinkle furikake on top.
* Use the same bowl that you mixed up your rice in and add in your drained canned tuna, sesame oil, sriracha, and mayo and mix well.
* Add the layer of saucy tuna on your rice layer evenly on top. Sprinkle with furikake.
* Bake at 400F for 20-30 minutes or until the top is golden brown.
* Serve with a side of seasoned seaweed and enjoy!


sushi bake canned tuna, spicy tuna sushi bake, tuna sushi bake, spicy tuna sushi, sushi bake tuna, spicy tuna mayo sushi, canned tuna, sushi bake, easy sushi bake, sushi bake dish, sushi bake asmr, baked sushi, easy baked sushi, sushi bake tutorial, spicy tuna, easy sushi bake ideas, sushi bake steps, viral sushi bake, sushi bake how to, sushi bake trend, sushi baked recipe, easy sushi bake recipe, how to make a sushi bake, sushi bake recipe, tiktok sushi bake, sushi bake tiktok
Spicy Canned Tuna Sushi Bake 🐟🍣 This Spicy Canned Spicy Canned Tuna Sushi Bake 🐟🍣

This Spicy Canned Tuna Sushi Bake is creamy, savory, and packed with bold flavor! Made with simple pantry ingredients, it’s an easy, budget-friendly twist on sushi! It is perfect for sharing, scooping with seaweed, and satisfying all your sushi cravings at home.

INGREDIENTS
* 1 Can Tuna drained
* 2 Tbsp Sriracha
* 1/4 Cup Mayo
* 1 Tbsp Sesame Oil
* 2 Tbsp Furikake
* 1 Cup White Rice cooked
* 1 tsp Sugar
* 1/2 Tbsp Rice Vinegar
* 1 Packet Seasoned Seaweed

INSTRUCTIONS
* Preheat your oven to 400F and prepare a 6-inch baking pan.
* In a bowl, add in your rice and heat it in the microwave for 1 minute. This is so it’s easier for the sugar and rice vinegar to soak in. Add in your rice vinegar and sugar and mix well.
* Next, add in the rice mixture to your baking pan in an even layer. Sprinkle furikake on top.
* Use the same bowl that you mixed up your rice in and add in your drained canned tuna, sesame oil, sriracha, and mayo and mix well.
* Add the layer of saucy tuna on your rice layer evenly on top. Sprinkle with furikake.
* Bake at 400F for 20-30 minutes or until the top is golden brown.
* Serve with a side of seasoned seaweed and enjoy!�

sushi bake canned tuna, spicy tuna sushi bake, tuna sushi bake, spicy tuna sushi, sushi bake tuna, spicy tuna mayo sushi, canned tuna, sushi bake, easy sushi bake, sushi bake dish, sushi bake asmr, baked sushi, easy baked sushi, sushi bake tutorial, spicy tuna, easy sushi bake ideas, sushi bake steps, viral sushi bake, sushi bake how to, sushi bake trend, sushi baked recipe, easy sushi bake recipe, how to make a sushi bake, sushi bake recipe, tiktok sushi bake, sushi bake tiktok
Banana Bread Syrup 🍌 This Banana Bread Syrup is Banana Bread Syrup 🍌 

This Banana Bread Syrup is warm, sweet, and full of cozy flavor just like your favorite homemade loaf in liquid form! Perfect for coffee, pancakes, waffles, or desserts, it’s an easy homemade syrup that adds a comforting, bakery-style touch to any treat 💛

INGREDIENTS
* 1/2 Cup White Sugar
* 1/2 Cup Brown Sugar
* 1 Mashed Ripe Banana
* 1 tsp Vanilla Extract
* 1/2 tsp Cinnamon
* 1 Cup Water

INSTRUCTIONS
* In a small saucepan over medium heat, combine water, white sugar, and brown sugar.
* Stir until the sugars fully dissolve and the mixture begins to gently simmer.
* Add the mashed banana and cinnamon. Simmer for 5–8 minutes, stirring occasionally.
* Remove from heat and stir in the vanilla extract.
* Strain the syrup (optional for a smoother texture) and let cool.
* Transfer to a jar or bottle and store in the fridge.

banana bread syrup, banana bread, banana latte, banana bread latte, banana bread matcha latte, copycat starbucks banana bread matcha latte, banana bread breve, banana bread, copycat starbucks iced banana bread matcha latte, copycat starbucks banana bread matcha, copycat starbucks iced banana bread matcha recipe, iced latte, banana milk, banana coffee, banana coffee recipe, fun latte recipes, banana coffee syrup,
Banana Bread Syrup 🍌 This Banana Bread Syrup is Banana Bread Syrup 🍌 

This Banana Bread Syrup is warm, sweet, and full of cozy flavor just like your favorite homemade loaf in liquid form! Perfect for coffee, pancakes, waffles, or desserts, it’s an easy homemade syrup that adds a comforting, bakery-style touch to any treat 💛

INGREDIENTS
* 1/2 Cup White Sugar
* 1/2 Cup Brown Sugar
* 1 Mashed Ripe Banana
* 1 tsp Vanilla Extract
* 1/2 tsp Cinnamon
* 1 Cup Water

INSTRUCTIONS
* In a small saucepan over medium heat, combine water, white sugar, and brown sugar.
* Stir until the sugars fully dissolve and the mixture begins to gently simmer.
* Add the mashed banana and cinnamon. Simmer for 5–8 minutes, stirring occasionally.
* Remove from heat and stir in the vanilla extract.
* Strain the syrup (optional for a smoother texture) and let cool.
* Transfer to a jar or bottle and store in the fridge.�
banana bread syrup, banana bread, banana latte, banana bread latte, banana bread matcha latte, copycat starbucks banana bread matcha latte, banana bread breve, banana bread, copycat starbucks iced banana bread matcha latte, copycat starbucks banana bread matcha, copycat starbucks iced banana bread matcha recipe, iced latte, banana milk, banana coffee, banana coffee recipe, fun latte recipes, banana coffee syrup,

Copyright © 2026 Lynn Mumbing Mejia · Theme by 17th Avenue